
Dell 5110cn Support Question
Dell 5110cn Support Question
Find answers below for this question about Dell 5110cn - Color Laser Printer.Need a Dell 5110cn manual? We have 1 online manual for this item!
Question posted by ronnititla on July 31st, 2015
'reseat Imaging Drum' (crum Id 093-965)
What do the above terms mean? Is this something we can fix without disconnecting the printer and sending it to a shop.
Current Answers
Answer #1: Posted by freginold on July 31st, 2015 1:46 PM
freginold

Member since:
December 20th, 2011 Points: 23,253,885

Member since:
December 20th, 2011 Points: 23,253,885
Hello, this message is telling you to take the drum unit(s) out and reinstall it again. You can see how to do this here:
http://www.dell.com/support/article/us/en/19/SLN143044/EN
http://www.dell.com/support/article/us/en/19/SLN143044/EN
Related Dell 5110cn Manual Pages
User Guide - Page 56
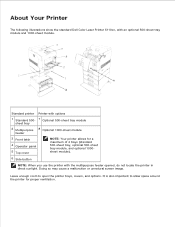
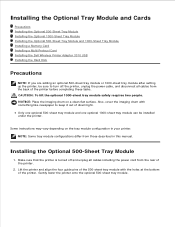
... also important to open the printer trays, covers, and options. About Your Printer
The following illustrations show the standard Dell Color Laser Printer 5110cn, with the multipurpose feeder opened, do not locate the printer in direct sunlight.
Doing so may cause a malfunction or unnatural screen image. Leave enough room to allow space around the printer for a maximum of 4 trays...
User Guide - Page 58
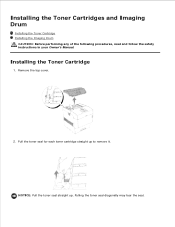
... seal for each toner cartridge straight up . Installing the Toner Cartridge
1. Pulling the toner seal diagonally may tear the seal. 3. Installing the Toner Cartridges and Imaging Drum
Installing the Toner Cartridge Installing the Imaging Drum
CAUTION: Before performing any of the following procedures, read and follow the safety instructions in your Owner's Manual.
User Guide - Page 59
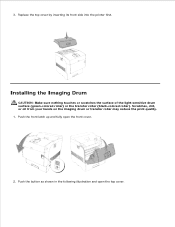
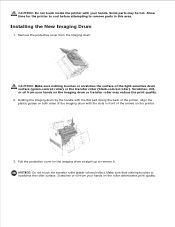
Installing the Imaging Drum
CAUTION: Make sure nothing touches or scratches the surface of the light-sensitive drum surface (green-colored roller) or the transfer roller (black-colored roller). Push the front latch up and fully open the top cover. Replace the top cover by inserting its front side into the printer first. 3. Push the button as...
User Guide - Page 60
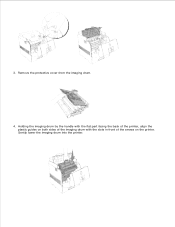
Remove the protective cover from the imaging drum.
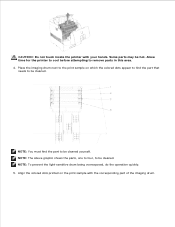
4. Holding the imaging drum by the handle with the flat part facing the back of the printer, align the plastic guides on both sides of the imaging drum with the slots in front of the arrows on the printer. 3. Gently lower the imaging drum into the printer.
User Guide - Page 61

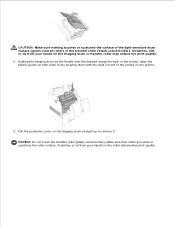
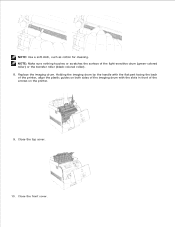
... the imaging drum straight up to come into the printer without ...correctly aligning the rollers with a protective sheet to remove it. Close the front cover. Make sure that nothing touches or scratches the roller surface. Pull the protective cover on the roller deteriorates print quality.
6. Close the top cover.
7. NOTICE: Do not touch the transfer roller (black-colored...
User Guide - Page 71
... it out of the printer.
2. Make sure that the printer is turned off the printer, unplug the power cable, and disconnect all cables including the power cord from the rear of direct light. Also, cover the imaging drum with the holes at the bottom of the printer before completing these tasks.
Lift the printer and align the four...
User Guide - Page 72
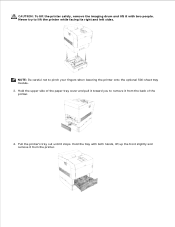
2. CAUTION: To lift the printer safely, remove the imaging drum and lift it with both hands, lift up the front slightly and remove it from the back of the printer.
4. Hold the tray with two people.
Hold the upper side of the paper tray cover and pull it toward you to remove it stops. Never...
User Guide - Page 77
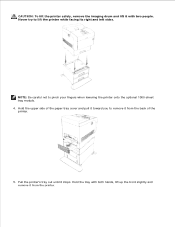
... tray with two people.
Pull the printer's tray out until it with both hands, lift up the front slightly and remove it from the back of the paper tray cover and pull it toward you to remove it from the printer. 3. CAUTION: To lift the printer safely, remove the imaging drum and lift it stops.
User Guide - Page 85
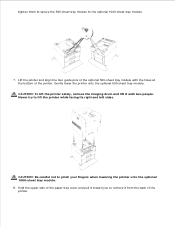
... the optional 500-sheet tray module with two people. CAUTION: To lift the printer safely, remove the imaging drum and lift it with the holes at the bottom of the printer. 6. Never try to remove it toward you to lift the printer while facing its right and left sides. Hold the upper side of the...
User Guide - Page 203

.... Transparency 024-934 Open Covers Remove Paper Insert TonerCart NNN-NNN Insert Y Toner
Insert Drum 091-972 Insert/Reseat Imaging Drum Replace Toner NNN-NNN Replace Y Toner
Imaging Drum 091-935 Replace Imaging Drum Toner Type NNN-NNN Reseat XXX
Imaging Drum 091-912 Reseat Imaging Drum
The printer detects jammed transparencies.
Then load the transparencies again. See "Replacing the...
User Guide - Page 205

... needs to Print NNN-NNN Imaging Drum Replace Soon
Toner cartridge is one of the following: · Yellow Toner(Y) · Cyan Toner(C) · Magenta Toner(M) · Black Toner(B)
Error NNN-NNN relates to printer problems.
Replace the specified toner cartridge. Ready to Print NNN-NNN XXX Is Low
Ready to be replaced.
Replace...
User Guide - Page 206

...media before you have cut or trimmed yourself. Do not use print media that connect to load printer media properly. Do not mix print media sizes, weights, or types in an acceptable environment....the Multipurpose Feeder Removing Print Jams From the Standard Tray Removing Print Jams Between the Imaging Drum and Fuser Removing Print Jams From the Fuser Removing Print Jams From the Duplexer Removing...
User Guide - Page 207
CAUTION: Do not attempt to clear any jams using tools or instruments. This may occur along the print media path.
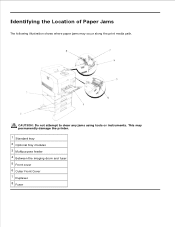
Identifying the Location of Paper Jams
The following illustration shows where paper jams may permanently damage the printer. 1 Standard tray 2 Optional tray modules 3 Multipurpose feeder 4 Between the imaging drum and fuser 5 Front cover 6 Outer Front Cover 7 Duplexer 8 Fuser
User Guide - Page 212
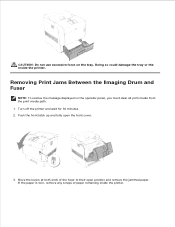
Removing Print Jams Between the Imaging Drum and Fuser
NOTE: To resolve the message displayed on the tray. CAUTION: Do not use excessive force on the operator panel, you must clear all print media from the print media path. 1. Move the levers at both ends of paper remaining inside the printer. Push the front...
User Guide - Page 230
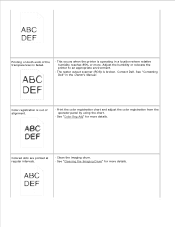
... broken. See "Contacting Dell" in a location where relative humidity reaches 85% or more. Colored dots are printed at regular intervals.
· Clean the imaging drum. · See "Cleaning the Imaging Drum" for more details.
Adjust the humidity or relocate the printer to an appropriate environment.
· The raster output scanner (ROS) is operating in the Owner...
User Guide - Page 281
... sides of the imaging drum with the slots in front of the light-sensitive drum surface (green-colored roller) or the transfer roller (black-colored roller). NOTICE: Do not touch the transfer roller (black-colored roller). Scratches or oil from your hands on the printer.
3. Scratches, dirt, or oil from your hands on the imaging drum straight up to...
User Guide - Page 295
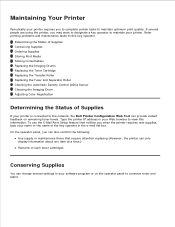
... Roller Replacing the Fuser and Separator Roller Cleaning the Automatic Density Control (ADC) Sensor Cleaning the Imaging Drum Adjusting Color Registration
Determining the Status of the key operator in your printer is connected to the network, the Dell Printer Configuration Web Tool can also confirm the following:
Any supply or maintenance items that notifies you...
User Guide - Page 299
... remove parts in front of the light-sensitive drum surface (green-colored roller) or the transfer roller (black-colored roller). Scratches or oil from the imaging drum.
Holding the imaging drum by the handle with the flat part facing the back of the printer, align the plastic guides on the printer.
3. Make sure that nothing touches or scratches the...
User Guide - Page 318
... operation quickly. 5. CAUTION: Do not touch inside the printer with the corresponding part of the imaging drum. Some parts may be cleaned. NOTE: The above graphic shows the parts, one to four, to remove parts in this area. 4. Align the colored dots printed on which the colored dots appear to find the part to be...
User Guide - Page 320
... both sides of the imaging drum with the slots in front of the light-sensitive drum (green-colored roller) or the transfer roller (black-colored roller). 8. Close the top cover.
10. Close the front cover. Replace the imaging drum. Holding the imaging drum by the handle with the flat part facing the back of the printer, align the plastic guides...
Similar Questions

We Are Looking For An Imaging Drum For The Dell 3130cn?
We are looking for an imaging drum for the Dell 3130cn?
We are looking for an imaging drum for the Dell 3130cn?
(Posted by scott67325 8 years ago)

Dell Color Laser 5110cn How To Check Toner Levels
(Posted by nepaul68 9 years ago)

After You Replace The Imaging Drum, You Should Reset The Imaging Drum's
counter. to reset the counter, see theinstruction sheet that shipped with the new imaging drum kit f...
counter. to reset the counter, see theinstruction sheet that shipped with the new imaging drum kit f...
(Posted by wtgtpd 10 years ago)

Dell Color Laser 5110cn How To Install Toner
(Posted by jokerSinner 10 years ago)

Redish Ghost Image
hi i have a dell 5110cn laser printer and its a few weeks now that i realize each time i prints i ge...
hi i have a dell 5110cn laser printer and its a few weeks now that i realize each time i prints i ge...
(Posted by bigdollardw 11 years ago)