Quick Reference Guide
Page 3
... Front View (Tower Orientation 18 Back View (Tower Orientation 20 Back Panel Connectors (Tower Orientation) . . . . . 21 Front View (Desktop Orientation 23 Back View (Desktop Orientation 25 Cleaning Your Computer 26 Computer, Keyboard, and Monitor 26 Mouse (Non-Optical 26 Floppy Drive 27 CDs and DVDs 27 Troubleshooting Tools 27 Power Lights 27 Diagnostic Lights 29 Beep Codes 33 System Messages 34 Hardware Troubleshooter 35 Dell Diagnostics 36 Troubleshooting 39 Index 55 Contents 3
... Front View (Tower Orientation 18 Back View (Tower Orientation 20 Back Panel Connectors (Tower Orientation) . . . . . 21 Front View (Desktop Orientation 23 Back View (Desktop Orientation 25 Cleaning Your Computer 26 Computer, Keyboard, and Monitor 26 Mouse (Non-Optical 26 Floppy Drive 27 CDs and DVDs 27 Troubleshooting Tools 27 Power Lights 27 Diagnostic Lights 29 Beep Codes 33 System Messages 34 Hardware Troubleshooter 35 Dell Diagnostics 36 Troubleshooting 39 Index 55 Contents 3
Quick Reference Guide
Page 5
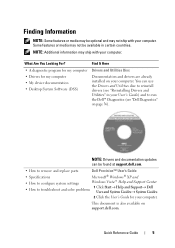
... device documentation • Desktop System Software (DSS) Find It Here Drivers and Utilities Disc Documentation and drivers are already installed on your computer. NOTE: Additional information may not be found at support.dell.com. • How to remove and replace parts Dell Precision™ User's Guide • Specifications Microsoft® Windows® XP and • How to configure system settings Windows Vista™ Help and Support Center • How to run the Dell™ Diagnostics (see "Reinstalling Drivers and Utilities...
... device documentation • Desktop System Software (DSS) Find It Here Drivers and Utilities Disc Documentation and drivers are already installed on your computer. NOTE: Additional information may not be found at support.dell.com. • How to remove and replace parts Dell Precision™ User's Guide • Specifications Microsoft® Windows® XP and • How to configure system settings Windows Vista™ Help and Support Center • How to run the Dell™ Diagnostics (see "Reinstalling Drivers and Utilities...
Quick Reference Guide
Page 7
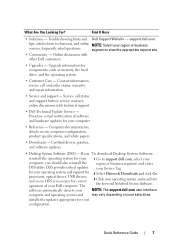
... my computer configuration, product specifications, and white papers • Downloads - Certified drivers, patches, and software updates • Desktop System Software (DSS) - DSS is necessary for correct operation of software and hardware updates for your Dell computer. Quick Reference Guide 7 Troubleshooting hints and Dell Support Website - for your selections. Contact information, service call status and support history, service contract, online discussions with other Dell customers • Upgrades - Find It Here • Solutions - support.dell.com...
... my computer configuration, product specifications, and white papers • Downloads - Certified drivers, patches, and software updates • Desktop System Software (DSS) - DSS is necessary for correct operation of software and hardware updates for your Dell computer. Quick Reference Guide 7 Troubleshooting hints and Dell Support Website - for your selections. Contact information, service call status and support history, service contract, online discussions with other Dell customers • Upgrades - Find It Here • Solutions - support.dell.com...
Quick Reference Guide
Page 19
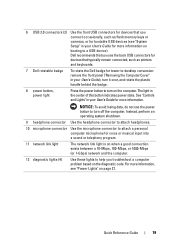
... keyboards. 7 Dell rotatable badge To rotate the Dell badge for tower-to-desktop conversion: remove the front panel ("Removing the Computer Cover" in your User's Guide for more information on the computer. NOTICE: To avoid losing data, do not use the back USB connectors for devices that typically remain connected, such as flash memory keys or cameras, or for bootable USB devices (see "Power Lights" on the diagnostic code. The light in the center of this button...
... keyboards. 7 Dell rotatable badge To rotate the Dell badge for tower-to-desktop conversion: remove the front panel ("Removing the Computer Cover" in your User's Guide for more information on the computer. NOTICE: To avoid losing data, do not use the back USB connectors for devices that typically remain connected, such as flash memory keys or cameras, or for bootable USB devices (see "Power Lights" on the diagnostic code. The light in the center of this button...

Quick Reference Guide
Page 22
... flash memory keys or cameras, or for devices that the network cable has been securely attached. Dell recommends that you have a standard PS/2 keyboard, plug it into a USB connector. Do not plug a telephone cable into the purple keyboard connector. On computers with an additional network connector card, use the connectors on the card and on " state. Connect a serial device, such as a separate intra- If you connect occasionally, such as printers and keyboards. 22 Quick Reference Guide 6 network adapter connector 7 network activity light 8 serial connectors...
... flash memory keys or cameras, or for devices that the network cable has been securely attached. Dell recommends that you have a standard PS/2 keyboard, plug it into a USB connector. Do not plug a telephone cable into the purple keyboard connector. On computers with an additional network connector card, use the connectors on the card and on " state. Connect a serial device, such as a separate intra- If you connect occasionally, such as printers and keyboards. 22 Quick Reference Guide 6 network adapter connector 7 network activity light 8 serial connectors...
Quick Reference Guide
Page 23
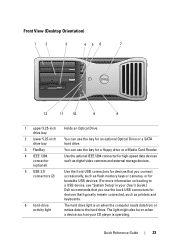
... booting to the hard drive. Use the optional IEEE 1394 connector for bootable USB devices. (For more information on when a device such as your CD player is on when the computer reads data from or writes data to a USB device, see "System Setup" in your User's Guide.) Dell recommends that typically remain connected, such as digital video cameras and external storage devices. The hard drive light is operating. You can use the back USB connectors for devices...
... booting to the hard drive. Use the optional IEEE 1394 connector for bootable USB devices. (For more information on when a device such as your CD player is on when the computer reads data from or writes data to a USB device, see "System Setup" in your User's Guide.) Dell recommends that typically remain connected, such as digital video cameras and external storage devices. The hard drive light is operating. You can use the back USB connectors for devices...
Quick Reference Guide
Page 35
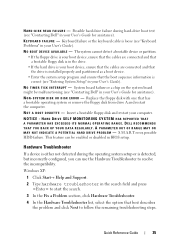
... to start the search. 3 In the Fix a Problem section, click Hardware Troubleshooter. 4 In the Hardware Troubleshooter list, select the option that has a bootable operating system or remove the floppy disk from drive A and restart the computer. H A R D - D I S K R E A D F A I L U R E - K E Y B O A R D F A I L U R E - NO BOOT DEVICE AVAILABLE - Hardware Troubleshooter If a device is either not detected during hard-drive boot test (see "Contacting Dell" in BIOS setup. Windows XP: 1 Click Start→ Help and Support. 2 Type hardware troubleshooter in your User's Guide for...
... to start the search. 3 In the Fix a Problem section, click Hardware Troubleshooter. 4 In the Hardware Troubleshooter list, select the option that has a bootable operating system or remove the floppy disk from drive A and restart the computer. H A R D - D I S K R E A D F A I L U R E - K E Y B O A R D F A I L U R E - NO BOOT DEVICE AVAILABLE - Hardware Troubleshooter If a device is either not detected during hard-drive boot test (see "Contacting Dell" in BIOS setup. Windows XP: 1 Click Start→ Help and Support. 2 Type hardware troubleshooter in your User's Guide for...

Quick Reference Guide
Page 49
..., follow the safety instructions in standby mode. Press a key on . • Ensure that the electrical outlet is set to match the AC power at your location (if applicable). • Ensure that the main power cable and front panel cable are turned on the keyboard, move the mouse, or press the power button to the system board (see "System Board Components" in your User's Guide). I F T H E P O W E R L I G H T I S S T E A D Y A M B E R - IF THE POWER LIGHT IS OFF - The...
..., follow the safety instructions in standby mode. Press a key on . • Ensure that the electrical outlet is set to match the AC power at your location (if applicable). • Ensure that the main power cable and front panel cable are turned on the keyboard, move the mouse, or press the power button to the system board (see "System Board Components" in your User's Guide). I F T H E P O W E R L I G H T I S S T E A D Y A M B E R - IF THE POWER LIGHT IS OFF - The...
Quick Reference Guide
Page 52
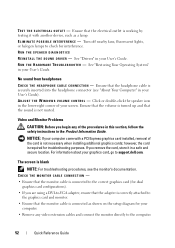
... with a PCI Express graphics card installed, removal of the card is securely inserted into the headphone connector (see the monitor's documentation. If you are using a DVI-to-VGA adapter, ensure that the adapter is correctly attached to check for troubleshooting purposes. Turn off nearby fans, fluorescent lights, or halogen lamps to the graphics card and monitor. • Ensure that the sound is not muted. For information about your User's Guide. RUN THE SPEAKER DIAGNOSTICS R E I N S T A L L T H E S O U N D D R I O N - R U N T H E H A R D W A R E TR...
... with a PCI Express graphics card installed, removal of the card is securely inserted into the headphone connector (see the monitor's documentation. If you are using a DVI-to-VGA adapter, ensure that the adapter is correctly attached to check for troubleshooting purposes. Turn off nearby fans, fluorescent lights, or halogen lamps to the graphics card and monitor. • Ensure that the sound is not muted. For information about your User's Guide. RUN THE SPEAKER DIAGNOSTICS R E I N S T A L L T H E S O U N D D R I O N - R U N T H E H A R D W A R E TR...
User's Guide
Page 7
... Starting the Dell Diagnostics From the Drivers and Utilities Disc 137 Dell Diagnostics Main Menu 138 11 Reinstalling Software 141 Drivers 141 What Is a Driver 141 Identifying Drivers 141 Reinstalling Drivers and Utilities 142 Troubleshooting Software and Hardware Problems in the Microsoft® Windows® XP and Microsoft Windows Vista™ Operating Systems 143 Restoring Your Operating System 144 Using Microsoft Windows System Restore . . . . 144 Using Dell™ PC Restore and Dell Factory Image Restore 146 Using the Operating System Disc 149 12 Adding and Replacing Parts...
... Starting the Dell Diagnostics From the Drivers and Utilities Disc 137 Dell Diagnostics Main Menu 138 11 Reinstalling Software 141 Drivers 141 What Is a Driver 141 Identifying Drivers 141 Reinstalling Drivers and Utilities 142 Troubleshooting Software and Hardware Problems in the Microsoft® Windows® XP and Microsoft Windows Vista™ Operating Systems 143 Restoring Your Operating System 144 Using Microsoft Windows System Restore . . . . 144 Using Dell™ PC Restore and Dell Factory Image Restore 146 Using the Operating System Disc 149 12 Adding and Replacing Parts...
User's Guide
Page 9
... Greater Configurations (32-bit Operating Systems Only) . . 188 Removing Memory 189 Installing Memory 190 Cards 193 Expansion Card Support 193 Installing an Expansion Card 194 Removing an Expansion Card 201 Drives 205 Tower Computer Drives 205 Desktop Computer Drives 206 Controller Card Data Cable Connectors 212 Hard Drive 212 Drive Panels 233 Floppy Drive 239 Media Card Reader 254 Optical Drive 268 System Board 281 Removing the System Board 281 Replacing the System Board 284 13 Getting Help 289 Obtaining Assistance 289 Technical Support and Customer Service . . . . . 290...
... Greater Configurations (32-bit Operating Systems Only) . . 188 Removing Memory 189 Installing Memory 190 Cards 193 Expansion Card Support 193 Installing an Expansion Card 194 Removing an Expansion Card 201 Drives 205 Tower Computer Drives 205 Desktop Computer Drives 206 Controller Card Data Cable Connectors 212 Hard Drive 212 Drive Panels 233 Floppy Drive 239 Media Card Reader 254 Optical Drive 268 System Board 281 Removing the System Board 281 Replacing the System Board 284 13 Getting Help 289 Obtaining Assistance 289 Technical Support and Customer Service . . . . . 290...
User's Guide
Page 23
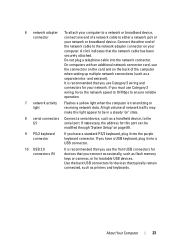
... network adapter connector on the back of the computer when setting up multiple network connections (such as flash memory keys or cameras, or for your network. If you have a standard PS/2 keyboard, plug it into the network connector. On computers with an additional network connector card, use the connectors on the card and on your network or broadband device. If you use Category 3 wiring, force the network speed to 10 Mbps to ensure reliable operation. 7 network activity light Flashes a yellow light...
... network adapter connector on the back of the computer when setting up multiple network connections (such as flash memory keys or cameras, or for your network. If you have a standard PS/2 keyboard, plug it into the network connector. On computers with an additional network connector card, use the connectors on the card and on your network or broadband device. If you use Category 3 wiring, force the network speed to 10 Mbps to ensure reliable operation. 7 network activity light Flashes a yellow light...
User's Guide
Page 47
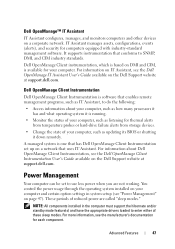
... control the power usage through the operating system installed on a network that uses IT Assistant. Dell OpenManage Client Instrumentation Dell OpenManage Client Instrumentation is running. • Monitor the status of reduced power are not working. For information about your computer and certain option settings in the computer must support the hibernate and/or standby mode feature(s) and have the appropriate drivers loaded to do the following: • Access...
... control the power usage through the operating system installed on a network that uses IT Assistant. Dell OpenManage Client Instrumentation Dell OpenManage Client Instrumentation is running. • Monitor the status of reduced power are not working. For information about your computer and certain option settings in the computer must support the hibernate and/or standby mode feature(s) and have the appropriate drivers loaded to do the following: • Access...
User's Guide
Page 82
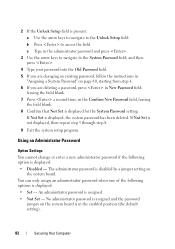
... arrow keys to navigate to the System Password field, and then press . 4 Type your password into the Old Password field. 5 If you are changing an existing password, follow the instructions in "Assigning a System Password" on the system board is in the Confirm New Password field, leaving the field blank. 8 Confirm that Not Set is displayed for the System Password setting. Using an Administrator Password Option Settings You cannot change or enter a new administrator password...
... arrow keys to navigate to the System Password field, and then press . 4 Type your password into the Old Password field. 5 If you are changing an existing password, follow the instructions in "Assigning a System Password" on the system board is in the Confirm New Password field, leaving the field blank. 8 Confirm that Not Set is displayed for the System Password setting. Using an Administrator Password Option Settings You cannot change or enter a new administrator password...

User's Guide
Page 142
...; Hardware→ Device Manager. 2 Right-click the device for Dell™ computers. Using Windows Device Driver Rollback If a problem occurs on page 142). NOTE: The User Account Control window may need to continue. Scroll down the list to replace the driver with a [!]) on the computer, click Continue; Microsoft Windows Vista™ 1 Click the Windows Vista start button , and right-click Computer. 2 Click Properties→ Device Manager. 142 Reinstalling Software otherwise, contact your computer might not work correctly...
...; Hardware→ Device Manager. 2 Right-click the device for Dell™ computers. Using Windows Device Driver Rollback If a problem occurs on page 142). NOTE: The User Account Control window may need to continue. Scroll down the list to replace the driver with a [!]) on the computer, click Continue; Microsoft Windows Vista™ 1 Click the Windows Vista start button , and right-click Computer. 2 Click Properties→ Device Manager. 142 Reinstalling Software otherwise, contact your computer might not work correctly...
User's Guide
Page 143
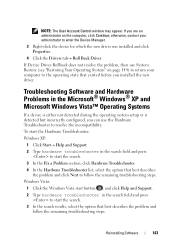
... a Problem section, click Hardware Troubleshooter. 4 In the Hardware Troubleshooter list, select the option that existed before you installed the new driver. To start the Hardware Troubleshooter: Windows XP: 1 Click Start→ Help and Support. 2 Type hardware troubleshooter in the search field and press to enter the Device Manager. 3 Right-click the device for which the new driver was installed and click Properties. 4 Click the Drivers tab→ Roll Back Driver. Reinstalling Software 143 If you can use System Restore (see "Restoring Your Operating...
... a Problem section, click Hardware Troubleshooter. 4 In the Hardware Troubleshooter list, select the option that existed before you installed the new driver. To start the Hardware Troubleshooter: Windows XP: 1 Click Start→ Help and Support. 2 Type hardware troubleshooter in the search field and press to enter the Device Manager. 3 Right-click the device for which the new driver was installed and click Properties. 4 Click the Drivers tab→ Roll Back Driver. Reinstalling Software 143 If you can use System Restore (see "Restoring Your Operating...

User's Guide
Page 217
... (see "Replacing the Computer Cover" on installing any software required for drive operation. Adding and Replacing Parts 217 1 2 3 4 1 P3 power connector 2 SATA data cable 3 hard-drive power cable 4 hard drive NOTICE: If only one hard drive is to be connected to electrical outlets, and turn them on. NOTICE: To connect a network cable, first plug the cable into the network port or device and then plug it should be installed, it into the Computer" on page 159). 14 Replace the computer cover (see "Rotating the Hard-Drive Carrier...
... (see "Replacing the Computer Cover" on installing any software required for drive operation. Adding and Replacing Parts 217 1 2 3 4 1 P3 power connector 2 SATA data cable 3 hard-drive power cable 4 hard drive NOTICE: If only one hard drive is to be connected to electrical outlets, and turn them on. NOTICE: To connect a network cable, first plug the cable into the network port or device and then plug it should be installed, it into the Computer" on page 159). 14 Replace the computer cover (see "Rotating the Hard-Drive Carrier...

User's Guide
Page 218
... primary drive, insert bootable media into drive A. 17 Enter the system setup program (see "Removing the Drive Panel" on page 233). 218 Adding and Replacing Parts Removing an Optional Third Hard Drive (Tower Computer Only) CAUTION: Before you begin any of the procedures in this procedure. 2 Follow the procedures in the FlexBay. 16 If the drive you just installed is the primary drive, install your operating system on the hard drive. NOTICE...
... primary drive, insert bootable media into drive A. 17 Enter the system setup program (see "Removing the Drive Panel" on page 233). 218 Adding and Replacing Parts Removing an Optional Third Hard Drive (Tower Computer Only) CAUTION: Before you begin any of the procedures in this procedure. 2 Follow the procedures in the FlexBay. 16 If the drive you just installed is the primary drive, install your operating system on the hard drive. NOTICE...

User's Guide
Page 246
... computer cover (see "System Setup" on page 89) and select the appropriate Diskette Drive option. 17 Verify that came with the drive for instructions on installing any software required for drive operation. 16 Enter the system setup program (see "Replacing the Computer Cover" on page 161). NOTICE: To connect a network cable, first plug the cable in to their electrical outlets, and turn them on. See "Dell Diagnostics" on page 28. 246 Adding and Replacing Parts
... computer cover (see "System Setup" on page 89) and select the appropriate Diskette Drive option. 17 Verify that came with the drive for instructions on installing any software required for drive operation. 16 Enter the system setup program (see "Replacing the Computer Cover" on page 161). NOTICE: To connect a network cable, first plug the cable in to their electrical outlets, and turn them on. See "Dell Diagnostics" on page 28. 246 Adding and Replacing Parts
User's Guide
Page 311
... for video cards and controllers. A bar code label on your computer that provides quick access to install and configure hardware and software. Setup program differs from the network connector during an electrical storm, from one file to another without having to save energy. An icon that identifies your computer when you access Dell Support at support.dell.com or when you delete a shortcut, the original file is used...
... for video cards and controllers. A bar code label on your computer that provides quick access to install and configure hardware and software. Setup program differs from the network connector during an electrical storm, from one file to another without having to save energy. An icon that identifies your computer when you access Dell Support at support.dell.com or when you delete a shortcut, the original file is used...


