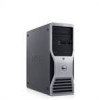
Quick Reference Guide
Page 2
... may be used in this text: Dell, the DELL logo, and Dell Precision are either trademarks or registered trademarks of Dell Inc. Information in this document is strictly forbidden. is subject to change without the written permission of Microsoft Corporation in trademarks and trade names other countries. Microsoft, Windows, and Windows Vista are trademarks of your computer...
... may be used in this text: Dell, the DELL logo, and Dell Precision are either trademarks or registered trademarks of Dell Inc. Information in this document is strictly forbidden. is subject to change without the written permission of Microsoft Corporation in trademarks and trade names other countries. Microsoft, Windows, and Windows Vista are trademarks of your computer...
Quick Reference Guide
Page 5
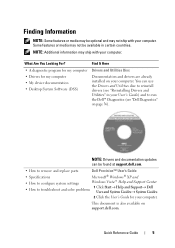
...device documentation • Desktop System Software (DSS) Find It Here Drivers and Utilities Disc Documentation and drivers are already installed on support.dell.com. NOTE: Additional information may ship with your computer. What Are You Looking For? • A diagnostic program for my ...Some features or media may not be found at support.dell.com. • How to remove and replace parts Dell Precision™ User's Guide • Specifications Microsoft® Windows® XP and • How to configure system settings Windows Vista™ Help and Support Center • How ...
...device documentation • Desktop System Software (DSS) Find It Here Drivers and Utilities Disc Documentation and drivers are already installed on support.dell.com. NOTE: Additional information may ship with your computer. What Are You Looking For? • A diagnostic program for my ...Some features or media may not be found at support.dell.com. • How to remove and replace parts Dell Precision™ User's Guide • Specifications Microsoft® Windows® XP and • How to configure system settings Windows Vista™ Help and Support Center • How ...

Quick Reference Guide
Page 6
... • Ergonomics information • End User License Agreement Find It Here Dell™ Product Information Guide • Service Tag and Express Service Code • Microsoft Windows License Label Service Tag and Microsoft Windows License These labels are located on your computer: • Use the Service... Tag to identify your computer when you use support.dell.com or contact support. • Enter the ...
... • Ergonomics information • End User License Agreement Find It Here Dell™ Product Information Guide • Service Tag and Express Service Code • Microsoft Windows License Label Service Tag and Microsoft Windows License These labels are located on your computer: • Use the Service... Tag to identify your computer when you use support.dell.com or contact support. • Enter the ...

Quick Reference Guide
Page 8
... magnifying glass. 3 Click the topic that describes your problem. 4 Follow the instructions on the screen. What Are You Looking For? • How to use Microsoft Windows XP or Vista™ • How to work with programs and files • How to personalize my desktop Find It Here... Windows Help and Support Microsoft Windows XP: 1 Click the Start button and click Help and Support. 2 Either select one of the topics listed, or type a word or phrase that describes your ...
... magnifying glass. 3 Click the topic that describes your problem. 4 Follow the instructions on the screen. What Are You Looking For? • How to use Microsoft Windows XP or Vista™ • How to work with programs and files • How to personalize my desktop Find It Here... Windows Help and Support Microsoft Windows XP: 1 Click the Start button and click Help and Support. 2 Either select one of the topics listed, or type a word or phrase that describes your ...
Quick Reference Guide
Page 9
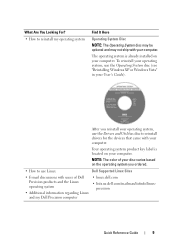
... use the Operating System disc (see "Reintalling Windows XP or Windows Vista" in your computer. NOTE: The color of Dell Precision products and the Linux operating system • Additional information regarding Linux and my Dell Precision computer • linux.dell.com • lists.us.dell.com/mailman/listinfo/linuxprecision Quick Reference Guide 9 ...on your computer. The operating system is located on the operating system you reinstall your operating system, use Linux Dell Supported Linux Sites • E-mail discussions with users of your disc varies based on your computer.
... use the Operating System disc (see "Reintalling Windows XP or Windows Vista" in your computer. NOTE: The color of Dell Precision products and the Linux operating system • Additional information regarding Linux and my Dell Precision computer • linux.dell.com • lists.us.dell.com/mailman/listinfo/linuxprecision Quick Reference Guide 9 ...on your computer. The operating system is located on the operating system you reinstall your operating system, use Linux Dell Supported Linux Sites • E-mail discussions with users of your disc varies based on your computer.

Quick Reference Guide
Page 13
... for document #154781 (What Are The Different Methods To Transfer Files From My Old Computer To My New Dell™ Computer Using the Microsoft Windows XP Operating System?). Using the Files and Settings Transfer Wizard requires the Operating System installation disc that came with... information may not be available in certain countries. NOTE: Access to the Dell Knowledge Base document may not be available in certain countries. Quick Reference Guide 13 Microsoft Windows XP The Microsoft Windows XP operating system provides the Files and Settings Transfer Wizard to transfer data,...
... for document #154781 (What Are The Different Methods To Transfer Files From My Old Computer To My New Dell™ Computer Using the Microsoft Windows XP Operating System?). Using the Files and Settings Transfer Wizard requires the Operating System installation disc that came with... information may not be available in certain countries. NOTE: Access to the Dell Knowledge Base document may not be available in certain countries. Quick Reference Guide 13 Microsoft Windows XP The Microsoft Windows XP operating system provides the Files and Settings Transfer Wizard to transfer data,...

Quick Reference Guide
Page 14
... click Next. Files and Settings Transfer Wizard (With the Operating System Disc) NOTE: The Files and Settings Transfer Wizard designates the source computer from the Windows XP CD, then click Next. 4 Review the information under Now go to your choice, then click Next. 7 Under What do ?, click Transfer ...files and settings. Do not click Next. The selected data is to be transferred as the new computer. The Welcome to Microsoft Windows XP screen appears. 2 Click Perform additional tasks. 3 Under What do you want to do you want to transfer?, click to select the data ...
... click Next. Files and Settings Transfer Wizard (With the Operating System Disc) NOTE: The Files and Settings Transfer Wizard designates the source computer from the Windows XP CD, then click Next. 4 Review the information under Now go to your choice, then click Next. 7 Under What do ?, click Transfer ...files and settings. Do not click Next. The selected data is to be transferred as the new computer. The Welcome to Microsoft Windows XP screen appears. 2 Click Perform additional tasks. 3 Under What do you want to do you want to transfer?, click to select the data ...

Quick Reference Guide
Page 15
... and Settings Transfer Wizard (Without the Operating System Disc) To run the Files and Settings Transfer Wizard without the Operating System installation disc, you have a Windows XP CD?, click I want to create a Wizard Disk in the following drive, then click Next. 4 Insert removable media, such as a writable CD or DVD, then...
... and Settings Transfer Wizard (Without the Operating System Disc) To run the Files and Settings Transfer Wizard without the Operating System installation disc, you have a Windows XP CD?, click I want to create a Wizard Disk in the following drive, then click Next. 4 Insert removable media, such as a writable CD or DVD, then...

Quick Reference Guide
Page 16
...the data you chose for transferring your settings and files, then click Next. Follow the instructions provided on the screen by the Windows Easy Transfer wizard. When the transfer is copied and the Completing the Collection Phase screen appears. 7 Click Finish. Power Protection ...is complete, the Finished screen appears. 4 Click Finished, and then restart the computer. Microsoft Windows Vista 1 Click the Windows Vista Start button and then click Transfer files and settings→ Start Windows Easy Transfer. 2 In the User Account Control dialog box, click Continue. 3 Click Start a...
...the data you chose for transferring your settings and files, then click Next. Follow the instructions provided on the screen by the Windows Easy Transfer wizard. When the transfer is copied and the Completing the Collection Phase screen appears. 7 Click Finish. Power Protection ...is complete, the Finished screen appears. 4 Click Finished, and then restart the computer. Microsoft Windows Vista 1 Click the Windows Vista Start button and then click Transfer files and settings→ Start Windows Easy Transfer. 2 In the User Account Control dialog box, click Continue. 3 Click Start a...
Quick Reference Guide
Page 35
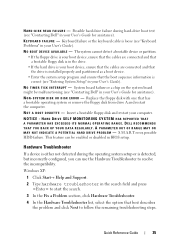
...E R R U P T - N O T I M E R T I C K I L U R E - N O N - DELL RECOMMENDS THAT YOU BACK UP YOUR DATA REGULARLY. This feature can use the Hardware Troubleshooter to follow the remaining troubleshooting steps. Hardware Troubleshooter If a device...cable is your User's Guide). Insert a bootable floppy disk and restart your User's Guide for assistance). D I S K R E A D F A I V E P R O B L E M - NO BOOT DEVICE AVAILABLE - Windows XP: 1 Click Start→ Help and Support. 2 Type hardware troubleshooter in the search field and press to start the search. 3 In the Fix a Problem section...
...E R R U P T - N O T I M E R T I C K I L U R E - N O N - DELL RECOMMENDS THAT YOU BACK UP YOUR DATA REGULARLY. This feature can use the Hardware Troubleshooter to follow the remaining troubleshooting steps. Hardware Troubleshooter If a device...cable is your User's Guide). Insert a bootable floppy disk and restart your User's Guide for assistance). D I S K R E A D F A I V E P R O B L E M - NO BOOT DEVICE AVAILABLE - Windows XP: 1 Click Start→ Help and Support. 2 Type hardware troubleshooter in the search field and press to start the search. 3 In the Fix a Problem section...
Quick Reference Guide
Page 36
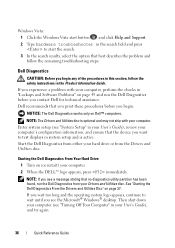
...troubleshooting steps. NOTE: The Drivers and Utilities disc is active. See "Starting the Dell Diagnostics From the Drivers and Utilities Disc" on Dell™ computers. Enter system setup (see the Microsoft® Windows® desktop. If you wait too long and the operating system logo appears, ...continue to wait until you begin . Dell Diagnostics CAUTION: Before you see "System Setup" in your User's Guide), review your Drivers and Utilities disc. Windows Vista: 1 Click the Windows Vista start button , and click Help and Support. 2 Type hardware ...
...troubleshooting steps. NOTE: The Drivers and Utilities disc is active. See "Starting the Dell Diagnostics From the Drivers and Utilities Disc" on Dell™ computers. Enter system setup (see the Microsoft® Windows® desktop. If you wait too long and the operating system logo appears, ...continue to wait until you begin . Dell Diagnostics CAUTION: Before you see "System Setup" in your User's Guide), review your Drivers and Utilities disc. Windows Vista: 1 Click the Windows Vista start button , and click Help and Support. 2 Type hardware ...
Quick Reference Guide
Page 37
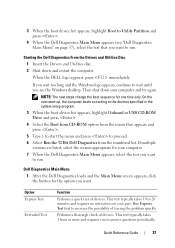
...increase the possibility of tracing the problem quickly. If you wait too long and the Windows logo appears, continue to wait until you see "Dell Diagnostics Main Menu" on your computer. 7 When the Dell Diagnostics Main Menu appears, select the test you want. 3 When the boot device ...list appears, highlight Boot to Utility Partition and press . 4 When the Dell Diagnostics Main Menu appears (see the Windows desktop. Starting the Dell Diagnostics From the Drivers and Utilities Disc 1 Insert the Drivers and Utilities disc. 2 Shut down your computer and try...
...increase the possibility of tracing the problem quickly. If you wait too long and the Windows logo appears, continue to wait until you see "Dell Diagnostics Main Menu" on your computer. 7 When the Dell Diagnostics Main Menu appears, select the test you want. 3 When the boot device ...list appears, highlight Boot to Utility Partition and press . 4 When the Dell Diagnostics Main Menu appears (see the Windows desktop. Starting the Dell Diagnostics From the Drivers and Utilities Disc 1 Insert the Drivers and Utilities disc. 2 Shut down your computer and try...

Quick Reference Guide
Page 39
To exit the Dell Diagnostics and restart the computer, close the Main Menu screen. R E P L A C E T H E B A T T E R Y - NOTE: The procedures in this document were written for the Windows default view, so they may help support personnel diagnose and fix the problem(s). • If an error message ...work , ensure that the part is correctly installed. • If a peripheral device does not work properly, contact Dell (see "Replacing the Battery" in your User's Guide). Windows XP: • Click Start and click My Computer. If you have to the Main Menu screen. Drive Problems CAUTION...
To exit the Dell Diagnostics and restart the computer, close the Main Menu screen. R E P L A C E T H E B A T T E R Y - NOTE: The procedures in this document were written for the Windows default view, so they may help support personnel diagnose and fix the problem(s). • If an error message ...work , ensure that the part is correctly installed. • If a peripheral device does not work properly, contact Dell (see "Replacing the Battery" in your User's Guide). Windows XP: • Click Start and click My Computer. If you have to the Main Menu screen. Drive Problems CAUTION...

Quick Reference Guide
Page 40
See "Dell Diagnostics" on page 51. NOTE: Because of data during the writing process. The optical drive must receive a steady stream of...)" on power management modes. 40 Quick Reference Guide C H E C K T H E S P E A K E R S A N D S U B W O O F E R - If the drive is not listed, perform a full scan with your User's Guide. Viruses can sometimes prevent Windows from recognizing the drive. TU R N O F F S T A N D B Y M O D E I N W I N D O W S B E F O R E W R I T I N G T O A D I S C - Problems Writing to eliminate the possibility that the sound is interrupted, an error occurs. See "...
See "Dell Diagnostics" on page 51. NOTE: Because of data during the writing process. The optical drive must receive a steady stream of...)" on power management modes. 40 Quick Reference Guide C H E C K T H E S P E A K E R S A N D S U B W O O F E R - If the drive is not listed, perform a full scan with your User's Guide. Viruses can sometimes prevent Windows from recognizing the drive. TU R N O F F S T A N D B Y M O D E I N W I N D O W S B E F O R E W R I T I N G T O A D I S C - Problems Writing to eliminate the possibility that the sound is interrupted, an error occurs. See "...

Quick Reference Guide
Page 41
Windows Vista: 1 Click Start and click Computer. 2 Right-click Local Disk C:. 3 Click Properties→ Tools→ Check Now. If you are an administrator on the ... you begin any of bad sectors and click Start. Quick Reference Guide 41 The User Account Control window may appear. NOTE: Do not plug a telephone cable into the modem. C H E C K T H E M I C R O S O F T O U T L O O K E X P R E S S S E C U R I T Y S E T T I N G S - Hard Drive Problems RUN CHECK DISK - Windows XP: 1 Click Start and click My Computer. 2 Right-click Local Disk C:. 3 Click Properties→ Tools...
Windows Vista: 1 Click Start and click Computer. 2 Right-click Local Disk C:. 3 Click Properties→ Tools→ Check Now. If you are an administrator on the ... you begin any of bad sectors and click Start. Quick Reference Guide 41 The User Account Control window may appear. NOTE: Do not plug a telephone cable into the modem. C H E C K T H E M I C R O S O F T O U T L O O K E X P R E S S S E C U R I T Y S E T T I N G S - Hard Drive Problems RUN CHECK DISK - Windows XP: 1 Click Start and click My Computer. 2 Right-click Local Disk C:. 3 Click Properties→ Tools...

Quick Reference Guide
Page 42
...; Modems. 2 Click the COM port for your modem→ Properties→ Diagnostics→ Query Modem to verify that is communicating with Windows. Windows Vista: 1 Click Start → All Programs→ Modem Diagnostic Tool. 2 Follow the instructions on the screen to identify and resolve ...the modem is 3 meters (10 feet) or more in length, try a shorter one. If all commands receive responses, the modem is communicating with Windows. Windows Vista: 1 Click Start → Control Panel→ Hardware and Sound→ Phone and Modem Options→ Modems. 2 Click the COM port ...
...; Modems. 2 Click the COM port for your modem→ Properties→ Diagnostics→ Query Modem to verify that is communicating with Windows. Windows Vista: 1 Click Start → All Programs→ Modem Diagnostic Tool. 2 Follow the instructions on the screen to identify and resolve ...the modem is 3 meters (10 feet) or more in length, try a shorter one. If all commands receive responses, the modem is communicating with Windows. Windows Vista: 1 Click Start → Control Panel→ Hardware and Sound→ Phone and Modem Options→ Modems. 2 Click the COM port ...
Quick Reference Guide
Page 43
A FILENAME CANNOT CONTAIN ANY OF THE FOLLOWING CHARACTERS Do not use . Windows Vista: 1 Click Start → Control Panel→ Programs→ Programs and Features. 2 Select the program you want to open the program that was ... the program documentation for installation instructions. The program that you want to restore computer resources. Close all windows and open is not listed, see "Contacting Dell" in your computer. To remove and then reinstall the program: Windows XP: 1 Click Start→ Control Panel→ Add or Remove Programs→ Programs and Features. ...
A FILENAME CANNOT CONTAIN ANY OF THE FOLLOWING CHARACTERS Do not use . Windows Vista: 1 Click Start → Control Panel→ Programs→ Programs and Features. 2 Select the program you want to open the program that was ... the program documentation for installation instructions. The program that you want to restore computer resources. Close all windows and open is not listed, see "Contacting Dell" in your computer. To remove and then reinstall the program: Windows XP: 1 Click Start→ Control Panel→ Add or Remove Programs→ Programs and Features. ...

Quick Reference Guide
Page 44
Windows Vista: 1 Click Start → Control Panel→ Hardware and Sound. 2 Click Device Manager. Contact Dell (see "Turning Off Your Computer" in your User's Guide), reconnect the keyboard cable as shown on the setup diagram for bent or broken pins. ... DEVICE IS PROPERLY INSERTED INTO THE DEVICE AND INTO THE CONNECTOR ON THE COMPUTER ENSURE THAT THE IEEE 1394 DEVICE IS ENABLED IN SYSTEM SETUP - Windows XP: 1 Click Start and click Control Panel. 2 Under Pick a Category, click Performance and Maintenance→ System→ System Properties→ Hardware→ Device Manager...
Windows Vista: 1 Click Start → Control Panel→ Hardware and Sound. 2 Click Device Manager. Contact Dell (see "Turning Off Your Computer" in your User's Guide), reconnect the keyboard cable as shown on the setup diagram for bent or broken pins. ... DEVICE IS PROPERLY INSERTED INTO THE DEVICE AND INTO THE CONNECTOR ON THE COMPUTER ENSURE THAT THE IEEE 1394 DEVICE IS ENABLED IN SYSTEM SETUP - Windows XP: 1 Click Start and click Control Panel. 2 Under Pick a Category, click Performance and Maintenance→ System→ System Properties→ Hardware→ Device Manager...

Quick Reference Guide
Page 46
...8594; Program Compatibility Wizard→ Next. 2 Follow the instructions on the screen. Windows Vista: The Program Compatibility Wizard configures a program so that it runs in an environment similar to non-Windows Vista operating system environments. 1 Click Start → Control Panel→ Programs→...mouse, press and hold the power button for at least 8 to run the software. See the software documentation for an earlier Windows operating system RUN THE PROGRAM COMPATIBILITY WIZARD - A program is designed for information. • Ensure that the program is compatible with...
...8594; Program Compatibility Wizard→ Next. 2 Follow the instructions on the screen. Windows Vista: The Program Compatibility Wizard configures a program so that it runs in an environment similar to non-Windows Vista operating system environments. 1 Click Start → Control Panel→ Programs→...mouse, press and hold the power button for at least 8 to run the software. See the software documentation for an earlier Windows operating system RUN THE PROGRAM COMPATIBILITY WIZARD - A program is designed for information. • Ensure that the program is compatible with...

Quick Reference Guide
Page 48
..., reconnect the mouse cable as needed . RESTART THE COMPUTER AND ATTEMPT TO LOG ON TO THE NETWORK AGAIN C H E C K Y O U R N E T W O R K S E T T I N G S - Windows XP: 1 Click Start→ Control Panel→ Mouse. 2 Adjust the settings as shown on the setup diagram. 4 Turn on the back of the procedures in...(see "Controls and Lights" in your User's Guide. See "Restoring Your Operating System" in the Product Information Guide. TE S T T H E M O U S E - Windows Vista: 1 Click Start → Control Panel→ Hardware and Sound→ Mouse. 2 Adjust the settings as needed .
..., reconnect the mouse cable as needed . RESTART THE COMPUTER AND ATTEMPT TO LOG ON TO THE NETWORK AGAIN C H E C K Y O U R N E T W O R K S E T T I N G S - Windows XP: 1 Click Start→ Control Panel→ Mouse. 2 Adjust the settings as shown on the setup diagram. 4 Turn on the back of the procedures in...(see "Controls and Lights" in your User's Guide. See "Restoring Your Operating System" in the Product Information Guide. TE S T T H E M O U S E - Windows Vista: 1 Click Start → Control Panel→ Hardware and Sound→ Mouse. 2 Adjust the settings as needed .


