Information Update - Intel Xeon 5600 Series Processors
Page 2
... support.dell.com/manuals. Operating the system memory at 1.5 V if any limitations. For example, populating three memory modules per channel is backward-compatible to Intel Xeon 5500 series and operates at 1.35 V. Systems with 1.35 V DDR3L memory operates the memory modules at a lower voltage may cause restrictions to PowerEdge R410, R510, R610, R710...
... support.dell.com/manuals. Operating the system memory at 1.5 V if any limitations. For example, populating three memory modules per channel is backward-compatible to Intel Xeon 5500 series and operates at 1.35 V. Systems with 1.35 V DDR3L memory operates the memory modules at a lower voltage may cause restrictions to PowerEdge R410, R510, R610, R710...
Information Update - Processor Installation
Page 3
...for some time after the system has been powered down (thermal grease side facing up). CAUTION: Never remove the heat sink from support.dell.com and follow the instructions included in the compressed download file to install the update on components in the interior of the system. 3... from the electrical outlet. Allow the heat sink and processor to remove the processor. See "Removing the Cooling Shroud" in the Hardware Owner's Manual. 4 Remove the cooling shroud. Before you begin this procedure, review the safety instructions that you intend to cool before handling them. NOTE: ...
...for some time after the system has been powered down (thermal grease side facing up). CAUTION: Never remove the heat sink from support.dell.com and follow the instructions included in the compressed download file to install the update on components in the interior of the system. 3... from the electrical outlet. Allow the heat sink and processor to remove the processor. See "Removing the Cooling Shroud" in the Hardware Owner's Manual. 4 Remove the cooling shroud. Before you begin this procedure, review the safety instructions that you intend to cool before handling them. NOTE: ...
Information Update - Processor Installation
Page 4
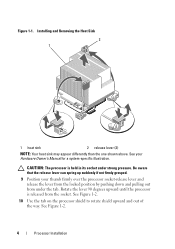
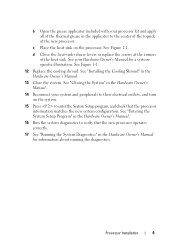
... in its socket under the tab. Figure 1-1. Be aware that the release lever can spring up suddenly if not firmly grasped. 9 Position your Hardware Owner's Manual for a system-specific illustration. CAUTION: The processor is released from under strong pressure. See Figure 1-2. 4 Processor Installation
... in its socket under the tab. Figure 1-1. Be aware that the release lever can spring up suddenly if not firmly grasped. 9 Position your Hardware Owner's Manual for a system-specific illustration. CAUTION: The processor is released from under strong pressure. See Figure 1-2. 4 Processor Installation
Information Update - Processor Installation
Page 9
...of the heat sink. See Figure 1-1. 12 Replace the cooling shroud. See "Entering the System Setup Program" in the Hardware Owner's Manual. 16 Run the system diagnostics to their electrical outlets, and turn on the processor. b Open the grease applicator included with your ...processor kit and apply all of the thermal grease in the Hardware Owner's Manual for a systemspecific illustration. See your system and peripherals to verify that the processor information matches the new system configuration. See "Installing ...
...of the heat sink. See Figure 1-1. 12 Replace the cooling shroud. See "Entering the System Setup Program" in the Hardware Owner's Manual. 16 Run the system diagnostics to their electrical outlets, and turn on the processor. b Open the grease applicator included with your ...processor kit and apply all of the thermal grease in the Hardware Owner's Manual for a systemspecific illustration. See your system and peripherals to verify that the processor information matches the new system configuration. See "Installing ...
Dell PowerEdge Deployment Guide
Page 3
PowerEdge Deployment Guide Table of Contents Introduction ...2 Unified Server Configurator (USC) Deployment ...2 Dell Systems Build and Update Utility (SBUU) ...3 Dell OpenManage™ Deployment Toolkit (DTK)...3 Manual Installation of Microsoft Operating Systems 4 Microsoft WDS (Legacy Images) / RIS ...4 WinPE ...4 Microsoft Automated Deployment Service (ADS) ...4 Page 1
PowerEdge Deployment Guide Table of Contents Introduction ...2 Unified Server Configurator (USC) Deployment ...2 Dell Systems Build and Update Utility (SBUU) ...3 Dell OpenManage™ Deployment Toolkit (DTK)...3 Manual Installation of Microsoft Operating Systems 4 Microsoft WDS (Legacy Images) / RIS ...4 WinPE ...4 Microsoft Automated Deployment Service (ADS) ...4 Page 1
Dell PowerEdge Deployment Guide
Page 6
...on http://support.microsoft.com/kb/254078/en. For more information. See Best Practices for Installation of Microsoft Windows on Dell Servers with Broadcom NetXtreme Devices for more information see Best Practices for the Broadcom NetXtreme 5708 and 5709 adapters. See ... will ensure that will need to install the chipset, Broadcom NetXtreme II, and Matrox G200 video drivers. Page 4 PowerEdge Deployment Guide Manual Installation of Microsoft Operating Systems This installation method involves booting to the operating system installation DVD to add the mass storage...
...on http://support.microsoft.com/kb/254078/en. For more information. See Best Practices for Installation of Microsoft Windows on Dell Servers with Broadcom NetXtreme Devices for more information see Best Practices for the Broadcom NetXtreme 5708 and 5709 adapters. See ... will ensure that will need to install the chipset, Broadcom NetXtreme II, and Matrox G200 video drivers. Page 4 PowerEdge Deployment Guide Manual Installation of Microsoft Operating Systems This installation method involves booting to the operating system installation DVD to add the mass storage...
Deploying UEFI-Aware Operating Systems on Dell PowerEdge Servers
Page 3
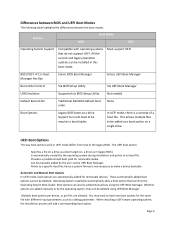
Table of Contents History ...2 What is UEFI?...2 What UEFI has to Offer...3 How is Dell's UEFI implemented? ...3 Differences between BIOS and UEFI Boot Modes 4 UEFI Boot Options ...4 Automatic and Manual Boot Options ...4 Booting to a Removable Media Device...5 UEFI Boot Manager ...5 Boot Options...5 UEFI Boot Settings ...5 System Utilities ...6 Deploying a UEFI‐Aware Operating System ...7 Deploying a UEFI Operating System ...7 Limitations ...8 Large Operating System Partitions ...8 Third Party Imaging Utilities ...8 Transferring Hard Disks ...8 UEFI Legacy Boot Controllers...8 Page 1
Table of Contents History ...2 What is UEFI?...2 What UEFI has to Offer...3 How is Dell's UEFI implemented? ...3 Differences between BIOS and UEFI Boot Modes 4 UEFI Boot Options ...4 Automatic and Manual Boot Options ...4 Booting to a Removable Media Device...5 UEFI Boot Manager ...5 Boot Options...5 UEFI Boot Settings ...5 System Utilities ...6 Deploying a UEFI‐Aware Operating System ...7 Deploying a UEFI Operating System ...7 Limitations ...8 Large Operating System Partitions ...8 Third Party Imaging Utilities ...8 Transferring Hard Disks ...8 UEFI Legacy Boot Controllers...8 Page 1
Deploying UEFI-Aware Operating Systems on Dell PowerEdge Servers
Page 6
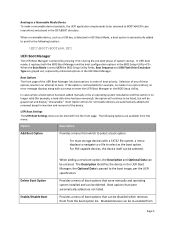
...Operating System installation automatically adds a boot option that do not support UEFI. Whether options are added manually or by the user via BIOS Setup Utility Not needed Default Boot Order Traditional Dell BIOS default boot order None Boot Options Legacy BIOS boots to be added as a debug parameter.... Page 4 The UEFI boot option: Specifies a file on a single drive. Can be manually added by the operating system, they can ...
...Operating System installation automatically adds a boot option that do not support UEFI. Whether options are added manually or by the user via BIOS Setup Utility Not needed Default Boot Order Traditional Dell BIOS default boot order None Boot Options Legacy BIOS boots to be added as a debug parameter.... Page 4 The UEFI boot option: Specifies a file on a single drive. Can be manually added by the operating system, they can ...
Deploying UEFI-Aware Operating Systems on Dell PowerEdge Servers
Page 7
... devices with a prompt to enter the UEFI Boot Manager or the BIOS Setup Utility. Provides a menu of boot priority. Boot options that were manually and operating system installed and can be deleted. Disabled devices can be re‐enabled from Page 5 In UEFI boot mode, it replaces both ...UEFI Boot Mode, a boot option is no media in an attempt to select a boot option. In cases where a boot option has been added manually or by an operating system installation and that can be disabled which to boot. The Description identifies the device in the BIOS Setup Utility . When...
... devices with a prompt to enter the UEFI Boot Manager or the BIOS Setup Utility. Provides a menu of boot priority. Boot options that were manually and operating system installed and can be deleted. Disabled devices can be re‐enabled from Page 5 In UEFI boot mode, it replaces both ...UEFI Boot Mode, a boot option is no media in an attempt to select a boot option. In cases where a boot option has been added manually or by an operating system installation and that can be disabled which to boot. The Description identifies the device in the BIOS Setup Utility . When...
Getting Started Guide
Page 9
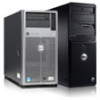
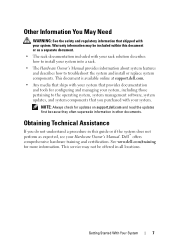
... You May Need WARNING: See the safety and regulatory information that you do not understand a procedure in other documents. See www.dell.com/training for configuring and managing your system, including those pertaining to the operating system, system management software, system updates, and ...system components that shipped with your system into a rack. • The Hardware Owner's Manual provides information about system features and describes how to install your system. Obtaining Technical Assistance If you purchased with your Hardware Owner...
... You May Need WARNING: See the safety and regulatory information that you do not understand a procedure in other documents. See www.dell.com/training for configuring and managing your system, including those pertaining to the operating system, system management software, system updates, and ...system components that shipped with your system into a rack. • The Hardware Owner's Manual provides information about system features and describes how to install your system. Obtaining Technical Assistance If you purchased with your Hardware Owner...
Hardware Owner's Manual
Page 63
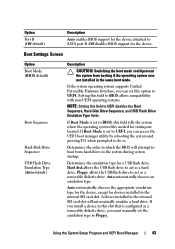
... UEFI Boot Manager 63 Floppy allows the USB flash drive to do so. Determines the order in this field to SATA port B. If you must manually set to boot from booting if the operating system was not installed in the system during system startup. If Boot Mode is set to UEFI...
... UEFI Boot Manager 63 Floppy allows the USB flash drive to do so. Determines the order in this field to SATA port B. If you must manually set to boot from booting if the operating system was not installed in the system during system startup. If Boot Mode is set to UEFI...
Hardware Owner's Manual
Page 65
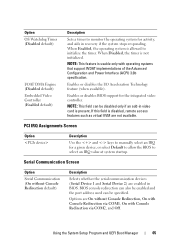
... the Advanced Configuration and Power Interface (ACPI) 3.0b specification. Enables or disables BIOS support for a given device, or select Default to allow the BIOS to manually select an IRQ for the integrated video controller. PCI IRQ Assignments Screen Option Description Use the and keys to select an IRQ value at system...
... the Advanced Configuration and Power Interface (ACPI) 3.0b specification. Enables or disables BIOS support for a given device, or select Default to allow the BIOS to manually select an IRQ for the integrated video controller. PCI IRQ Assignments Screen Option Description Use the and keys to select an IRQ value at system...
Hardware Owner's Manual
Page 74
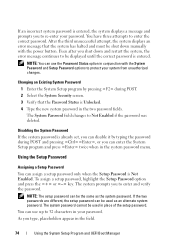
... password. The system password cannot be used as the system password. You can be used in place of the setup password. As you shut down manually with the System Password and Setup Password options to Not Enabled if the password was deleted. Changing an Existing System Password 1 Enter the System Setup...
... password. The system password cannot be used as the system password. You can be used in place of the setup password. As you shut down manually with the System Password and Setup Password options to Not Enabled if the password was deleted. Changing an Existing System Password 1 Enter the System Setup...

