
Getting Started Guide
Page 5
Installation and Configuration WARNING: Before performing the following the safety instructions and the rack installation instructions provided with the system. Unpacking the System Unpack your system. Installing the Rails and System in a Rack Assemble the rails and install the system in the rack following procedure, review the safety instructions that came with your system and identify each item. Getting Started With Your System 3
Installation and Configuration WARNING: Before performing the following the safety instructions and the rack installation instructions provided with the system. Unpacking the System Unpack your system. Installing the Rails and System in a Rack Assemble the rails and install the system in the rack following procedure, review the safety instructions that came with your system and identify each item. Getting Started With Your System 3
Hardware Owner's Manual
Page 86
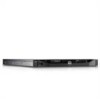
... damage the partially installed carrier's shield spring and make it . Remove the screws from the carrier. Damage due to servicing that is not authorized by Dell is not covered by your operating system supports hot-swap drive installation. CAUTION: Ensure that have been tested and approved for use with the SAS... of the hard-drive carrier and open the handle. 4 With the lever on the hard-drive carrier and separate the hard drive from the slide rails on the hard-drive carrier open, slide the hard-drive carrier into the hard-drive bay until it contacts the backplane.
... damage the partially installed carrier's shield spring and make it . Remove the screws from the carrier. Damage due to servicing that is not authorized by Dell is not covered by your operating system supports hot-swap drive installation. CAUTION: Ensure that have been tested and approved for use with the SAS... of the hard-drive carrier and open the handle. 4 With the lever on the hard-drive carrier and separate the hard drive from the slide rails on the hard-drive carrier open, slide the hard-drive carrier into the hard-drive bay until it contacts the backplane.
Hardware Owner's Manual
Page 91
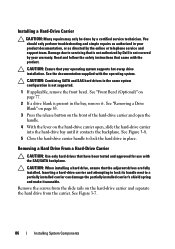
...flush with the connector end of the drive at the back. Removing a Hard Drive From a Hard-Drive Bracket Remove the screws from the slide rails on the hard-drive bracket. See Figure 3-9. 2 Align the screw holes on the hard drive with the hard drives ordered from the bracket. ... 1 Insert the hard drive into the hard-drive bracket with the back of holes on the hard-drive bracket and separate the hard drive from Dell. Removing and Installing a Hard Drive From a Hard-Drive Bracket 1 2 3 4 1 screws (4)* 3 SAS/SATA screw holes (4) 2 hard drive 4 hard-drive bracket *Screws are...
...flush with the connector end of the drive at the back. Removing a Hard Drive From a Hard-Drive Bracket Remove the screws from the slide rails on the hard-drive bracket. See Figure 3-9. 2 Align the screw holes on the hard drive with the hard drives ordered from the bracket. ... 1 Insert the hard drive into the hard-drive bracket with the back of holes on the hard-drive bracket and separate the hard drive from Dell. Removing and Installing a Hard Drive From a Hard-Drive Bracket 1 2 3 4 1 screws (4)* 3 SAS/SATA screw holes (4) 2 hard drive 4 hard-drive bracket *Screws are...


