
Getting Started Guide
Page 5
See "Using the System Setup Program" in your system include: • 1U/1S rack-mountable chassis with support for static rails and sliding rails. Up to a maximum of 8 GB by installing combinations of 512-MB, 1-GB, or 2-GB unbuffered ...
See "Using the System Setup Program" in your system include: • 1U/1S rack-mountable chassis with support for static rails and sliding rails. Up to a maximum of 8 GB by installing combinations of 512-MB, 1-GB, or 2-GB unbuffered ...
Getting Started Guide
Page 7
The Hardware Owner's Manual is available on the CDs that came with your system or on support.dell.com. • CDs included with your rack solution describes how to install your system. • Systems management software documentation describes the features, requirements,...included within this document or as a separate document. • The Rack Installation Instructions or Rack Installation Guide included with your system provide documentation and tools for configuring and managing your system into a rack. • The Hardware Owner's Manual provides information about system features ...
The Hardware Owner's Manual is available on the CDs that came with your system or on support.dell.com. • CDs included with your rack solution describes how to install your system. • Systems management software documentation describes the features, requirements,...included within this document or as a separate document. • The Rack Installation Instructions or Rack Installation Guide included with your system provide documentation and tools for configuring and managing your system into a rack. • The Hardware Owner's Manual provides information about system features ...
Getting Started Guide
Page 9
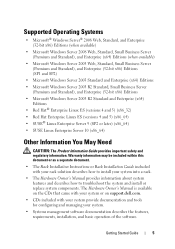
Getting Started Guide 7 See your rack installation documentation for your system, install the rails and the system in the rack. Installing the Rails and System in a Rack Once you need them later. Unpacking the System Unpack your system in a rack. Keep all shipping materials in case you have read the "Safety Instructions" located in the rack installation documentation for instructions on installing your system and identify each item.
Getting Started Guide 7 See your rack installation documentation for your system, install the rails and the system in the rack. Installing the Rails and System in a Rack Once you need them later. Unpacking the System Unpack your system in a rack. Keep all shipping materials in case you have read the "Safety Instructions" located in the rack installation documentation for instructions on installing your system and identify each item.

Hardware Owner's Manual (PDF)
Page 11
... The system indicators and features are illustrated in this document or as a separate document. • The Rack Installation Guide and Rack Installation Instructions included with your rack solution describe how to resolve any problems indicated by a message. About Your System 11 The system firmware, ... Alert messages This section describes each type of message, lists the possible causes, and provides steps to install your system into a rack. • The Getting Started Guide provides an overview of your system's front and back panels provide convenient connectivity and system expansion ...
... The system indicators and features are illustrated in this document or as a separate document. • The Rack Installation Guide and Rack Installation Instructions included with your rack solution describe how to resolve any problems indicated by a message. About Your System 11 The system firmware, ... Alert messages This section describes each type of message, lists the possible causes, and provides steps to install your system into a rack. • The Getting Started Guide provides an overview of your system's front and back panels provide convenient connectivity and system expansion ...
Hardware Owner's Manual (PDF)
Page 16
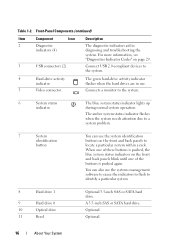
... (4) The diagnostic indicators aid in use. Optional. You can use the systems management software to cause the indicators to flash to locate a particular system within a rack. The amber system status indicator flashes when the system needs attention due to a system problem. 7 System identification button You can also use the system identification...
... (4) The diagnostic indicators aid in use. Optional. You can use the systems management software to cause the indicators to flash to locate a particular system within a rack. The amber system status indicator flashes when the system needs attention due to a system problem. 7 System identification button You can also use the system identification...
Hardware Owner's Manual (PDF)
Page 54
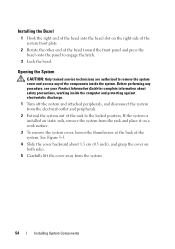
... and disconnect the system from the system. 54 Installing System Components If the system is installed on static rails, remove the system from the rack and place it on both sides. 5 Carefully lift the cover away from the electrical outlet and peripherals. 2 Extend the system out of the... rack to the locked position. Opening the System CAUTION: Only trained service technicians are authorized to engage the latch. 3 Lock the bezel. See Figure 3-3. 4 ...
... and disconnect the system from the system. 54 Installing System Components If the system is installed on static rails, remove the system from the rack and place it on both sides. 5 Carefully lift the cover away from the electrical outlet and peripherals. 2 Extend the system out of the... rack to the locked position. Opening the System CAUTION: Only trained service technicians are authorized to engage the latch. 3 Lock the bezel. See Figure 3-3. 4 ...

Hardware Owner's Manual (PDF)
Page 55
Installing System Components 55 Figure 3-3. See Figure 3-3. 4 Replace the system in the rack, and reconnect the peripheral cables. 5 Reconnect the system to secure the cover. Installing and Removing the System Cover 1 2 1 system cover 2 thumbscrew Closing the System 1 Ensure that you did not leave tools or parts inside the system. 2 Place the cover over the sides of the chassis, and slide the cover forward. 3 Tighten the thumbscrew at the back of the system to the electrical outlet, and turn on the system.
Installing System Components 55 Figure 3-3. See Figure 3-3. 4 Replace the system in the rack, and reconnect the peripheral cables. 5 Reconnect the system to secure the cover. Installing and Removing the System Cover 1 2 1 system cover 2 thumbscrew Closing the System 1 Ensure that you did not leave tools or parts inside the system. 2 Place the cover over the sides of the chassis, and slide the cover forward. 3 Tighten the thumbscrew at the back of the system to the electrical outlet, and turn on the system.
Hardware Owner's Manual (PDF)
Page 171
... maintaining the date, time, and system configuration information. Pixels are optimized to remove the processor chip. mirroring - Nonmaskable interrupt. NVRAM is installed or integrated in a rack. A type of processor socket that are arranged in the Windows 2000 operating system. pixel - Megahertz. A type of data redundancy in memory modules (DIMMs). MS-DOS...
... maintaining the date, time, and system configuration information. Pixels are optimized to remove the processor chip. mirroring - Nonmaskable interrupt. NVRAM is installed or integrated in a rack. A type of processor socket that are arranged in the Windows 2000 operating system. pixel - Megahertz. A type of data redundancy in memory modules (DIMMs). MS-DOS...


