Information Update (.pdf)
Page 5
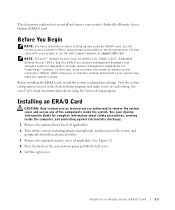
... Remote Access Option (ERA/O) card. See your system or on the Dell Support website at support.dell.com. See Figure 1-1. 4 Press the latch on the documentation CD ... are systems management hardware and software solutions designed to provide remote management capabilities for PowerEdge™ systems. Collectively, these solutions are authorized to remove the system cover and... the components inside the computer, and protecting against electrostatic discharge. 1 Remove the optional front bezel (if applicable). 2 Turn off the system, including attached peripherals, and disconnect the system...
... Remote Access Option (ERA/O) card. See your system or on the Dell Support website at support.dell.com. See Figure 1-1. 4 Press the latch on the documentation CD ... are systems management hardware and software solutions designed to provide remote management capabilities for PowerEdge™ systems. Collectively, these solutions are authorized to remove the system cover and... the components inside the computer, and protecting against electrostatic discharge. 1 Remove the optional front bezel (if applicable). 2 Turn off the system, including attached peripherals, and disconnect the system...

Information Update (.pdf)
Page 10
www.dell.com | support.dell.com 14 Reconnect the system and peripherals to their electrical outlets, and turn them on. 15 Install the optional front bezel (if applicable). 16 If the 100-Mbps RAC Ethernet connector on the documentation CD for the location of the cover to the RAC Ethernet ...updating the firmware. 1-6 Installing or Replacing an ERA/O Card See the RAC documentation provided on the back of the ERA/O firmware, available at the Dell Support website at the top of the connector. 17 Connect a network cable to tear away the cover. You can insert your finger underneath the ...
www.dell.com | support.dell.com 14 Reconnect the system and peripherals to their electrical outlets, and turn them on. 15 Install the optional front bezel (if applicable). 16 If the 100-Mbps RAC Ethernet connector on the documentation CD for the location of the cover to the RAC Ethernet ...updating the firmware. 1-6 Installing or Replacing an ERA/O Card See the RAC documentation provided on the back of the ERA/O firmware, available at the Dell Support website at the top of the connector. 17 Connect a network cable to tear away the cover. You can insert your finger underneath the ...
Installation and Troubleshooting Guide (.htm)
Page 16
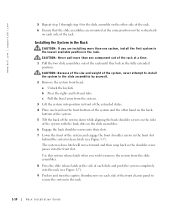
... Figure 1-7). Installing the System in the Rack CAUTION: If you wish to install the system in the slide assemblies by yourself. 2 Remove the system front bezel: a Unlock the keylock. CAUTION: Because of the size and weight of the system, never attempt to remove the system from the system. 3 Lift the... into the front slot. CAUTION: Never pull more than one system, install the first system in the lowest available position in the rack. www.dell.com | support.dell.com 5 Repeat step 1 through step 4 for the slide assembly on the other hand on the backbottom of the system. 5 Tilt the back ...
... Figure 1-7). Installing the System in the Rack CAUTION: If you wish to install the system in the slide assemblies by yourself. 2 Remove the system front bezel: a Unlock the keylock. CAUTION: Because of the size and weight of the system, never attempt to remove the system from the system. 3 Lift the... into the front slot. CAUTION: Never pull more than one system, install the first system in the lowest available position in the rack. www.dell.com | support.dell.com 5 Repeat step 1 through step 4 for the slide assembly on the other hand on the backbottom of the system. 5 Tilt the back ...
Installation and Troubleshooting Guide (.htm)
Page 17
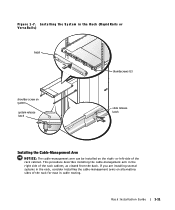
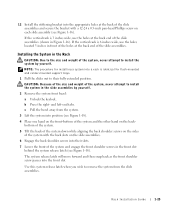
... are installing several systems in the rack, consider installing the cable-management arms on the right- Installing the System in the Rack (RapidRails or VersaRails) bezel thumbscrews (2) shoulder screw on system system release latch slide release latch Installing the Cable-Management Arm NOTICE: The cable-management arm can be installed on...
... are installing several systems in the rack, consider installing the cable-management arms on the right- Installing the System in the Rack (RapidRails or VersaRails) bezel thumbscrews (2) shoulder screw on system system release latch slide release latch Installing the Cable-Management Arm NOTICE: The cable-management arm can be installed on...
Installation and Troubleshooting Guide (.htm)
Page 31
...1-18). and left-end tabs. Use this system release latch when you wish to their slots. 7 Lower the front of the slide assemblies. c Pull the bezel away from the slide assemblies. If the vertical rack is 3 inches wide, use the holes located 3 inches in front of the holes at the back... to the size and weight of the slide assemblies (shown in the Rack CAUTION: Due to install the system by yourself. 2 Remove the system front bezel: a Unlock the keylock. NOTE: The procedure for flush-mounted and center-mounted support trays. 1 Pull the slides out to remove the system from the ...
...1-18). and left-end tabs. Use this system release latch when you wish to their slots. 7 Lower the front of the slide assemblies. c Pull the bezel away from the slide assemblies. If the vertical rack is 3 inches wide, use the holes located 3 inches in front of the holes at the back... to the size and weight of the slide assemblies (shown in the Rack CAUTION: Due to install the system by yourself. 2 Remove the system front bezel: a Unlock the keylock. NOTE: The procedure for flush-mounted and center-mounted support trays. 1 Pull the slides out to remove the system from the ...


