Dell PowerEdge Systems Microprocessor Upgrade Guide
Page 5
Ground yourself by touching an unpainted metal surface on the chassis, such as the metal around the card-slot openings at the back of the computer, before disconnecting the cable. Doing so reduces the potential for some system models, is a cooling ...: When you are installing has a 500-megahertz (MHz) Pentium III primary microprocessor, the secondary microprocessor must be a 500-MHz Pentium III microprocessor. 1-2 Dell PowerEdge Systems - if you disconnect a cable, pull on its connector or on the cable itself. Turn off your computer and any connector pins. Also, before...
Ground yourself by touching an unpainted metal surface on the chassis, such as the metal around the card-slot openings at the back of the computer, before disconnecting the cable. Doing so reduces the potential for some system models, is a cooling ...: When you are installing has a 500-megahertz (MHz) Pentium III primary microprocessor, the secondary microprocessor must be a 500-MHz Pentium III microprocessor. 1-2 Dell PowerEdge Systems - if you disconnect a cable, pull on its connector or on the cable itself. Turn off your computer and any connector pins. Also, before...
Dell PowerEdge Systems Microprocessor Upgrade Guide
Page 12
...For instructions, see Figure 1-2) and pull the tray open to a second stop position (or service position). To...of the chassis. To install the upgrade mounting tray assembly (provided in your upgrade kit) in your PowerEdge 4300 system, perform the preceding steps in this document. Microprocessor Upgrade 1-9 Remove the system board mounting ...out again, you slide the system board and mounting tray assembly completely out of the chassis. g. support.dell.com Dell PowerEdge Systems - Record the locations and disconnect all the expansion cards. a. d. e. Lay the tray assembly with...
...For instructions, see Figure 1-2) and pull the tray open to a second stop position (or service position). To...of the chassis. To install the upgrade mounting tray assembly (provided in your upgrade kit) in your PowerEdge 4300 system, perform the preceding steps in this document. Microprocessor Upgrade 1-9 Remove the system board mounting ...out again, you slide the system board and mounting tray assembly completely out of the chassis. g. support.dell.com Dell PowerEdge Systems - Record the locations and disconnect all the expansion cards. a. d. e. Lay the tray assembly with...
Dell PowerEdge Systems Microprocessor Upgrade Guide
Page 19
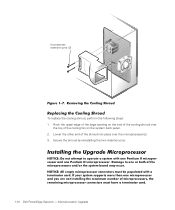
thumbscrew retention pins (2) To replace the cooling shroud, perform the following steps: 1. Microprocessor Upgrade Secure the shroud by reinstalling the two retention pins. 1-16 Dell PowerEdge Systems - Hook the upper edge of the large opening on the system back panel. 2. Lower the other end of the cooling fan on the end of the cooling shroud over the top of the shroud into place over the microprocessor(s). 3.
thumbscrew retention pins (2) To replace the cooling shroud, perform the following steps: 1. Microprocessor Upgrade Secure the shroud by reinstalling the two retention pins. 1-16 Dell PowerEdge Systems - Hook the upper edge of the large opening on the system back panel. 2. Lower the other end of the cooling fan on the end of the cooling shroud over the top of the shroud into place over the microprocessor(s). 3.
Dell PowerEdge Systems Microprocessor Upgrade Guide
Page 21
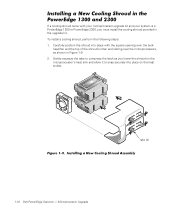
Microprocessor Upgrade If a cooling shroud came with the square opening over the microprocessors, as you must install the cooling shroud provided in Figure 1-9. 2. Carefully position the shroud into place on the microprocessor's heat sink and ... shroud's other end resting over the bulk- Gently squeeze the tabs to snap securely into place with your microprocessor upgrade kit and your system is a PowerEdge 1300 or PowerEdge 2300, you lower the shroud on the heat sink(s). To install a cooling shroud, perform the following steps: 1. tabs (4) 1-18...
Microprocessor Upgrade If a cooling shroud came with the square opening over the microprocessors, as you must install the cooling shroud provided in Figure 1-9. 2. Carefully position the shroud into place on the microprocessor's heat sink and ... shroud's other end resting over the bulk- Gently squeeze the tabs to snap securely into place with your microprocessor upgrade kit and your system is a PowerEdge 1300 or PowerEdge 2300, you lower the shroud on the heat sink(s). To install a cooling shroud, perform the following steps: 1. tabs (4) 1-18...


