
Dell OptiPlex 9030 All-In-One Owners Manual
Page 3
... Removing the Converter Board...16 Installing the Converter Board...17 Removing the Coin-Cell Battery...18 Installing the Coin-Cell Battery...18 Removing the Optical Drive...18 Installing the Optical Drive...20 Removing the Hard Drive...20 Installing the Hard Drive...21 Removing the Intrusion Switch...22 Installing the Intrusion Switch...23 Removing the Wireless Local Area Network (WLAN) Card 23 Installing the WLAN Card...24 Removing the Heatsink Assembly...24 Installing the Heatsink Assembly...24 Removing the Processor Fan...25 Installing the Processor Fan...26 Removing the Power-Supply Fan...
... Removing the Converter Board...16 Installing the Converter Board...17 Removing the Coin-Cell Battery...18 Installing the Coin-Cell Battery...18 Removing the Optical Drive...18 Installing the Optical Drive...20 Removing the Hard Drive...20 Installing the Hard Drive...21 Removing the Intrusion Switch...22 Installing the Intrusion Switch...23 Removing the Wireless Local Area Network (WLAN) Card 23 Installing the WLAN Card...24 Removing the Heatsink Assembly...24 Installing the Heatsink Assembly...24 Removing the Processor Fan...25 Installing the Processor Fan...26 Removing the Power-Supply Fan...

Dell OptiPlex 9030 All-In-One Owners Manual
Page 4
... 29 Installing the Power Supply Unit...30 Removing the Processor...31 Installing the Processor...31 Removing the Speakers...32 Installing the Speakers...33 Removing the System Board...34 System Board Layout...35 Installing the System Board...36 Removing the Display Panel...37 Installing the Display Panel...39 Removing the Camera...40 Installing the Camera...41 3 System Setup...42 Boot Sequence...42 Navigation Keys...42 System Setup Options...43 Updating the BIOS ...53 System and Setup Password...54 Assigning a System Password and Setup Password 54 Deleting or Changing an...
... 29 Installing the Power Supply Unit...30 Removing the Processor...31 Installing the Processor...31 Removing the Speakers...32 Installing the Speakers...33 Removing the System Board...34 System Board Layout...35 Installing the System Board...36 Removing the Display Panel...37 Installing the Display Panel...39 Removing the Camera...40 Installing the Camera...41 3 System Setup...42 Boot Sequence...42 Navigation Keys...42 System Setup Options...43 Updating the BIOS ...53 System and Setup Password...54 Assigning a System Password and Setup Password 54 Deleting or Changing an...
Dell OptiPlex 9030 All-In-One Owners Manual
Page 5
... to servicing that is not authorized by Dell is not covered by your warranty. After you are correctly oriented and aligned. if you finish working inside the computer, replace all power sources before connecting to avoid bending any connector pins. CAUTION: To avoid electrostatic discharge, ground yourself by using a wrist grounding strap or by a certified service technician. CAUTION: Handle components and cards with...
... to servicing that is not authorized by Dell is not covered by your warranty. After you are correctly oriented and aligned. if you finish working inside the computer, replace all power sources before connecting to avoid bending any connector pins. CAUTION: To avoid electrostatic discharge, ground yourself by using a wrist grounding strap or by a certified service technician. CAUTION: Handle components and cards with...

Dell OptiPlex 9030 All-In-One Owners Manual
Page 6
... plastic scribe 6 Ensure that your work , periodically touch an unpainted metal surface to ground the system board. 6. Disconnect all attached devices from being scratched. 2. Remove the cover. CAUTION: Before touching anything inside the computer. 1. CAUTION: To disconnect a network cable, first unplug the cable from your computer and all network cables from the network device. 3. Press and hold the power button while the computer is flat...
... plastic scribe 6 Ensure that your work , periodically touch an unpainted metal surface to ground the system board. 6. Disconnect all attached devices from being scratched. 2. Remove the cover. CAUTION: Before touching anything inside the computer. 1. CAUTION: To disconnect a network cable, first unplug the cable from your computer and all network cables from the network device. 3. Press and hold the power button while the computer is flat...

Dell OptiPlex 9030 All-In-One Owners Manual
Page 7
... click Settings. Click Start . 2. Replace the cover. or 1. After Working Inside Your Computer After you complete any replacement procedure, ensure you connect any telephone or network cables to your computer and all attached devices to turn off . Ensure that the computer works correctly by running the Dell Diagnostics. 7 CAUTION: To connect a network cable, first plug the cable into the network device and then plug it into the computer. 2. Turn on your computer. 1. Shut down your operating...
... click Settings. Click Start . 2. Replace the cover. or 1. After Working Inside Your Computer After you complete any replacement procedure, ensure you connect any telephone or network cables to your computer and all attached devices to turn off . Ensure that the computer works correctly by running the Dell Diagnostics. 7 CAUTION: To connect a network cable, first plug the cable into the network device and then plug it into the computer. 2. Turn on your computer. 1. Shut down your operating...

Dell OptiPlex 9030 All-In-One Owners Manual
Page 9
2 Removing and Installing Components This section provides detailed information on -screen display (OSD) buttons board 9. Inside View - 1 1. speaker cover 5. power-supply fan bracket 12. VESA mount bracket 9 I/O board shield 4. power-supply fan 7. optical drive 11. power-supply unit 13. system board shield 2. converter board 8. power-supply diagnostic board 6. memory shield 3. intrusion switch 10. System Overview Figure 1. power and on how to remove or install the components from your computer.
2 Removing and Installing Components This section provides detailed information on -screen display (OSD) buttons board 9. Inside View - 1 1. speaker cover 5. power-supply fan bracket 12. VESA mount bracket 9 I/O board shield 4. power-supply fan 7. optical drive 11. power-supply unit 13. system board shield 2. converter board 8. power-supply diagnostic board 6. memory shield 3. intrusion switch 10. System Overview Figure 1. power and on how to remove or install the components from your computer.

Dell OptiPlex 9030 All-In-One Owners Manual
Page 21
... hard-drive case to release it from the hard-drive cage [2]. Align and place the hard-drive cage on the hard- Tighten the screws that secure the hard-drive cage to the computer [1]. Connect the hard-drive cables to the computer. 5. 4. c. Thread the cables into the notches on the computer. 4. Perform the following steps as shown in the illustration: a. Press down on the hard-drive cage. 6. Installing the Hard Drive...
... hard-drive case to release it from the hard-drive cage [2]. Align and place the hard-drive cage on the hard- Tighten the screws that secure the hard-drive cage to the computer [1]. Connect the hard-drive cables to the computer. 5. 4. c. Thread the cables into the notches on the computer. 4. Perform the following steps as shown in the illustration: a. Press down on the hard-drive cage. 6. Installing the Hard Drive...

Dell OptiPlex 9030 All-In-One Owners Manual
Page 36
... Working Inside Your Computer. 36 memory i. VESA stand 5. USB 3.0 connectors 17. Line-out connector 11. HDMI connector 18. heatsink 20. Connect all the cables to the base panel. 4. Tighten the screws to secure the system board to the system board. 3. input/output (I/O) board shield d. hard drive g. optical drive h. display port 10. USB 2.0 connector 14. USB 3.0 connectors 6. network connector 15. 4. audio connector 7. back cover l. SATA HDD connector 9. system-board shield j. memory card reader 5. USB 2.0 connector 16. power-supply fan b. SATA ODD connector...
... Working Inside Your Computer. 36 memory i. VESA stand 5. USB 3.0 connectors 17. Line-out connector 11. HDMI connector 18. heatsink 20. Connect all the cables to the base panel. 4. Tighten the screws to secure the system board to the system board. 3. input/output (I/O) board shield d. hard drive g. optical drive h. display port 10. USB 2.0 connector 14. USB 3.0 connectors 6. network connector 15. 4. audio connector 7. back cover l. SATA HDD connector 9. system-board shield j. memory card reader 5. USB 2.0 connector 16. power-supply fan b. SATA ODD connector...
Dell OptiPlex 9030 All-In-One Owners Manual
Page 42
The boot sequence screen also displays the option to a specific device (for example: optical drive or hard drive). During the Power-on Self Test (POST), when the Dell logo appears, you can boot from including the diagnostic option. NOTE: For most of the system setup options, changes that you add or remove hardware • View the system hardware configuration • Enable or disable integrated devices • Set performance and power management thresholds • Manage your computer hardware and specify BIOS‐level options. Navigation Keys The...
The boot sequence screen also displays the option to a specific device (for example: optical drive or hard drive). During the Power-on Self Test (POST), when the Dell logo appears, you can boot from including the diagnostic option. NOTE: For most of the system setup options, changes that you add or remove hardware • View the system hardware configuration • Enable or disable integrated devices • Set performance and power management thresholds • Manage your computer hardware and specify BIOS‐level options. Navigation Keys The...
Dell OptiPlex 9030 All-In-One Owners Manual
Page 43
... graphics browser only. Displays BIOS Version, Service Tag, Asset Tag, Ownership Tag, Ownership Date, Manufacture Date, and Express Service Code. • Memory Information - To change the boot options order. You should enable the Legacy Option ROMs to the next focus area. Moves to the previous page till you to find an operating system. Displays the System Setup help file. Displays Processor Type, Core Count, Processor ID, Current Clock Speed, Minimum Clock Speed...
... graphics browser only. Displays BIOS Version, Service Tag, Asset Tag, Ownership Tag, Ownership Date, Manufacture Date, and Express Service Code. • Memory Information - To change the boot options order. You should enable the Legacy Option ROMs to the next focus area. Moves to the previous page till you to find an operating system. Displays the System Setup help file. Displays Processor Type, Core Count, Processor ID, Current Clock Speed, Minimum Clock Speed...
Dell OptiPlex 9030 All-In-One Owners Manual
Page 44
... enable UEFI network stack, UEFI network protocols will load. You can set the date and time. This option is disabled by default. • Enabled w/Cloud Desktop NOTE: Depending on the current boot mode and type of option ROMs in this option, only UEFI option ROMs will be used without PXE turned on the operating system of PXE boot (Legacy PXE or UEFI PXE) depends on the computer and its installed devices, the items listed...
... enable UEFI network stack, UEFI network protocols will load. You can set the date and time. This option is disabled by default. • Enabled w/Cloud Desktop NOTE: Depending on the current boot mode and type of option ROMs in this option, only UEFI option ROMs will be used without PXE turned on the operating system of PXE boot (Legacy PXE or UEFI PXE) depends on the computer and its installed devices, the items listed...
Dell OptiPlex 9030 All-In-One Owners Manual
Page 45
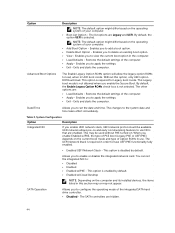
...-One system. • Disable OSD buttons - If USB port is selected. By default, the Enable Audio option is disabled, the operation system cannot see any type of the options are reported during system startup. SATA is configured for 2 ports All of USB mass storage devices (HDD, memory key, floppy). This technology is selected by default. This option is part of these settings. USB Configuration This field configures the integrated USB controller. Audio NOTE: USB keyboard and mouse always work in the BIOS setup irrespective of the SMART (Self Monitoring...
...-One system. • Disable OSD buttons - If USB port is selected. By default, the Enable Audio option is disabled, the operation system cannot see any type of the options are reported during system startup. SATA is configured for 2 ports All of USB mass storage devices (HDD, memory key, floppy). This technology is selected by default. This option is part of these settings. USB Configuration This field configures the integrated USB controller. Audio NOTE: USB keyboard and mouse always work in the BIOS setup irrespective of the SMART (Self Monitoring...
Dell OptiPlex 9030 All-In-One Owners Manual
Page 47
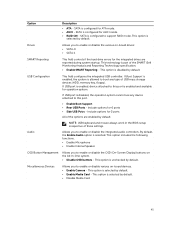
... default. • On-Silent Allows you control whether the Trusted Platform Module (TPM) in the system is set . This field lets you to determine whether changes to this option take effect immediately. Allows you activate or disable the BIOS module interface of the processor. • Enable CPU XD Support - Changes to the system and hard disk passwords are set . • Allow Non-Admin Password Changes - This option will be displayed...
... default. • On-Silent Allows you control whether the Trusted Platform Module (TPM) in the system is set . This field lets you to determine whether changes to this option take effect immediately. Allows you activate or disable the BIOS module interface of the processor. • Enable CPU XD Support - Changes to the system and hard disk passwords are set . • Allow Non-Admin Password Changes - This option will be displayed...

Dell OptiPlex 9030 All-In-One Owners Manual
Page 48
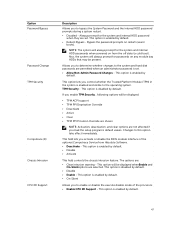
... enter setup when an admin password is selected by default. Deletes the selected key • Reset All Keys- This option is selected by default. • One-Time Enable - This option is set. • Enable Admin Setup Lockout - selected file • Append from File- This option is enabled by default. • KEK • db • dbx If you access the Option Read Only Memory (OROM) configuration screens via the hotkey. Option Dell Encryption OROM Keyboard Access Admin Setup Lockout HDD...
... enter setup when an admin password is selected by default. Deletes the selected key • Reset All Keys- This option is selected by default. • One-Time Enable - This option is set. • Enable Admin Setup Lockout - selected file • Append from File- This option is enabled by default. • KEK • db • dbx If you access the Option Read Only Memory (OROM) configuration screens via the hotkey. Option Dell Encryption OROM Keyboard Access Admin Setup Lockout HDD...
Dell OptiPlex 9030 All-In-One Owners Manual
Page 49
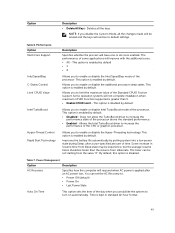
... state of the Standard CPUID Fuction support. Performance Option Multi Core Support Intel SpeedStep C-States Control Limit CPUID Value Intel TurboBoost Hyper-Thread Control Rapid Start Technology Description Specifies whether the process will have one or all the changes made will restore to increase the performance of the processor. Allows you disable the Custom Mode, all cores enabled. Allows the Intel TurboBoost driver to default settings.
... state of the Standard CPUID Fuction support. Performance Option Multi Core Support Intel SpeedStep C-States Control Limit CPUID Value Intel TurboBoost Hyper-Thread Control Rapid Start Technology Description Specifies whether the process will have one or all the changes made will restore to increase the performance of the processor. Allows you disable the Custom Mode, all cores enabled. Allows the Intel TurboBoost driver to default settings.

Dell OptiPlex 9030 All-In-One Owners Manual
Page 50
... - This option allows the computer to disabled. This option is disabled by default. If this setting and must be enabled in S4 and S5- Option Deep Sleep Control Fan Control Override USB Wake Support Wake on days selected above at the time you specified above . POST Behavior Option Numlock LED Keyboard Errors Fastboot Description (hour:minutes:seconds). The system will power up from the off your computer using the switch on a power strip or...
... - This option allows the computer to disabled. This option is disabled by default. If this setting and must be enabled in S4 and S5- Option Deep Sleep Control Fan Control Override USB Wake Support Wake on days selected above at the time you specified above . POST Behavior Option Numlock LED Keyboard Errors Fastboot Description (hour:minutes:seconds). The system will power up from the off your computer using the switch on a power strip or...
Dell OptiPlex 9030 All-In-One Owners Manual
Page 53
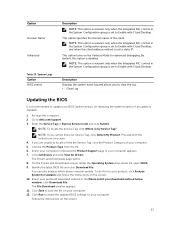
... Enable with Cloud Desktop. Enter the Service Tag or Express Service Code and click Submit. Click Run to update your BIOS (system setup), on your computer appears. 7. This option specifies the domain name of your computer. 12. To do this option is recommended to install the updated BIOS settings on the screen. 10. The File Download window appears. 11. NOTE: If you to dell.com/support. 3. On the Drivers and Downloads screen, under the Operating...
... Enable with Cloud Desktop. Enter the Service Tag or Express Service Code and click Submit. Click Run to update your BIOS (system setup), on your computer appears. 7. This option specifies the domain name of your computer. 12. To do this option is recommended to install the updated BIOS settings on the screen. 10. The File Download window appears. 11. NOTE: If you to dell.com/support. 3. On the Drivers and Downloads screen, under the Operating...
Dell OptiPlex 9030 All-In-One Owners Manual
Page 57
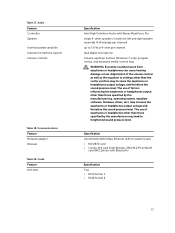
... the manufacturer(e.g. Specification Intel 10/100/1000 Mbps Ethernet LAN on system board • M.2 2230 card • combo M.2 card (Intel Wireless 7260 M.2 PCIe WLAN card (802.11n/ac) with Waves MaxxVoice Pro single 4-ohms speakers in both the left and right speaker assembly (4 W average per channel dual digital microphone Volume up/down buttons (Windows 7 only), program menus, and keyboard media-control keys WARNING: Excessive sound pressure from earphones...
... the manufacturer(e.g. Specification Intel 10/100/1000 Mbps Ethernet LAN on system board • M.2 2230 card • combo M.2 card (Intel Wireless 7260 M.2 PCIe WLAN card (802.11n/ac) with Waves MaxxVoice Pro single 4-ohms speakers in both the left and right speaker assembly (4 W average per channel dual digital microphone Volume up/down buttons (Windows 7 only), program menus, and keyboard media-control keys WARNING: Excessive sound pressure from earphones...

Dell OptiPlex 9030 All-In-One Owners Manual
Page 58
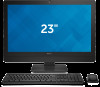
.... Ports and Connectors Feature Audio: Network adapter USB 2.0 (Front/Rear/Internal) USB 3.0 (Front/Rear/Internal) Video HDMI Media card reader Table 23. Displays Feature Type Maximum resolution Refresh rate Brightness Operating angle Pixel pitch Controls Table 21. Power Feature 185 Watt PSU Frequency Voltage Input current 58 Specification 23-inch full-HD WLED 1920 x 1080 60 Hz Brightness up/down buttons 178 horizontal / 178 vertical 0.2652 mm on-screen controls Specification one 2.5-inch SATA hard drive or one DVD-ROM SATA drive or DVD+/- one 2.5-inch SATA drive with...
.... Ports and Connectors Feature Audio: Network adapter USB 2.0 (Front/Rear/Internal) USB 3.0 (Front/Rear/Internal) Video HDMI Media card reader Table 23. Displays Feature Type Maximum resolution Refresh rate Brightness Operating angle Pixel pitch Controls Table 21. Power Feature 185 Watt PSU Frequency Voltage Input current 58 Specification 23-inch full-HD WLED 1920 x 1080 60 Hz Brightness up/down buttons 178 horizontal / 178 vertical 0.2652 mm on-screen controls Specification one 2.5-inch SATA hard drive or one DVD-ROM SATA drive or DVD+/- one 2.5-inch SATA drive with...

Optiplex 9030 AIO Statement of Volatility
Page 1
... One media card slot: J56 Non Volatile memory Yes N/A System On System Non Volatile memory 512 No N/A memory memory Bytes. Stores CMOS information. Statement of data and tells you how to avoid the problem. The Dell OptiPlex 9030 AIO contains both volatile and non-volatile (NV) components. SMSC5555 Panel EDID U29 Non-volatile memory, 1024 No N/A & setting in 2K bytes of on-chip ROM for embedded keyboard controller 256...
... One media card slot: J56 Non Volatile memory Yes N/A System On System Non Volatile memory 512 No N/A memory memory Bytes. Stores CMOS information. Statement of data and tells you how to avoid the problem. The Dell OptiPlex 9030 AIO contains both volatile and non-volatile (NV) components. SMSC5555 Panel EDID U29 Non-volatile memory, 1024 No N/A & setting in 2K bytes of on-chip ROM for embedded keyboard controller 256...


