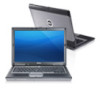
Owner's Manual
Page 1
Dell Latitude ST Owner's Manual Regulatory Model: T02G Regulatory Type: T02G001
Dell Latitude ST Owner's Manual Regulatory Model: T02G Regulatory Type: T02G001

Owner's Manual
Page 3
... Stylus Battery and Pen Tip 11 Electronic Pen Usage...11 Using the Pen as a Mouse...11 Using the Pen as a Pen...11 Tablet PC Input Panel...12 Working With Files...12 Entering Text...12 Pen Flicks...13 Touch Usage...14 Docking Station...15 3 Removing The SD Memory Card 17 Installing The SD Memory Card...17 4 Removing The Digitizer Pen...19 Installing The Digitizer Pen...19 5 Removing The...
... Stylus Battery and Pen Tip 11 Electronic Pen Usage...11 Using the Pen as a Mouse...11 Using the Pen as a Pen...11 Tablet PC Input Panel...12 Working With Files...12 Entering Text...12 Pen Flicks...13 Touch Usage...14 Docking Station...15 3 Removing The SD Memory Card 17 Installing The SD Memory Card...17 4 Removing The Digitizer Pen...19 Installing The Digitizer Pen...19 5 Removing The...

Owner's Manual
Page 4
... Wireless Wide Area Network (WWAN) Card 31 Installing The Wireless Wide Area Network (WWAN) Card 32 11 Removing The Internal Storage Device (Solid State Drive 33 Installing The Internal Storage Device (Solid State Drive 33 12 Removing The Coin-Cell Battery 35 Installing The Coin-Cell Battery...35 13 Removing The Speaker...37 Installing The Speaker...38 14 Removing The Middle Frame Assembly 39 Installing The Middle Frame Assembly...40 15 Removing The Camera...41 Installing...
... Wireless Wide Area Network (WWAN) Card 31 Installing The Wireless Wide Area Network (WWAN) Card 32 11 Removing The Internal Storage Device (Solid State Drive 33 Installing The Internal Storage Device (Solid State Drive 33 12 Removing The Coin-Cell Battery 35 Installing The Coin-Cell Battery...35 13 Removing The Speaker...37 Installing The Speaker...38 14 Removing The Middle Frame Assembly 39 Installing The Middle Frame Assembly...40 15 Removing The Camera...41 Installing...
Owner's Manual
Page 7
... its edges, not by performing the removal procedure in on the locking tabs before you pull connectors apart, keep them evenly aligned to prevent the computer cover from being scratched. 2. As you connect a cable, ensure that your work surface is connected to servicing that shipped with your product documentation, or as the optional Media Base or Battery Slice, undock it. NOTE: The...
... its edges, not by performing the removal procedure in on the locking tabs before you pull connectors apart, keep them evenly aligned to prevent the computer cover from being scratched. 2. As you connect a cable, ensure that your work surface is connected to servicing that shipped with your product documentation, or as the optional Media Base or Battery Slice, undock it. NOTE: The...
Owner's Manual
Page 8
... turn off your operating system, press and hold the power button for other Dell computers. 8 CAUTION: To avoid damage to the computer, use batteries designed for about 4 seconds to turn off when you connect any replacement procedure, ensure you shut down the operating system. 2. After Working Inside Your Computer After you complete any external devices, cards, and cables before you turn them off . Do not use only the battery...
... turn off your operating system, press and hold the power button for other Dell computers. 8 CAUTION: To avoid damage to the computer, use batteries designed for about 4 seconds to turn off when you connect any replacement procedure, ensure you shut down the operating system. 2. After Working Inside Your Computer After you complete any external devices, cards, and cables before you turn them off . Do not use only the battery...
Owner's Manual
Page 9
... and light to be configured with the manageability, security and compatibility of a laptop. Check Boxes Visual identifier in Touch Mode used for right-clicking purposes. 9 Input Device-Sensitive Tablet Input Panel and icon change size according to a standard mouse pointer. The Latitude ST , opens a new category of tablet platforms that address the unique needs of business users like: • Business class security, manageability and virtualization support • Intel Atom CPU...
... and light to be configured with the manageability, security and compatibility of a laptop. Check Boxes Visual identifier in Touch Mode used for right-clicking purposes. 9 Input Device-Sensitive Tablet Input Panel and icon change size according to a standard mouse pointer. The Latitude ST , opens a new category of tablet platforms that address the unique needs of business users like: • Business class security, manageability and virtualization support • Intel Atom CPU...
Owner's Manual
Page 10
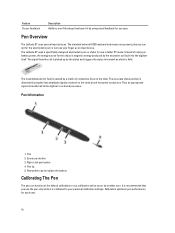
... as an input device. Right-click pen button 4. The standard external USB keyboard and mouse are present, plus you can function at the default calibration or at a calibration set by you or by another user. The Latitude ST uses a specifically designed electrostatic pen or...battery power, the energy source for the stylus is determined using visual feedback for each user. 10 The signal from the coil is recommended that you use in tablet PC mode. It is picked up by the stylus and triggers the stylus to the digitizer's on the vertical and horizontal conductors. Pen 2. Removable...
... as an input device. Right-click pen button 4. The standard external USB keyboard and mouse are present, plus you can function at the default calibration or at a calibration set by you or by another user. The Latitude ST uses a specifically designed electrostatic pen or...battery power, the energy source for the stylus is determined using visual feedback for each user. 10 The signal from the coil is recommended that you use in tablet PC mode. It is picked up by the stylus and triggers the stylus to the digitizer's on the vertical and horizontal conductors. Pen 2. Removable...

Owner's Manual
Page 11
... external USB keyboard and mouse are present, plus you can use the pen the same way you to use your Tablet Same as an input device. Using the Pen as a right-click on the stylus pen head. On the Calibrate pen or touch input screens, select Pen input. Install a new pen tip on a mouse. Same as a Pen The handwriting recognition software makes it easy to enter...
... external USB keyboard and mouse are present, plus you can use the pen the same way you to use your Tablet Same as an input device. Using the Pen as a right-click on the stylus pen head. On the Calibrate pen or touch input screens, select Pen input. Install a new pen tip on a mouse. Same as a Pen The handwriting recognition software makes it easy to enter...
Owner's Manual
Page 12
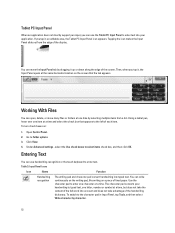
... use the Tablet PC Input Panel to enter text into your handwriting to typed text, one time by character. 12 Working With Files You can open, delete, or move the Input Panel tab by dragging it , the Input Panel opens at one letter, number or symbol at a time, but does not take the context of the screen. To switch to the character pad...
... use the Tablet PC Input Panel to enter text into your handwriting to typed text, one time by character. 12 Working With Files You can open, delete, or move the Input Panel tab by dragging it , the Input Panel opens at one letter, number or symbol at a time, but does not take the context of the screen. To switch to the character pad...
Owner's Manual
Page 13
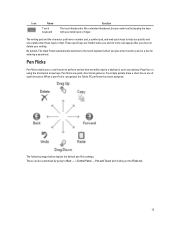
... settings. Pen Flicks Pen flicks enable you to use the pen to write, but you quickly and accurately enter these types of eight directions. Icon Name Touch keyboard Function The touch keyboard is recognized, the Tablet PC performs the action assigned. These quick keys are quick, directional gestures. These can be customized by tapping the keys with your writing. By default, The Input Panel automatically switches to Start → > Control Panel...
... settings. Pen Flicks Pen flicks enable you to use the pen to write, but you quickly and accurately enter these types of eight directions. Icon Name Touch keyboard Function The touch keyboard is recognized, the Tablet PC performs the action assigned. These quick keys are quick, directional gestures. These can be customized by tapping the keys with your writing. By default, The Input Panel automatically switches to Start → > Control Panel...
Owner's Manual
Page 30
... restart the computer. a) Connect a USB keyboard to Save settings and Exit. WLAN will be performed to the color code on the WLAN. Install the label door. 7. b) Press the key at the Dell logo to load defaults. Install the battery. 5. c) Select to "Enter Setup". Optionally if the Latitude ST unit is shipped from the factory without a LAN driver and the driver is installed manually, you will connect automatically after windows starts up. 30 Connect the antennas according...
... restart the computer. a) Connect a USB keyboard to Save settings and Exit. WLAN will be performed to the color code on the WLAN. Install the label door. 7. b) Press the key at the Dell logo to load defaults. Install the battery. 5. c) Select to "Enter Setup". Optionally if the Latitude ST unit is shipped from the factory without a LAN driver and the driver is installed manually, you will connect automatically after windows starts up. 30 Connect the antennas according...
Owner's Manual
Page 33
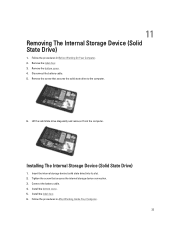
... cover. 4. Remove the label door. 3. Insert the internal storage device (solid state drive) into its slot. 2. Follow the procedures in After Working Inside Your Computer. 33 Install the bottom cover. 5. Follow the procedures in Before Working On Your Computer. 2. Connect the battery cable. 4. Tighten the screw that secures the solid state drive to the computer. 6. Installing The Internal Storage Device (Solid State Drive) 1. 11 Removing The Internal Storage Device (Solid State Drive) 1. Remove...
... cover. 4. Remove the label door. 3. Insert the internal storage device (solid state drive) into its slot. 2. Follow the procedures in After Working Inside Your Computer. 33 Install the bottom cover. 5. Follow the procedures in Before Working On Your Computer. 2. Connect the battery cable. 4. Tighten the screw that secures the solid state drive to the computer. 6. Installing The Internal Storage Device (Solid State Drive) 1. 11 Removing The Internal Storage Device (Solid State Drive) 1. Remove...

Owner's Manual
Page 51
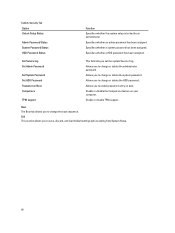
... user password. • read the current amount of memory or set the type of hard drive installed. • check battery health. 20 System Setup System Setup Overview System Setup allows you to: • change the system configuration information after you add, change, or remove any hardware in the Options Field are changeable. 51 Turn on your current settings. When the blue DELL logo is recommended that the keyboard has initialized. Before you use...
... user password. • read the current amount of memory or set the type of hard drive installed. • check battery health. 20 System Setup System Setup Overview System Setup allows you to: • change the system configuration information after you add, change, or remove any hardware in the Options Field are changeable. 51 Turn on your current settings. When the blue DELL logo is recommended that the keyboard has initialized. Before you use...
Owner's Manual
Page 52
... Setup. Help Appears on the computer's internal clock. Hard Drive Network Diagnostics and Enter Setup options are attempting to boot to a particular device or to initiate a one-time boot menu with a list of the System Setup window and contains help information about the Processor cache size 52 The following keys to navigate through the System Setup screens: Keystroke Action < F2 > Displays information on any changes to display. - BIOS Version Displays the BIOS revision. CPU Speed Displays...
... Setup. Help Appears on the computer's internal clock. Hard Drive Network Diagnostics and Enter Setup options are attempting to boot to a particular device or to initiate a one-time boot menu with a list of the System Setup window and contains help information about the Processor cache size 52 The following keys to navigate through the System Setup screens: Keystroke Action < F2 > Displays information on any changes to display. - BIOS Version Displays the BIOS revision. CPU Speed Displays...
Owner's Manual
Page 53
... size. USB Wake Support Allows USB devices to an AC power source. Virtualization Enable or disable the Intel Virtualization feature. Advanced Tab Option Function Intel SpeedStep Enable or disable the Intel SpeedStep Default: Enabled feature. Express Charge A Dell fast charging technology. Security The Security tab displays the security status and allows you enable or disable various on LAN Allows you to manage the security features of the computer. Option Fixed HDD System Memory Extended Memory Memory Speed...
... size. USB Wake Support Allows USB devices to an AC power source. Virtualization Enable or disable the Intel Virtualization feature. Advanced Tab Option Function Intel SpeedStep Enable or disable the Intel SpeedStep Default: Enabled feature. Express Charge A Dell fast charging technology. Security The Security tab displays the security status and allows you enable or disable various on LAN Allows you to manage the security features of the computer. Option Fixed HDD System Memory Extended Memory Memory Speed...
Owner's Manual
Page 54
... change the boot sequence. Set Service tag Set Admin Password Set System Password Set HDD Password Password on your computer. Boot The Boot tab allows you set the system Service Tag. Enable or disable the Computrace feature on Boot Computrace TPM support This field lets you to save, discard, and load default settings before exiting from System Setup. 54 Specifies whether a system password has been assigned. Table 6. Security Tab Option Unlock Setup Status Admin Password Status System Password Status HDD Password...
... change the boot sequence. Set Service tag Set Admin Password Set System Password Set HDD Password Password on your computer. Boot The Boot tab allows you set the system Service Tag. Enable or disable the Computrace feature on Boot Computrace TPM support This field lets you to save, discard, and load default settings before exiting from System Setup. 54 Specifies whether a system password has been assigned. Table 6. Security Tab Option Unlock Setup Status Admin Password Status System Password Status HDD Password...
Owner's Manual
Page 55
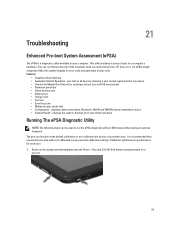
... any media (hard drive, CD drive, etc.). displays cable connectivity, Bluetooth, WLAN and WWAN devices installation status • System Health - Power on your personal calibration settings. runs test on all devices, allowing a user to boot into a full OS environment • Notebook panel test • Video memory test • Battery test • Charger test • Fan test • Event log scan • Multiprocessor cache test • Configuration - This utility includes a series of tests for a computer's hardware.
... any media (hard drive, CD drive, etc.). displays cable connectivity, Bluetooth, WLAN and WWAN devices installation status • System Health - Power on your personal calibration settings. runs test on all devices, allowing a user to boot into a full OS environment • Notebook panel test • Video memory test • Battery test • Charger test • Fan test • Event log scan • Multiprocessor cache test • Configuration - This utility includes a series of tests for a computer's hardware.
Owner's Manual
Page 57
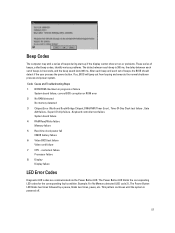
... failure System board failure, covers BIOS corruption or ROM error 2 No RAM detected No memory detected 3 Chipset Error (North and South Bridge Chipset, DMA/IMR/ Timer Error) , Time-Of-Day Clock test failure , Gate A20 failure , Super I/O chip failure , Keyboard controller test failure System board failure 4 RAM Read/Write failure Memory failure 5 Real-time clock power fail CMOS battery failure 6 Video BIOS test failure Video card failure 7 CPU - The Power Button LED blinks the corresponding LED codes for...
... failure System board failure, covers BIOS corruption or ROM error 2 No RAM detected No memory detected 3 Chipset Error (North and South Bridge Chipset, DMA/IMR/ Timer Error) , Time-Of-Day Clock test failure , Gate A20 failure , Super I/O chip failure , Keyboard controller test failure System board failure 4 RAM Read/Write failure Memory failure 5 Real-time clock power fail CMOS battery failure 6 Video BIOS test failure Video card failure 7 CPU - The Power Button LED blinks the corresponding LED codes for...
Owner's Manual
Page 58
... multi touch functionality: N-trig Software Bundle Not Installed Troubleshooting Steps: 1. Code Cause and Troubleshooting Steps 1 System board: BIOS ROM failure System board failure, covers BIOS corruption or ROM error 2 Memory No memory/RAM detected 3 Chipset Error (North and South Bridge Chipset, DMA/IMR/ Timer Error) , Time-Of-Day Clock test failure , Gate A20 failure , Super I/O chip failure , Keyboard controller test failure System board failure 4 RAM Read/Write failure Memory failure 5 Real-time clock power fail CMOS battery failure 6 Video BIOS...
... multi touch functionality: N-trig Software Bundle Not Installed Troubleshooting Steps: 1. Code Cause and Troubleshooting Steps 1 System board: BIOS ROM failure System board failure, covers BIOS corruption or ROM error 2 Memory No memory/RAM detected 3 Chipset Error (North and South Bridge Chipset, DMA/IMR/ Timer Error) , Time-Of-Day Clock test failure , Gate A20 failure , Super I/O chip failure , Keyboard controller test failure System board failure 4 RAM Read/Write failure Memory failure 5 Real-time clock power fail CMOS battery failure 6 Video BIOS...
Owner's Manual
Page 59
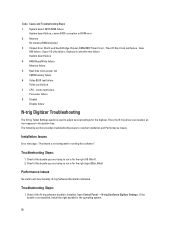
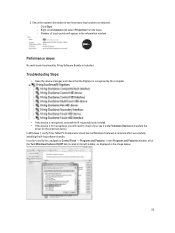
... verify this, navigate to see it under Unknown Devices and update the driver for the unknown device. In the Programs and Features window, click the Turn Windows Features On/Off link, located in the left sidebar, as displayed in the information window Performance issues No multi touch functionality: N-trig Software Bundle Is Installed Troubleshooting Steps: • Open the device manager and check that the Digitizer is recognized by...
... verify this, navigate to see it under Unknown Devices and update the driver for the unknown device. In the Programs and Features window, click the Turn Windows Features On/Off link, located in the left sidebar, as displayed in the information window Performance issues No multi touch functionality: N-trig Software Bundle Is Installed Troubleshooting Steps: • Open the device manager and check that the Digitizer is recognized by...


