User Manual
Page 2
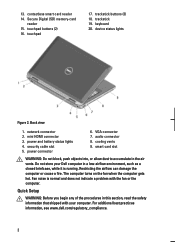
... section, read the safety information that shipped with the fan or the computer. Do not store your computer. 13. trackstick 19. keyboard 20. device status lights Figure 2. power and battery status lights 4. VGA connector 7. audio connector 8. Restricting the airflow can damage the... computer or cause a fire. Fan noise is normal and does not indicate a problem with your Dell computer in a low-airflow environment, such as a closed briefcase, while it is running. touchpad buttons (2) 16. power connector 6. cooling vents ...
... section, read the safety information that shipped with the fan or the computer. Do not store your computer. 13. trackstick 19. keyboard 20. device status lights Figure 2. power and battery status lights 4. VGA connector 7. audio connector 8. Restricting the airflow can damage the... computer or cause a fire. Fan noise is normal and does not indicate a problem with your Dell computer in a low-airflow environment, such as a closed briefcase, while it is running. touchpad buttons (2) 16. power connector 6. cooling vents ...
User Manual
Page 3
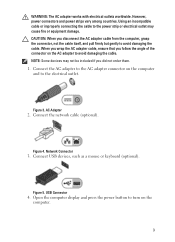
... computer display and press the power button to the electrical outlet. Connect the network cable (optional). Network Connector 3. Connect USB devices, such as a mouse or keyboard (optional). Figure 5. Connect the AC adapter to the AC adapter connector on the computer and to turn on the AC adapter to avoid damaging the...
... computer display and press the power button to the electrical outlet. Connect the network cable (optional). Network Connector 3. Connect USB devices, such as a mouse or keyboard (optional). Figure 5. Connect the AC adapter to the AC adapter connector on the computer and to turn on the AC adapter to avoid damaging the...
Owners Manual
Page 4
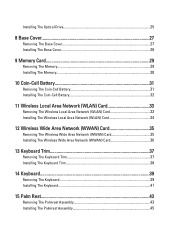
... The Wireless Wide Area Network (WWAN) Card 35 Installing The Wireless Wide Area Network (WWAN) Card 36 13 Keyboard Trim 37 Removing The Keyboard Trim 37 Installing The Keyboard Trim 38 14 Keyboard 39 Removing The Keyboard 39 Installing The Keyboard 41 15 Palm Rest 43 Removing The Palmrest Assembly 43 Installing The Palmrest Assembly 45
... The Wireless Wide Area Network (WWAN) Card 35 Installing The Wireless Wide Area Network (WWAN) Card 36 13 Keyboard Trim 37 Removing The Keyboard Trim 37 Installing The Keyboard Trim 38 14 Keyboard 39 Removing The Keyboard 39 Installing The Keyboard 41 15 Palm Rest 43 Removing The Palmrest Assembly 43 Installing The Palmrest Assembly 45
Owners Manual
Page 37
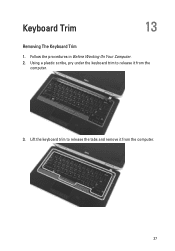
Using a plastic scribe, pry under the keyboard trim to release the tabs and remove it from the computer. 37 Lift the keyboard trim to release it from the computer. 3. Follow the procedures in Before Working On Your Computer. 2. Keyboard Trim 13 Removing The Keyboard Trim 1.
Using a plastic scribe, pry under the keyboard trim to release the tabs and remove it from the computer. 37 Lift the keyboard trim to release it from the computer. 3. Follow the procedures in Before Working On Your Computer. 2. Keyboard Trim 13 Removing The Keyboard Trim 1.

Owners Manual
Page 38
Follow the procedures in After Working Inside Your Computer. 38 Align the keyboard trim with the keyboard and snap it into place. 2. Installing The Keyboard Trim 1.
Follow the procedures in After Working Inside Your Computer. 38 Align the keyboard trim with the keyboard and snap it into place. 2. Installing The Keyboard Trim 1.
Owners Manual
Page 39
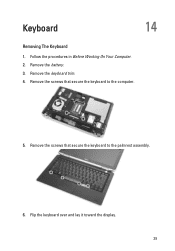
Follow the procedures in Before Working On Your Computer. 2. Flip the keyboard over and lay it toward the display. 39 Keyboard 14 Removing The Keyboard 1. Remove the battery. 3. Remove the screws that secure the keyboard to the palmrest assembly. 6. Remove the keyboard trim. 4. Remove the screws that secure the keyboard to the computer. 5.
Follow the procedures in Before Working On Your Computer. 2. Flip the keyboard over and lay it toward the display. 39 Keyboard 14 Removing The Keyboard 1. Remove the battery. 3. Remove the screws that secure the keyboard to the palmrest assembly. 6. Remove the keyboard trim. 4. Remove the screws that secure the keyboard to the computer. 5.
Owners Manual
Page 40
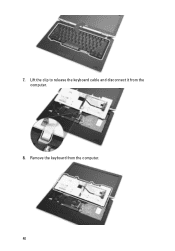
Remove the keyboard from the computer. 8. 7. Lift the clip to release the keyboard cable and disconnect it from the computer. 40
Remove the keyboard from the computer. 8. 7. Lift the clip to release the keyboard cable and disconnect it from the computer. 40
Owners Manual
Page 41
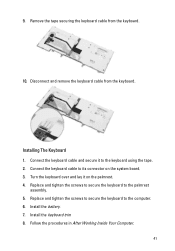
.... 5. Replace and tighten the screws to secure the keyboard to the computer. 6. Disconnect and remove the keyboard cable from the keyboard. 10. Turn the keyboard over and lay it to its connector on the palmrest. 4. Installing The Keyboard 1. Remove the tape securing the keyboard cable from the keyboard. Follow the procedures in After Working Inside Your Computer...
.... 5. Replace and tighten the screws to secure the keyboard to the computer. 6. Disconnect and remove the keyboard cable from the keyboard. 10. Turn the keyboard over and lay it to its connector on the palmrest. 4. Installing The Keyboard 1. Remove the tape securing the keyboard cable from the keyboard. Follow the procedures in After Working Inside Your Computer...
Owners Manual
Page 43
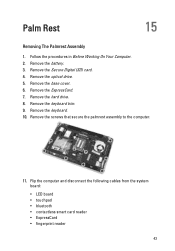
Remove the Secure Digital (SD) card. 4. Remove the keyboard trim. 9. Follow the procedures in Before Working On Your Computer. 2. Remove the hard drive. 8. Remove the screws that secure the palmrest assembly to the computer. ...; LED board • touchpad • bluetooth • contactless smart card reader • ExpressCard • fingerprint reader 43 Remove the battery. 3. Remove the ExpressCard. 7. Remove the keyboard. 10. Remove the base cover. 6. Remove the optical drive. 5. Palm Rest 15 Removing The Palmrest Assembly 1.
Remove the Secure Digital (SD) card. 4. Remove the keyboard trim. 9. Follow the procedures in Before Working On Your Computer. 2. Remove the hard drive. 8. Remove the screws that secure the palmrest assembly to the computer. ...; LED board • touchpad • bluetooth • contactless smart card reader • ExpressCard • fingerprint reader 43 Remove the battery. 3. Remove the ExpressCard. 7. Remove the keyboard. 10. Remove the base cover. 6. Remove the optical drive. 5. Palm Rest 15 Removing The Palmrest Assembly 1.
Owners Manual
Page 45
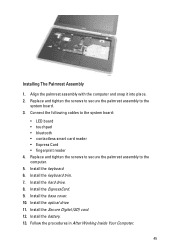
...; Express Card • fingerprint reader 4. Install the optical drive. 11. Connect the following cables to the computer. 5. Install the keyboard trim. 7. Install the hard drive. 8. Install the base cover. 10. Install the keyboard. 6. Install the Secure Digital (SD) card. 12. Follow the procedures in After Working Inside Your Computer. 45 Align the...
...; Express Card • fingerprint reader 4. Install the optical drive. 11. Connect the following cables to the computer. 5. Install the keyboard trim. 7. Install the hard drive. 8. Install the base cover. 10. Install the keyboard. 6. Install the Secure Digital (SD) card. 12. Follow the procedures in After Working Inside Your Computer. 45 Align the...
Owners Manual
Page 47
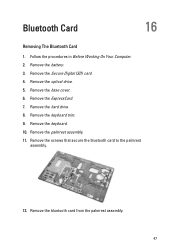
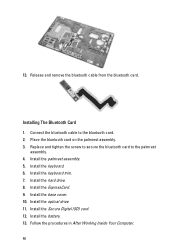
Remove the ExpressCard. 7. Bluetooth Card 16 Removing The Bluetooth Card 1. Remove the keyboard trim. 9. Remove the bluetooth card from the palmrest assembly. 47 Remove the Secure Digital (SD) card. 4. Remove the optical drive. 5. Remove the keyboard. 10. Remove the screws that secure the bluetooth card to the palmrest assembly. 12. Remove the hard drive. 8. Remove the palmrest assembly. 11. Remove the base cover. 6. Follow the procedures in Before Working On Your Computer. 2. Remove the battery. 3.
Remove the ExpressCard. 7. Bluetooth Card 16 Removing The Bluetooth Card 1. Remove the keyboard trim. 9. Remove the bluetooth card from the palmrest assembly. 47 Remove the Secure Digital (SD) card. 4. Remove the optical drive. 5. Remove the keyboard. 10. Remove the screws that secure the bluetooth card to the palmrest assembly. 12. Remove the hard drive. 8. Remove the palmrest assembly. 11. Remove the base cover. 6. Follow the procedures in Before Working On Your Computer. 2. Remove the battery. 3.
Owners Manual
Page 48
.... 7. Install the battery. 13. Follow the procedures in After Working Inside Your Computer. 48 Install the palmrest assembly. 5. Install the ExpressCard. 9. 13. Install the keyboard. 6. Replace and tighten the screw to secure the bluetooth card to the bluetooth card. 2. Install the base cover. 10. Connect the bluetooth cable to the ...
.... 7. Install the battery. 13. Follow the procedures in After Working Inside Your Computer. 48 Install the palmrest assembly. 5. Install the ExpressCard. 9. 13. Install the keyboard. 6. Replace and tighten the screw to secure the bluetooth card to the bluetooth card. 2. Install the base cover. 10. Connect the bluetooth cable to the ...
Owners Manual
Page 49
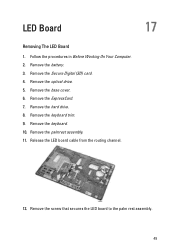
Remove the base cover. 6. Remove the ExpressCard. 7. Remove the screw that secures the LED board to the palm rest assembly. 49 Remove the keyboard trim. 9. Remove the optical drive. 5. Release the LED board cable from the routing channel. 12. Remove the Secure Digital (SD) card. 4. Remove the hard drive. 8. Remove the keyboard. 10. LED Board 17 Removing The LED Board 1. Follow the procedures in Before Working On Your Computer. 2. Remove the battery. 3. Remove the palmrest assembly. 11.
Remove the base cover. 6. Remove the ExpressCard. 7. Remove the screw that secures the LED board to the palm rest assembly. 49 Remove the keyboard trim. 9. Remove the optical drive. 5. Release the LED board cable from the routing channel. 12. Remove the Secure Digital (SD) card. 4. Remove the hard drive. 8. Remove the keyboard. 10. LED Board 17 Removing The LED Board 1. Follow the procedures in Before Working On Your Computer. 2. Remove the battery. 3. Remove the palmrest assembly. 11.
Owners Manual
Page 51
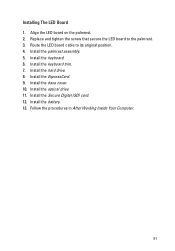
Install the palmrest assembly. 5. Install the Secure Digital (SD) card. 12. Install the hard drive. 8. Install the battery. 13. Install the optical drive. 11. Follow the procedures in After Working Inside Your Computer. 51 Installing The LED Board 1. Replace and tighten the screw that secure the LED board to its original position. 4. Install the ExpressCard. 9. Install the base cover. 10. Align the LED board on the palmrest. 2. Install the keyboard. 6. Install the keyboard trim. 7. Route the LED board cable to the palmrest. 3.
Install the palmrest assembly. 5. Install the Secure Digital (SD) card. 12. Install the hard drive. 8. Install the battery. 13. Install the optical drive. 11. Follow the procedures in After Working Inside Your Computer. 51 Installing The LED Board 1. Replace and tighten the screw that secure the LED board to its original position. 4. Install the ExpressCard. 9. Install the base cover. 10. Align the LED board on the palmrest. 2. Install the keyboard. 6. Install the keyboard trim. 7. Route the LED board cable to the palmrest. 3.
Owners Manual
Page 53
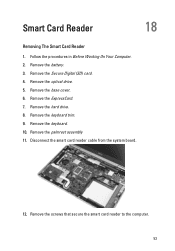
Remove the base cover. 6. Remove the palmrest assembly 11. Remove the battery. 3. Remove the hard drive. 8. Remove the keyboard. 10. Follow the procedures in Before Working On Your Computer. 2. Remove the screws that secure the smart card reader to the computer. 53 Remove the Secure Digital (SD) card. 4. Disconnect the smart card reader cable from the system board. 12. Remove the keyboard trim. 9. Remove the optical drive. 5. Remove the ExpressCard. 7. Smart Card Reader 18 Removing The Smart Card Reader 1.
Remove the base cover. 6. Remove the palmrest assembly 11. Remove the battery. 3. Remove the hard drive. 8. Remove the keyboard. 10. Follow the procedures in Before Working On Your Computer. 2. Remove the screws that secure the smart card reader to the computer. 53 Remove the Secure Digital (SD) card. 4. Disconnect the smart card reader cable from the system board. 12. Remove the keyboard trim. 9. Remove the optical drive. 5. Remove the ExpressCard. 7. Smart Card Reader 18 Removing The Smart Card Reader 1.
Owners Manual
Page 55
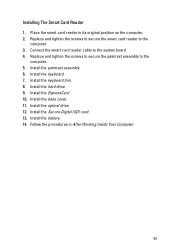
... the palmrest assembly to the system board. 4. Install the Secure Digital (SD) card. 13. Connect the smart card reader cable to the computer. 5. Install the keyboard. 7. Install the base cover. 11. Installing The Smart Card Reader 1. Install the palmrest assembly. 6. Install the battery. 14. Install the ExpressCard. 10. Follow the procedures... computer. 3. Replace and tighten the screws to secure the smart card reader to its original position on the computer. 2. Install the hard drive. 9. Install the keyboard trim. 8. Install the optical drive. 12.
... the palmrest assembly to the system board. 4. Install the Secure Digital (SD) card. 13. Connect the smart card reader cable to the computer. 5. Install the keyboard. 7. Install the base cover. 11. Installing The Smart Card Reader 1. Install the palmrest assembly. 6. Install the battery. 14. Install the ExpressCard. 10. Follow the procedures... computer. 3. Replace and tighten the screws to secure the smart card reader to its original position on the computer. 2. Install the hard drive. 9. Install the keyboard trim. 8. Install the optical drive. 12.
Owners Manual
Page 57
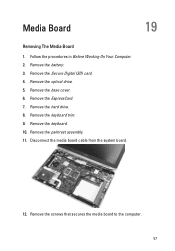
Remove the Secure Digital (SD) card. 4. Media Board 19 Removing The Media Board 1. Remove the hard drive. 8. Remove the keyboard. 10. Remove the palmrest assembly. 11. Remove the battery. 3. Remove the optical drive. 5. Remove the screws that secures the media board to the computer. 57 Remove the keyboard trim. 9. Follow the procedures in Before Working On Your Computer. 2. Remove the ExpressCard. 7. Disconnect the media board cable from the system board. 12. Remove the base cover. 6.
Remove the Secure Digital (SD) card. 4. Media Board 19 Removing The Media Board 1. Remove the hard drive. 8. Remove the keyboard. 10. Remove the palmrest assembly. 11. Remove the battery. 3. Remove the optical drive. 5. Remove the screws that secures the media board to the computer. 57 Remove the keyboard trim. 9. Follow the procedures in Before Working On Your Computer. 2. Remove the ExpressCard. 7. Disconnect the media board cable from the system board. 12. Remove the base cover. 6.
Owners Manual
Page 59
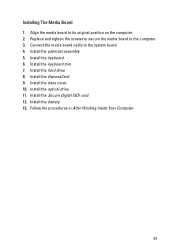
Install the palmrest assembly. 5. Install the Secure Digital (SD) card. 12. Follow the procedures in After Working Inside Your Computer. 59 Install the keyboard. 6. Install the ExpressCard. 9. Install the optical drive. 11. Install the base cover. 10. Install the battery. 13. Connect the media board cable to its original position on the computer. 2. Installing The Media Board 1. Align the media board to the system board. 4. Replace and tighten the screws to secure the media board to the computer. 3. Install the keyboard trim. 7. Install the hard drive. 8.
Install the palmrest assembly. 5. Install the Secure Digital (SD) card. 12. Follow the procedures in After Working Inside Your Computer. 59 Install the keyboard. 6. Install the ExpressCard. 9. Install the optical drive. 11. Install the base cover. 10. Install the battery. 13. Connect the media board cable to its original position on the computer. 2. Installing The Media Board 1. Align the media board to the system board. 4. Replace and tighten the screws to secure the media board to the computer. 3. Install the keyboard trim. 7. Install the hard drive. 8.
Owners Manual
Page 61
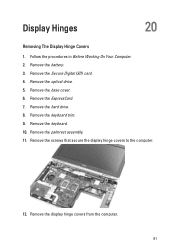
Display Hinges 20 Removing The Display Hinge Covers 1. Remove the hard drive. 8. Remove the palmrest assembly. 11. Follow the procedures in Before Working On Your Computer. 2. Remove the battery. 3. Remove the ExpressCard. 7. Remove the optical drive. 5. Remove the display hinge covers from the computer. 61 Remove the Secure Digital (SD) card. 4. Remove the keyboard trim. 9. Remove the base cover. 6. Remove the screws that secure the display hinge covers to the computer. 12. Remove the keyboard. 10.
Display Hinges 20 Removing The Display Hinge Covers 1. Remove the hard drive. 8. Remove the palmrest assembly. 11. Follow the procedures in Before Working On Your Computer. 2. Remove the battery. 3. Remove the ExpressCard. 7. Remove the optical drive. 5. Remove the display hinge covers from the computer. 61 Remove the Secure Digital (SD) card. 4. Remove the keyboard trim. 9. Remove the base cover. 6. Remove the screws that secure the display hinge covers to the computer. 12. Remove the keyboard. 10.
Owners Manual
Page 62
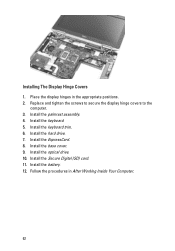
Install the hard drive. 7. Install the base cover. 9. Install the ExpressCard. 8. Install the optical drive. 10. Install the palmrest assembly. 4. Install the Secure Digital (SD) card. 11. Install the battery. 12. Install the keyboard trim. 6. Place the display hinges in After Working Inside Your Computer. 62 Install the keyboard. 5. Replace and tighten the screws to secure the display hinge covers to the computer. 3. Installing The Display Hinge Covers 1. Follow the procedures in the appropriate positions. 2.
Install the hard drive. 7. Install the base cover. 9. Install the ExpressCard. 8. Install the optical drive. 10. Install the palmrest assembly. 4. Install the Secure Digital (SD) card. 11. Install the battery. 12. Install the keyboard trim. 6. Place the display hinges in After Working Inside Your Computer. 62 Install the keyboard. 5. Replace and tighten the screws to secure the display hinge covers to the computer. 3. Installing The Display Hinge Covers 1. Follow the procedures in the appropriate positions. 2.


