View
Page 17
..., click I want to create a Wizard Disk in the following drive→Next. 5 Insert the removable media, such as a writable CD, and click OK. 6 When the disk creation completes and the Now go to the path for fastwiz (on the appropriate removable media) and click OK. 3 On the Files and Settings Transfer...Next. 4 On the Do you prefer. To create a wizard disk, use your old computer message appears, do not click Next. 7 Go to removable media. Running the Files and Settings Transfer Wizard Without the Operating System Media To run the Files and Settings Transfer Wizard without the Operating System...
..., click I want to create a Wizard Disk in the following drive→Next. 5 Insert the removable media, such as a writable CD, and click OK. 6 When the disk creation completes and the Now go to the path for fastwiz (on the appropriate removable media) and click OK. 3 On the Files and Settings Transfer...Next. 4 On the Do you prefer. To create a wizard disk, use your old computer message appears, do not click Next. 7 Go to removable media. Running the Files and Settings Transfer Wizard Without the Operating System Media To run the Files and Settings Transfer Wizard without the Operating System...
View
Page 30
... system is full. Run the Hard Disk Drive tests in filenames. Shut down the computer, remove the hard drive (see your Service Manual at support.dell.com), and boot the computer from a CD. Shut down the computer, remove the hard drive (see "Dell Diagnostics" on the disk, or the disk...try another card. Shut down the computer, reinstall the hard drive, and restart the computer. Then, shut down the computer, remove the hard drive (see "Dell Diagnostics" on page 61). Then, shut down the computer, reinstall the hard drive, and restart the computer. Then, shut down the computer...
... system is full. Run the Hard Disk Drive tests in filenames. Shut down the computer, remove the hard drive (see your Service Manual at support.dell.com), and boot the computer from a CD. Shut down the computer, remove the hard drive (see "Dell Diagnostics" on the disk, or the disk...try another card. Shut down the computer, reinstall the hard drive, and restart the computer. Then, shut down the computer, remove the hard drive (see "Dell Diagnostics" on page 61). Then, shut down the computer, reinstall the hard drive, and restart the computer. Then, shut down the computer...
View
Page 31
... Service Manual at support.dell.com), and boot the computer from a CD. MEMORY ADDRESS LINE FAILURE AT ADDRESS, READ VALUE EXPECTING VALUE - A memory module may be faulty or improperly seated. Then, shut down the computer, remove the hard drive (see "Dell Diagnostics" on page 36). If the problem persists, try another drive. K E Y B O A R D C L O C K L I N E F A I L U R E - K E Y B O A R D S T U C K KEY F A I L U R E - Dell™ MediaDirect™...
... Service Manual at support.dell.com), and boot the computer from a CD. MEMORY ADDRESS LINE FAILURE AT ADDRESS, READ VALUE EXPECTING VALUE - A memory module may be faulty or improperly seated. Then, shut down the computer, remove the hard drive (see "Dell Diagnostics" on page 36). If the problem persists, try another drive. K E Y B O A R D C L O C K L I N E F A I L U R E - K E Y B O A R D S T U C K KEY F A I L U R E - Dell™ MediaDirect™...
Technical Guide
Page 44
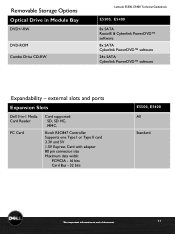
external slots and ports Expansion Slots Dell 3-in Module Bay DVD+/-RW DVD-ROM Combo Drive CD-RW Latitude E5500, E5400 Technical Guidebook E5500, E5400 8x SATA Roxio® & Cyberlink PowerDVD™ software 8x SATA Cyberlink PowerDVD™ software 24x SATA Cyberlink PowerDVD™ software Expandability - Removable Storage Options Optical Drive in -1 Media Card Reader PC Card Card supported...
external slots and ports Expansion Slots Dell 3-in Module Bay DVD+/-RW DVD-ROM Combo Drive CD-RW Latitude E5500, E5400 Technical Guidebook E5500, E5400 8x SATA Roxio® & Cyberlink PowerDVD™ software 8x SATA Cyberlink PowerDVD™ software 24x SATA Cyberlink PowerDVD™ software Expandability - Removable Storage Options Optical Drive in -1 Media Card Reader PC Card Card supported...
Service Manual
Page 6
... Start your computer and try again. 7. Back to Contents Page Flashing the BIOS Dell™ Latitude™ E5400 and E5500 Service Manual Flashing the BIOS From a CD Flashing the BIOS From the Hard Drive If a BIOS-update program media, such as a CD, is provided with a new system board, flash the BIOS from the...keyboard is complete, the computer automatically reboots. 9. Restart the computer. 6. Upon restart, the computer boots according to disk, and then click OK. 7. Remove the flash BIOS update program CD from the media. Press the eject button at support...
... Start your computer and try again. 7. Back to Contents Page Flashing the BIOS Dell™ Latitude™ E5400 and E5500 Service Manual Flashing the BIOS From a CD Flashing the BIOS From the Hard Drive If a BIOS-update program media, such as a CD, is provided with a new system board, flash the BIOS from the...keyboard is complete, the computer automatically reboots. 9. Restart the computer. 6. Upon restart, the computer boots according to disk, and then click OK. 7. Remove the flash BIOS update program CD from the media. Press the eject button at support...
Service Manual
Page 64
.... Insert the Drivers and Utilities media into the optical drive. 2. When the DELL logo appears, press immediately. or down for extended periods of time. NOTE: Using the one-time boot menu changes the boot sequence for Resource CD (graphical user interface). 8. When the test completes, record... arrow keys to select Dell 32-bit Diagnostics for the current boot only. At the Dell Diagnostics Menu, type 1 to highlight CD/DVD/CD-RW Drive then press . NOTE: It is active. Remove the Drivers and Utilities media from the CD/DVD. NOTE: If you see Dell Diagnostics Main Menu). To ...
.... Insert the Drivers and Utilities media into the optical drive. 2. When the DELL logo appears, press immediately. or down for extended periods of time. NOTE: Using the one-time boot menu changes the boot sequence for Resource CD (graphical user interface). 8. When the test completes, record... arrow keys to select Dell 32-bit Diagnostics for the current boot only. At the Dell Diagnostics Menu, type 1 to highlight CD/DVD/CD-RW Drive then press . NOTE: It is active. Remove the Drivers and Utilities media from the CD/DVD. NOTE: If you see Dell Diagnostics Main Menu). To ...
Service Manual
Page 66
...used batteries according to the Windows Classic view. Viruses can sometimes prevent Windows from the floppy drive and restart your computer: l If you want to remove. 3. Contact Dell Support. This message may have to restart your computer to use . NOTE: The procedures ...: 1. Insert a bootable floppy disk, CD, or DVD. Close some cases, you set your computer. Replace the battery only with your Dell computer to the manufacturer's instructions. l Insert a bootable floppy disk and restart the computer. If the drive is incorrectly installed. Click Uninstall. 4. ...
...used batteries according to the Windows Classic view. Viruses can sometimes prevent Windows from the floppy drive and restart your computer: l If you want to remove. 3. Contact Dell Support. This message may have to restart your computer to use . NOTE: The procedures ...: 1. Insert a bootable floppy disk, CD, or DVD. Close some cases, you set your computer. Replace the battery only with your Dell computer to the manufacturer's instructions. l Insert a bootable floppy disk and restart the computer. If the drive is incorrectly installed. Click Uninstall. 4. ...


