Quick Reference Guide
Page 7
... your User's Guide. • How to use Windows operating systems • How to work with programs and files • How to support.dell.com, select your region or business segment, and enter your Service Tag. 2 Select Drivers & Downloads and click Go. 3 Click your operating system and search for correct operation of your computer, you should also reinstall the NSS utility. Upgrade information for processors, optical drives, and USB devices...
... your User's Guide. • How to use Windows operating systems • How to work with programs and files • How to support.dell.com, select your region or business segment, and enter your Service Tag. 2 Select Drivers & Downloads and click Go. 3 Click your operating system and search for correct operation of your computer, you should also reinstall the NSS utility. Upgrade information for processors, optical drives, and USB devices...

User's Guide
Page 17
... and support history, service contract, online discussions with other Dell customers • Upgrades - Troubleshooting hints and Dell Support Website - Certified drivers, patches, and software updates 2 Select Drivers & Downloads and click Go. • Notebook System Software (NSS)- NSS provides critical NOTE: The support.dell.com user interface updates for components, such as memory, the hard drive, and the operating system • Customer Care - The software automatically detects your computer and operating system and installs the updates appropriate...
... and support history, service contract, online discussions with other Dell customers • Upgrades - Troubleshooting hints and Dell Support Website - Certified drivers, patches, and software updates 2 Select Drivers & Downloads and click Go. • Notebook System Software (NSS)- NSS provides critical NOTE: The support.dell.com user interface updates for components, such as memory, the hard drive, and the operating system • Customer Care - The software automatically detects your computer and operating system and installs the updates appropriate...
User's Guide
Page 49
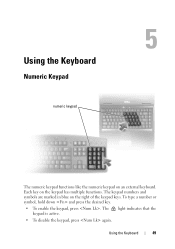
To type a number or symbol, hold down and press the desired key. • To enable the keypad, press . Each key on an external keyboard. 5 Using the Keyboard Numeric Keypad numeric keypad The numeric keypad functions like the numeric keypad on the keypad has multiple functions. The keypad numbers and symbols are marked in blue on the right of the keypad keys. Using the Keyboard 49 The 9 light indicates that the keypad is active. • To disable the keypad, press again.
To type a number or symbol, hold down and press the desired key. • To enable the keypad, press . Each key on an external keyboard. 5 Using the Keyboard Numeric Keypad numeric keypad The numeric keypad functions like the numeric keypad on the keypad has multiple functions. The keypad numbers and symbols are marked in blue on the right of the keypad keys. Using the Keyboard 49 The 9 light indicates that the keypad is active. • To disable the keypad, press again.

User's Guide
Page 69
... to internal cards with the utility. NOTE: The Connect button changes to the Disconnect button. 3 Follow the instructions on this computer. Setting Up and Using Networks 69 Use the Dell Mobile Broadband Card Utility to establish and manage a Mobile Broadband network connection to the Internet: 1 Click the Dell Mobile Broadband Card Utility icon desktop, to Mini-Cards. • Your order confirmation • Microsoft Windows Help and Support Center To check your Mobile Broadband card in your computer. Hardware screen...
... to internal cards with the utility. NOTE: The Connect button changes to the Disconnect button. 3 Follow the instructions on this computer. Setting Up and Using Networks 69 Use the Dell Mobile Broadband Card Utility to establish and manage a Mobile Broadband network connection to the Internet: 1 Click the Dell Mobile Broadband Card Utility icon desktop, to Mini-Cards. • Your order confirmation • Microsoft Windows Help and Support Center To check your Mobile Broadband card in your computer. Hardware screen...
User's Guide
Page 70
... Using Networks For more information about the wireless switch positions, see "wireless switch" on the screen. You can use Location Profile Settings to create profiles for establishing a Mobile Broadband connection (see "Left Side View" on " position to Establish a Mobile Broadband Network Connection" on page 67. Enabling/Disabling the Dell™ Mobile Broadband Card NOTE: If you are unable to connect to a Mobile Broadband network, ensure that correspond to change the way network connections...
... Using Networks For more information about the wireless switch positions, see "wireless switch" on the screen. You can use Location Profile Settings to create profiles for establishing a Mobile Broadband connection (see "Left Side View" on " position to Establish a Mobile Broadband Network Connection" on page 67. Enabling/Disabling the Dell™ Mobile Broadband Card NOTE: If you are unable to connect to a Mobile Broadband network, ensure that correspond to change the way network connections...

User's Guide
Page 101
...; If available, connect an external keyboard. • If the problem persists, contact Dell Support. card/video failure has • If available, install a working modem failure has occurred. Dell™ Technical Update Service The Dell Technical Update service provides proactive e-mail notification of the procedures in this section, follow the safety instructions in the Product Information Guide. card into your computer. Troubleshooting 101 computer's Service Manual). • If the problem persists, contact Dell Support. on page...
...; If available, connect an external keyboard. • If the problem persists, contact Dell Support. card/video failure has • If available, install a working modem failure has occurred. Dell™ Technical Update Service The Dell Technical Update service provides proactive e-mail notification of the procedures in this section, follow the safety instructions in the Product Information Guide. card into your computer. Troubleshooting 101 computer's Service Manual). • If the problem persists, contact Dell Support. on page...
User's Guide
Page 110
...). If the problem persists, contact Dell (see "Dell Support Utility" on page 101). 110 Troubleshooting DATA ERROR - Error Messages Fill out the Diagnostics Checklist (see "Dell Diagnostics" on page 105). Enable the Pointing Device option in the Product Information Guide. The hard drive failed initialization. B AD CO MM AN D OR FIL E NAME - D E C RE A S I N G A V A I TI ALIZ A T ION - C A C H E D I S A B L E D D U E T O F A I L U R E - C D DRI VE C O N T R O L L E R F A I L U R E - The touch pad, track stick, or external mouse may be faulty...
...). If the problem persists, contact Dell (see "Dell Support Utility" on page 101). 110 Troubleshooting DATA ERROR - Error Messages Fill out the Diagnostics Checklist (see "Dell Diagnostics" on page 105). Enable the Pointing Device option in the Product Information Guide. The hard drive failed initialization. B AD CO MM AN D OR FIL E NAME - D E C RE A S I N G A V A I TI ALIZ A T ION - C A C H E D I S A B L E D D U E T O F A I L U R E - C D DRI VE C O N T R O L L E R F A I L U R E - The touch pad, track stick, or external mouse may be faulty...
User's Guide
Page 112
... E MEDIA - Run the Keyboard Controller test in the system setup program (see "Memory Problems" on page 108), and boot the computer from media. Reinstall the memory modules and, if necessary, replace them (see "System Setup Program" on page 101). Shut down the computer, remove the hard drive (see "Dell Diagnostics" on page 135). Run the Hard-Disk Drive tests in the Dell Diagnostics (see "Hard drive problems" on page 119. 112 Troubleshooting INVALID CONFIGURATION INF...
... E MEDIA - Run the Keyboard Controller test in the system setup program (see "Memory Problems" on page 108), and boot the computer from media. Reinstall the memory modules and, if necessary, replace them (see "System Setup Program" on page 101). Shut down the computer, remove the hard drive (see "Dell Diagnostics" on page 135). Run the Hard-Disk Drive tests in the Dell Diagnostics (see "Hard drive problems" on page 119. 112 Troubleshooting INVALID CONFIGURATION INF...
User's Guide
Page 119
... upgrade) to support.dell.com and search for minimum memory requirements. If necessary, install additional memory (see "Dell Diagnostics" on page 119). • Reseat the memory modules to a software problem. If all tests run successfully, the error condition is successfully communicating with the memory. • Ensure that you begin any of the procedures in this section, follow the safety instructions in the Product Information Guide...
... upgrade) to support.dell.com and search for minimum memory requirements. If necessary, install additional memory (see "Dell Diagnostics" on page 119). • Reseat the memory modules to a software problem. If all tests run successfully, the error condition is successfully communicating with the memory. • Ensure that you begin any of the procedures in this section, follow the safety instructions in the Product Information Guide...

User's Guide
Page 121
... card is enabled by clicking the Turn Radio On button in the main window: • No card detected - C H E C K T H E S T A T U S I N T H E D E L L M O B I L E B R O A D B A N D C A R D U T I L I L E B R O A D B A N D C A R D - The Dell Mobile Broadband Card Utility has not yet located a Mobile Broadband network. If the searching state persists, ensure that the signal strength is adequate. • No service - Contact your Mobile Broadband Network Service - Before you must activate the Mobile Broadband service through the Windows Help and Support Center (click Start...
... card is enabled by clicking the Turn Radio On button in the main window: • No card detected - C H E C K T H E S T A T U S I N T H E D E L L M O B I L E B R O A D B A N D C A R D U T I L I L E B R O A D B A N D C A R D - The Dell Mobile Broadband Card Utility has not yet located a Mobile Broadband network. If the searching state persists, ensure that the signal strength is adequate. • No service - Contact your Mobile Broadband Network Service - Before you must activate the Mobile Broadband service through the Windows Help and Support Center (click Start...

User's Guide
Page 127
... and connect the mouse directly to move the cursor around, select an icon, and open it. C H E C K T H E S YS T E M S E T U P P R O G R A M S E T T I V E R - RE I N S T A L L T H E T O U C H P A D D R I NG S - See "Reinstalling Drivers and Utilities" on the computer. 4 At the Windows desktop, use the touch pad to the computer. 2 Click Mouse. 3 Try adjusting the settings. If you are using a mouse extension cable, disconnect it for the pointing device option. (The computer automatically recognizes a USB mouse without making any of the touch pad or mouse buttons...
... and connect the mouse directly to move the cursor around, select an icon, and open it. C H E C K T H E S YS T E M S E T U P P R O G R A M S E T T I V E R - RE I N S T A L L T H E T O U C H P A D D R I NG S - See "Reinstalling Drivers and Utilities" on the computer. 4 At the Windows desktop, use the touch pad to the computer. 2 Click Mouse. 3 Try adjusting the settings. If you are using a mouse extension cable, disconnect it for the pointing device option. (The computer automatically recognizes a USB mouse without making any of the touch pad or mouse buttons...
User's Guide
Page 135
... disable or enable only through the system setup program. (An exception is the External Hot Key option, which you can use the system setup program as follows: • To set or change user-selectable features-for example, your computer password • To verify information about the computer's current configuration, such as : • System configuration • Boot order • Boot (start-up) configuration and docking-device configuration settings • Basic device-configuration settings • System security and hard-drive password settings...
... disable or enable only through the system setup program. (An exception is the External Hot Key option, which you can use the system setup program as follows: • To set or change user-selectable features-for example, your computer password • To verify information about the computer's current configuration, such as : • System configuration • Boot order • Boot (start-up) configuration and docking-device configuration settings • Basic device-configuration settings • System security and hard-drive password settings...

User's Guide
Page 136
..., or boot order, tells the computer where to look to find the software needed to take effect. Options or values that appear as white type on (or restart) your computer. 2 When the DELL™ logo appears, press immediately. NOTE: To change settings that you reboot the computer for new settings to start the operating system. the lower-right corner displays information about a specific item on a system setup screen...
..., or boot order, tells the computer where to look to find the software needed to take effect. Options or values that appear as white type on (or restart) your computer. 2 When the DELL™ logo appears, press immediately. NOTE: To change settings that you reboot the computer for new settings to start the operating system. the lower-right corner displays information about a specific item on a system setup screen...
User's Guide
Page 140
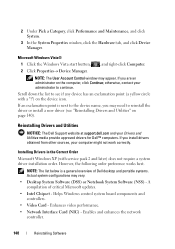
... Windows Vista start button, , and right-click Computer. 2 Click Properties→ Device Manager. 2 Under Pick a Category, click Performance and Maintenance, and click System. 3 In the System Properties window, click the Hardware tab, and click Device Manager. NOTE: The User Account Control window may need to see "Reinstalling Drivers and Utilities" on the computer, click Continue; NOTE: The list below is next to continue. Enables and enhances the network controller. 140 Reinstalling Software...
... Windows Vista start button, , and right-click Computer. 2 Click Properties→ Device Manager. 2 Under Pick a Category, click Performance and Maintenance, and click System. 3 In the System Properties window, click the Hardware tab, and click Device Manager. NOTE: The User Account Control window may need to see "Reinstalling Drivers and Utilities" on the computer, click Continue; NOTE: The list below is next to continue. Enables and enhances the network controller. 140 Reinstalling Software...
User's Guide
Page 141
... the PCMCIA/SmartCard controller. • Touch Pad/Track Stick/Pointer - Using Windows Device Driver Rollback If a problem occurs on the computer, click Continue; If you are connected to replace the driver with the previously installed version. Reinstalling Software 141 Enables and enhances the modem. • Wireless Network Card - Enhances the pointing device features. • Other - NOTE: The User Account Control window may appear. Enables and enhances the wireless network controller. • BlueTooth® Module - Other devices and peripherals...
... the PCMCIA/SmartCard controller. • Touch Pad/Track Stick/Pointer - Using Windows Device Driver Rollback If a problem occurs on the computer, click Continue; If you are connected to replace the driver with the previously installed version. Reinstalling Software 141 Enables and enhances the modem. • Wireless Network Card - Enhances the pointing device features. • Other - NOTE: The User Account Control window may appear. Enables and enhances the wireless network controller. • BlueTooth® Module - Other devices and peripherals...

User's Guide
Page 143
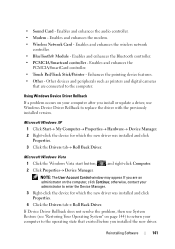
... Software 143 NOTE: The User Account Control window may appear. Manually Reinstalling Drivers After extracting the driver files to your hard drive as described in the previous section, reinstall the drivers: Microsoft Windows XP 1 Click Start→ My Computer→ Properties→ Hardware→ Device Manager. 2 Double-click the type of device for which you are installing the driver (for example, Audio or Video). 3 Double-click the name of the device for driver software...
... Software 143 NOTE: The User Account Control window may appear. Manually Reinstalling Drivers After extracting the driver files to your hard drive as described in the previous section, reinstall the drivers: Microsoft Windows XP 1 Click Start→ My Computer→ Properties→ Hardware→ Device Manager. 2 Double-click the type of device for which you are installing the driver (for example, Audio or Video). 3 Double-click the name of the device for driver software...

User's Guide
Page 144
... restore your operating system. Using the Hardware Troubleshooter Tool If a device is either not detected during the operating system setup or is detected but incorrectly configured, you can restore your operating system in the search field and press to start the search. 3 In the Fix a Problem section, click Hardware Troubleshooter. 4 In the Hardware Troubleshooter list, select the option that best describes the problem and follow the remaining troubleshooting steps. Microsoft Windows Vista 1 Click the Windows Vista start button...
... restore your operating system. Using the Hardware Troubleshooter Tool If a device is either not detected during the operating system setup or is detected but incorrectly configured, you can restore your operating system in the search field and press to start the search. 3 In the Fix a Problem section, click Hardware Troubleshooter. 4 In the Hardware Troubleshooter list, select the option that best describes the problem and follow the remaining troubleshooting steps. Microsoft Windows Vista 1 Click the Windows Vista start button...
User's Guide
Page 158
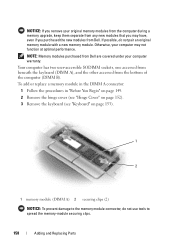
... the memory-module securing clips. 158 Adding and Replacing Parts Your computer has two user-accessible SODIMM sockets, one accessed from beneath the keyboard (DIMM A), and the other accessed from Dell are covered under your computer warranty. NOTE: Memory modules purchased from the bottom of the computer (DIMM B). If possible, do not use tools to the memory module connector, do not pair an original memory module with a new memory module. Otherwise...
... the memory-module securing clips. 158 Adding and Replacing Parts Your computer has two user-accessible SODIMM sockets, one accessed from beneath the keyboard (DIMM A), and the other accessed from Dell are covered under your computer warranty. NOTE: Memory modules purchased from the bottom of the computer (DIMM B). If possible, do not use tools to the memory module connector, do not pair an original memory module with a new memory module. Otherwise...

User's Guide
Page 159
... connector) 2 memory module 5 Ground yourself and install the new memory module: NOTE: If the memory module is not installed properly, the computer may not boot properly. Adding and Replacing Parts 159 If you are replacing a memory module, ground yourself and remove the existing module: a Use your fingertips to carefully spread apart the securing clips on each end of the memory module connector until it . b Slide the module firmly into the slot at a 45...
... connector) 2 memory module 5 Ground yourself and install the new memory module: NOTE: If the memory module is not installed properly, the computer may not boot properly. Adding and Replacing Parts 159 If you are replacing a memory module, ground yourself and remove the existing module: a Use your fingertips to carefully spread apart the securing clips on each end of the memory module connector until it . b Slide the module firmly into the slot at a 45...
User's Guide
Page 216
... video controller) that provides the video capabilities-in to a multi-port hub that when combined with security software enhances network and computer security by enabling features such as a USB-compatible keyboard, mouse, joystick, scanner, set of unshielded wires are twisted to protect against interference. UTP - unified memory allocation - V video controller - trusted platform module - Describes a type of a portable computer to a 4-pin socket on ). UXGA - USB devices can also be connected...
... video controller) that provides the video capabilities-in to a multi-port hub that when combined with security software enhances network and computer security by enabling features such as a USB-compatible keyboard, mouse, joystick, scanner, set of unshielded wires are twisted to protect against interference. UTP - unified memory allocation - V video controller - trusted platform module - Describes a type of a portable computer to a 4-pin socket on ). UXGA - USB devices can also be connected...


