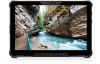
SIM/eSIM Setup Guide for Windows
Page 4
To activate cellular service, you must provide the device IMEI and ICCID to your mobile operator is displayed next to the cellular network icon. NOTE: The name of your selected WWAN service provider. Connect to a cellular data network for location and access instructions, go to https://www.dell.com/support/ and enter the model number in Search support. 3. For more information, see Cellular settings in Windows. 4 Install the SIM card and connect to the cellular network service Turn off...
To activate cellular service, you must provide the device IMEI and ICCID to your mobile operator is displayed next to the cellular network icon. NOTE: The name of your selected WWAN service provider. Connect to a cellular data network for location and access instructions, go to https://www.dell.com/support/ and enter the model number in Search support. 3. For more information, see Cellular settings in Windows. 4 Install the SIM card and connect to the cellular network service Turn off...

Service Manual
Page 3
... of Latitude 7230 Rugged Extreme Tablet 13 Batteries...15 Lithium-ion battery precautions...15 Removing the batteries...15 Installing the batteries...16 Subscriber Identification Module (SIM) card...17 Removing the uSIM...17 Inserting the uSIM...18 Stylus...19 Removing the stylus...19 Installing the stylus...20 Handle...21 Removing the handle...21 Installing the handle...22 Back-cover assembly...23 Removing the base-cover assembly...23 Installing the base-cover assembly...26 M.2 solid-state drive...28 Removing the...
... of Latitude 7230 Rugged Extreme Tablet 13 Batteries...15 Lithium-ion battery precautions...15 Removing the batteries...15 Installing the batteries...16 Subscriber Identification Module (SIM) card...17 Removing the uSIM...17 Inserting the uSIM...18 Stylus...19 Removing the stylus...19 Installing the stylus...20 Handle...21 Removing the handle...21 Installing the handle...22 Back-cover assembly...23 Removing the base-cover assembly...23 Installing the base-cover assembly...26 M.2 solid-state drive...28 Removing the...

Service Manual
Page 7
... has successfully entered Service Mode. only. Ensure that your tablet, if applicable. 8. If the AC adapter is connected to continue. Remove the AC adapter and then press any key to a docking device (docked) such as the mobile keyboard or a docking station, undock it. 5. e. Range as touching a connector on the keyboard and press the power button for use these external connections in a hazardous location: POGO ports, smart card reader, SIM-card slot, mini-RS232 port, USB 3.0 port, DC-in Removing the back-cover assembly...
... has successfully entered Service Mode. only. Ensure that your tablet, if applicable. 8. If the AC adapter is connected to continue. Remove the AC adapter and then press any key to a docking device (docked) such as the mobile keyboard or a docking station, undock it. 5. e. Range as touching a connector on the keyboard and press the power button for use these external connections in a hazardous location: POGO ports, smart card reader, SIM-card slot, mini-RS232 port, USB 3.0 port, DC-in Removing the back-cover assembly...
Service Manual
Page 80
... computer work incorrectly. Use the BIOS Setup program for future reference. Navigation keys Keys Up arrow Down arrow Enter Spacebar Tab Navigation Moves to the previous field. Expands or collapses a drop-down the BIOS Setup program screen information for the following purposes: ● Get information about the hardware installed in the field. One time boot menu To enter one time boot menu, turn on (or restart) your computer, such as the user password, type...
... computer work incorrectly. Use the BIOS Setup program for future reference. Navigation keys Keys Up arrow Down arrow Enter Spacebar Tab Navigation Moves to the previous field. Expands or collapses a drop-down the BIOS Setup program screen information for the following purposes: ● Get information about the hardware installed in the field. One time boot menu To enter one time boot menu, turn on (or restart) your computer, such as the user password, type...
Service Manual
Page 88
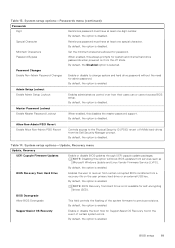
... disabled. System setup options-Passwords menu Passwords Admin Password System Password M.2 PCIe SSD-0 Password Configuration Upper Case Letter Set, change, or delete the administrator password. System setup options-Security menu (continued) Security PPI Bypass for clear Commands option is disabled. 88 BIOS setup Clear Firmware Device Tamper Detection By default, the option is disabled. Table 13. By default, the option is disabled. Reinforces password must have at least one upper case letter. Data Wipe on Next Boot Start Data Wipe Enable or disable the data...
... disabled. System setup options-Passwords menu Passwords Admin Password System Password M.2 PCIe SSD-0 Password Configuration Upper Case Letter Set, change, or delete the administrator password. System setup options-Security menu (continued) Security PPI Bypass for clear Commands option is disabled. 88 BIOS setup Clear Firmware Device Tamper Detection By default, the option is disabled. Table 13. By default, the option is disabled. Reinforces password must have at least one upper case letter. Data Wipe on Next Boot Start Data Wipe Enable or disable the data...
Service Manual
Page 89
By default, the option is enabled. By default, the option is disabled. Master Password Lockout Enable Master Password Lockout When enabled, this always prompts for system and internal hard drive passwords when powered on the user primary hard drive or an external USB key. NOTE: BIOS Recovery from Hard Drive is enabled. By default, the option is selected. By default, the Disabled option is enabled. NOTE: Disabling this option will block BIOS updates from a recovery file on from the Dell Security Manager prompt. By default, the option is disabled. Special...
By default, the option is enabled. By default, the option is disabled. Master Password Lockout Enable Master Password Lockout When enabled, this always prompts for system and internal hard drive passwords when powered on the user primary hard drive or an external USB key. NOTE: BIOS Recovery from Hard Drive is enabled. By default, the option is selected. By default, the Disabled option is enabled. NOTE: Disabling this option will block BIOS updates from a recovery file on from the Dell Security Manager prompt. By default, the option is disabled. Special...

Service Manual
Page 94
... access the One-Time Boot Menu, select BIOS Update using a bootable USB drive or you copied the flash into a USB port of the Dell computers built after the BIOS update is copied to perform the BIOS update flash process from Windows using the mouse or arrow keys then press Enter. Updating from the One-Time boot menu To update your computer. If the option is displayed. 3. Turn on -screen instructions to flash the BIOS. 7. From a turn off the computer during the BIOS update process. Select the file...
... access the One-Time Boot Menu, select BIOS Update using a bootable USB drive or you copied the flash into a USB port of the Dell computers built after the BIOS update is copied to perform the BIOS update flash process from Windows using the mouse or arrow keys then press Enter. Updating from the One-Time boot menu To update your computer. If the option is displayed. 3. Turn on -screen instructions to flash the BIOS. 7. From a turn off the computer during the BIOS update process. Select the file...
Service Manual
Page 99
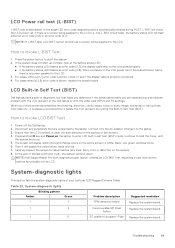
... does not start the system. 2. Power off the Dell laptop. 2. Disconnect any lines, fuzzy color or distortion on the screen). 8. Connect only the AC adapter (charger) to invoke L-BIST Test: 1. At the end of your Latitude 7230 Rugged Extreme Tablet. Table 23. L-BIST will display solid colors and change colors on the surface of the LCD. For cases, when a [2,7] error code is shown, check to see if the display cable is...
... does not start the system. 2. Power off the Dell laptop. 2. Disconnect any lines, fuzzy color or distortion on the screen). 8. Connect only the AC adapter (charger) to invoke L-BIST Test: 1. At the end of your Latitude 7230 Rugged Extreme Tablet. Table 23. L-BIST will display solid colors and change colors on the surface of the LCD. For cases, when a [2,7] error code is shown, check to see if the display cable is...
Service Manual
Page 100
... code flow errors Disconnect all power source (AC, battery, coin cell) and drain flea power by pressing and holding down power button for 3~5 seconds. Non-RPMC Flash on Boot Guard fused system CPU failure ● Run the Dell Support Assist/Dell Diagnostics tool. ● If problem persists, replace the system board. Memory/RAM failure ● Reset and swap memory modules among the slots. ● If problem persists, replace the memory module. Replace...
... code flow errors Disconnect all power source (AC, battery, coin cell) and drain flea power by pressing and holding down power button for 3~5 seconds. Non-RPMC Flash on Boot Guard fused system CPU failure ● Run the Dell Support Assist/Dell Diagnostics tool. ● If problem persists, replace the system board. Memory/RAM failure ● Reset and swap memory modules among the slots. ● If problem persists, replace the memory module. Replace...

Service Manual
Page 101
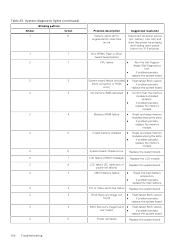
...; Run "BIOS recovery from No POST/No Power/No Boot situations. Memory DIMM power rail failure CPU Power Cable Connection Issue NOTE: Blinking 3-3-3 LEDs on Lock LED (Caps-Lock or Nums-Lock), Power button LED (without Fingerprint reader), and Diagnostic LED indicates failure to ensure all power source (AC, battery, coin cell) and drain flea power by ● SBIOS. RJ45 LEDs The Latitude 7230 Rugged Extreme Tablet RJ45 port has double-LEDs on Dell SupportAssist Pre-boot System...
...; Run "BIOS recovery from No POST/No Power/No Boot situations. Memory DIMM power rail failure CPU Power Cable Connection Issue NOTE: Blinking 3-3-3 LEDs on Lock LED (Caps-Lock or Nums-Lock), Power button LED (without Fingerprint reader), and Diagnostic LED indicates failure to ensure all power source (AC, battery, coin cell) and drain flea power by ● SBIOS. RJ45 LEDs The Latitude 7230 Rugged Extreme Tablet RJ45 port has double-LEDs on Dell SupportAssist Pre-boot System...
Re-imaging guide for Windows
Page 3
... and installing the fingerprint-reader driver 13 IR Camera driver...14 Downloading and installing IR Camera driver...14 Dell ControlVault3 Driver Firmware...14 Downloading and installing the Dell ControlVault3 driver and firmware 14 Wireless Local Network (WLAN) drivers and applications 15 Downloading and installing the Wi-Fi driver...15 Dell Docking Station WD19...15 Dell Thunderbolt Dock WD19TB...15 Dell Power Manager Service (DPM)...16 Dell Rugged Dock...16 DisplayLink Driver for Rugged Tablet Dock...16 Prolific USB Serial Port Driver for Rugged Tablet Dock 17 eGalax Dr Touch Mode...
... and installing the fingerprint-reader driver 13 IR Camera driver...14 Downloading and installing IR Camera driver...14 Dell ControlVault3 Driver Firmware...14 Downloading and installing the Dell ControlVault3 driver and firmware 14 Wireless Local Network (WLAN) drivers and applications 15 Downloading and installing the Wi-Fi driver...15 Dell Docking Station WD19...15 Dell Thunderbolt Dock WD19TB...15 Dell Power Manager Service (DPM)...16 Dell Rugged Dock...16 DisplayLink Driver for Rugged Tablet Dock...16 Prolific USB Serial Port Driver for Rugged Tablet Dock 17 eGalax Dr Touch Mode...
Re-imaging guide for Windows
Page 5
... driver issues or updates being prompted by Windows, driver updates may be updated when you reinstall the operating system using either a CD, DVD, USB key, or when you are facing networking, graphics, sound or other hardware-related problems. Dell recommends that you have the latest device drivers installed on your Dell computer using the Dell Backup and Recovery application or other factory-reset methods. Do not attempt to follow instructions may create new problems. Review the importance of each driver update...
... driver issues or updates being prompted by Windows, driver updates may be updated when you reinstall the operating system using either a CD, DVD, USB key, or when you are facing networking, graphics, sound or other hardware-related problems. Dell recommends that you have the latest device drivers installed on your Dell computer using the Dell Backup and Recovery application or other factory-reset methods. Do not attempt to follow instructions may create new problems. Review the importance of each driver update...

Re-imaging guide for Windows
Page 8
... Drivers & downloads > Find drivers. 4. Select the latest version of your computer, and then click Search. Turn on -screen instructions. NOTE: If you saved the BIOS update file. 8. 4 Updating or resetting the BIOS Updating the BIOS in your computer being unable to boot, a BIOS reset is necessary. Press F2 when the Dell logo is displayed. 3. On the left pane, select Security. 4. In the Search support field, enter the Service Tag/Serial Number/Service Request/Model/Keyword of BIOS, and click Download...
... Drivers & downloads > Find drivers. 4. Select the latest version of your computer, and then click Search. Turn on -screen instructions. NOTE: If you saved the BIOS update file. 8. 4 Updating or resetting the BIOS Updating the BIOS in your computer being unable to boot, a BIOS reset is necessary. Press F2 when the Dell logo is displayed. 3. On the left pane, select Security. 4. In the Search support field, enter the Service Tag/Serial Number/Service Request/Model/Keyword of BIOS, and click Download...
Re-imaging guide for Windows
Page 11
... www.dell.com/support. KB updates are automatically downloaded and installed when Windows Updates are encountering issues with a specific device. For video capture or streaming, users can also be manually downloaded and installed from third-party providers. Click Drivers & downloads > Find drivers. 5. In the Search support field, enter the Service Tag/Serial Number/Service Request/Model/Keyword of your computer. In the Category drop-down, select Chipset. 6. Double-click the chipset driver file icon and follow the instructions...
... www.dell.com/support. KB updates are automatically downloaded and installed when Windows Updates are encountering issues with a specific device. For video capture or streaming, users can also be manually downloaded and installed from third-party providers. Click Drivers & downloads > Find drivers. 5. In the Search support field, enter the Service Tag/Serial Number/Service Request/Model/Keyword of your computer. In the Category drop-down, select Chipset. 6. Double-click the chipset driver file icon and follow the instructions...

Re-imaging guide for Windows
Page 12
... card reader driver file. 8. In the Search support field, enter the Service Tag/Serial Number/Service Request/Model/Keyword of RAID 0/1 ● Intel VMD support from 11th Generation platforms (see How to manually browse for download from www.dell.com/support. In the Category drop-down , select Chipset. 6. After the download is complete, go to display a blue screen and an error code followed by default. In the Search support field, enter the Service Tag/Serial Number/Service...
... card reader driver file. 8. In the Search support field, enter the Service Tag/Serial Number/Service Request/Model/Keyword of RAID 0/1 ● Intel VMD support from 11th Generation platforms (see How to manually browse for download from www.dell.com/support. In the Category drop-down , select Chipset. 6. After the download is complete, go to display a blue screen and an error code followed by default. In the Search support field, enter the Service Tag/Serial Number/Service...

Re-imaging guide for Windows
Page 16
... functioning optimally. In the Search support field, enter the Service Tag/Serial Number/Service Request/Model/Keyword of the system. CAUTION: You must update your computer's BIOS and the Dell Docking Station drivers to your computer that is an application that are as the mouse, keyboard, external hard drive, and large-screen displays without having to your computer. 4. Dell Power Manager Service (DPM) DPM is complete, go to power adapter, battery, docking, and USB Type-C device/protocol incompatibility. The key...
... functioning optimally. In the Search support field, enter the Service Tag/Serial Number/Service Request/Model/Keyword of the system. CAUTION: You must update your computer's BIOS and the Dell Docking Station drivers to your computer that is an application that are as the mouse, keyboard, external hard drive, and large-screen displays without having to your computer. 4. Dell Power Manager Service (DPM) DPM is complete, go to power adapter, battery, docking, and USB Type-C device/protocol incompatibility. The key...

Keyboard for Users Guide
Page 1
Dell Keyboard for Latitude 7230 Rugged Extreme Tablet User's Guide Rugged Tablet Model: Latitude 7230 Regulatory Model: T06HKYBP
Dell Keyboard for Latitude 7230 Rugged Extreme Tablet User's Guide Rugged Tablet Model: Latitude 7230 Regulatory Model: T06HKYBP

Keyboard for Users Guide
Page 8
... table is a list of shortcuts available on the Latitude 7230 Rugged Extreme Tablet. Function Key Result F1 Mute audio F2 Decrease volume F3 Increase volume F4 Mute microphone F5 Keyboard backlight brightness F6 Decrease screen brightness F7 Increase screen brightness F8 Switch to external display F9 Scroll lock F10 Print screen F12 Home Fn + Esc Toggle Fn-key lock Additional keyboard shortcuts can be customised via the Rugged Control Center application on the keyboard. For more information on the Rugged Control...
... table is a list of shortcuts available on the Latitude 7230 Rugged Extreme Tablet. Function Key Result F1 Mute audio F2 Decrease volume F3 Increase volume F4 Mute microphone F5 Keyboard backlight brightness F6 Decrease screen brightness F7 Increase screen brightness F8 Switch to external display F9 Scroll lock F10 Print screen F12 Home Fn + Esc Toggle Fn-key lock Additional keyboard shortcuts can be customised via the Rugged Control Center application on the keyboard. For more information on the Rugged Control...

Setup and Specifications
Page 7
... an issue is detected, the necessary system state information is sent to Dell to the internet, create an offline account. ● On the Support and Protection screen, enter your computer with critical fixes and latest device drivers as they become available. SupportAssist is the smart technology that you need to a secured wireless network, enter the password for your Latitude 7230 Rugged Extreme Tablet 7 For more information, see SupportAssist for Windows updates. When setting...
... an issue is detected, the necessary system state information is sent to Dell to the internet, create an offline account. ● On the Support and Protection screen, enter your computer with critical fixes and latest device drivers as they become available. SupportAssist is the smart technology that you need to a secured wireless network, enter the password for your Latitude 7230 Rugged Extreme Tablet 7 For more information, see SupportAssist for Windows updates. When setting...

Setup and Specifications
Page 15
...-serial RS232/1D-2D barcode scanner/Blank) Audio port One headset (headphone and microphone combo) port Video port Supported through a dock or directly through USB Type-C/ HDMI Media-card reader One microSD-card slot Power-adapter port 65 W/90 W adapter USB-C Security-cable slot One wedge-shaped lock slot Internal slots The following table lists the wired Ethernet Local Area Network (LAN) specifications of your Latitude 7230 Rugged Extreme Tablet. Ethernet The following table lists the internal slots of your Latitude 7230 Rugged Extreme Tablet. Table 9. External ports...
...-serial RS232/1D-2D barcode scanner/Blank) Audio port One headset (headphone and microphone combo) port Video port Supported through a dock or directly through USB Type-C/ HDMI Media-card reader One microSD-card slot Power-adapter port 65 W/90 W adapter USB-C Security-cable slot One wedge-shaped lock slot Internal slots The following table lists the wired Ethernet Local Area Network (LAN) specifications of your Latitude 7230 Rugged Extreme Tablet. Ethernet The following table lists the internal slots of your Latitude 7230 Rugged Extreme Tablet. Table 9. External ports...


