
Owners Manual
Page 3
Contents 1 Working on Your Computer...5 Before Working Inside Your Computer...5 Turning Off Your Computer...6 After Working Inside Your Computer...7 2 Removing and Installing Components 9 System Overview...9 Recommended Tools...10 Removing the SD Card...10 Installing the SD ...
Contents 1 Working on Your Computer...5 Before Working Inside Your Computer...5 Turning Off Your Computer...6 After Working Inside Your Computer...7 2 Removing and Installing Components 9 System Overview...9 Recommended Tools...10 Removing the SD Card...10 Installing the SD ...
Owners Manual
Page 5
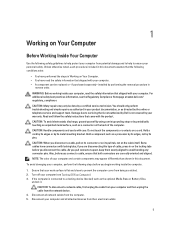
...protect your computer from potential damage and to help to servicing that is not authorized by Dell is not covered by your warranty. For additional safety best practices information, see Turning Off Your Computer). 3. Read and follow the safety instructions that shipped with locking tabs;... in reverse order. Hold a component such as the optional Media Base or Battery Slice, undock it. Turn off your computer (see the Regulatory Compliance Homepage at www.dell.com/ regulatory_compliance CAUTION: Many repairs may appear differently than shown in on the locking tabs before you connect...
...protect your computer from potential damage and to help to servicing that is not authorized by Dell is not covered by your warranty. For additional safety best practices information, see Turning Off Your Computer). 3. Read and follow the safety instructions that shipped with locking tabs;... in reverse order. Hold a component such as the optional Media Base or Battery Slice, undock it. Turn off your computer (see the Regulatory Compliance Homepage at www.dell.com/ regulatory_compliance CAUTION: Many repairs may appear differently than shown in on the locking tabs before you connect...
Owners Manual
Page 6
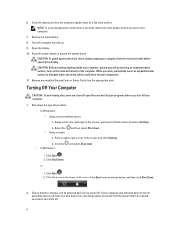
...the arrow in from the right edge of the screen, opening the display. If your computer and attached devices did not automatically turn off when you turn off your computer. 1. CAUTION: To guard against electrical shock, always unplug your computer from the appropriate slots. b. Ensure that...your computer, ground yourself by touching an unpainted metal surface, such as shown below, and then click Shut Down . 2. 6. or 1. Turning Off Your Computer CAUTION: To avoid losing data, save and close all open programs before opening the Charms menu and select Settings. Select ...
...the arrow in from the right edge of the screen, opening the display. If your computer and attached devices did not automatically turn off when you turn off your computer. 1. CAUTION: To guard against electrical shock, always unplug your computer from the appropriate slots. b. Ensure that...your computer, ground yourself by touching an unpainted metal surface, such as shown below, and then click Shut Down . 2. 6. or 1. Turning Off Your Computer CAUTION: To avoid losing data, save and close all open programs before opening the Charms menu and select Settings. Select ...
Owners Manual
Page 7
Turn on your computer. Connect any cards, such as a port replicator, battery slice, or media base, and replace any telephone or network cables to your computer. ... device and then plug it into the computer. 3. Connect any external devices, such as an ExpressCard. 2. Do not use only the battery designed for other Dell computers. 1. After Working Inside Your Computer After you complete any replacement procedure, ensure you connect any external devices, cards, and cables before...
Turn on your computer. Connect any cards, such as a port replicator, battery slice, or media base, and replace any telephone or network cables to your computer. ... device and then plug it into the computer. 3. Connect any external devices, such as an ExpressCard. 2. Do not use only the battery designed for other Dell computers. 1. After Working Inside Your Computer After you complete any replacement procedure, ensure you connect any external devices, cards, and cables before...
Owners Manual
Page 47
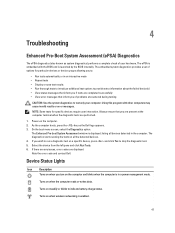
... testing CAUTION: Use the system diagnostics to test only your hardware. If there are any issues, error codes are performed. 1. Turns on all devices detected in the computer. The Enhanced Pre-boot System Assessment window is displayed, listing all the detected devices. 4.... complete check of your computer. 4 Troubleshooting Enhanced Pre-Boot System Assessment (ePSA) Diagnostics The ePSA diagnostics (also known as the Dell logo appears. 3. Turns on when wireless networking is in an interactive mode • Repeat tests • Display or save test results • Run ...
... testing CAUTION: Use the system diagnostics to test only your hardware. If there are any issues, error codes are performed. 1. Turns on all devices detected in the computer. The Enhanced Pre-boot System Assessment window is displayed, listing all the detected devices. 4.... complete check of your computer. 4 Troubleshooting Enhanced Pre-Boot System Assessment (ePSA) Diagnostics The ePSA diagnostics (also known as the Dell logo appears. 3. Turns on when wireless networking is in an interactive mode • Repeat tests • Display or save test results • Run ...
Setup Guide
Page 3
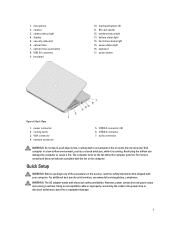
...15. keyboard 17. Back View 1. Restricting the airflow can damage the computer or cause a fire. For additional best practices information, see www.dell.com/regulatory_compliance WARNING: The AC adapter works with the fan or the computer. security cable slot 6. power status light 16. network connector 5. ... push objects into, or allow dust to the power strip or electrical outlet may cause fire or equipment damage. 3 The computer turns on the fan when the computer gets hot. Fan noise is running. Using an incompatible cable or improperly connecting the cable to accumulate...
...15. keyboard 17. Back View 1. Restricting the airflow can damage the computer or cause a fire. For additional best practices information, see www.dell.com/regulatory_compliance WARNING: The AC adapter works with the fan or the computer. security cable slot 6. power status light 16. network connector 5. ... push objects into, or allow dust to the power strip or electrical outlet may cause fire or equipment damage. 3 The computer turns on the fan when the computer gets hot. Fan noise is running. Using an incompatible cable or improperly connecting the cable to accumulate...
Setup Guide
Page 4
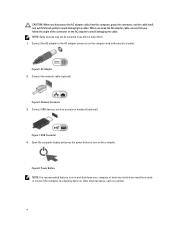
... connector, not the cable itself, and pull firmly but gently to avoid damaging the cable. Open the computer display and press the power button to turn on the AC adapter to the AC adapter connector on the computer. Connect the AC adapter to avoid damaging the cable. Figure 7. When you wrap.... 4 Power Button NOTE: It is recommended that you follow the angle of the connector on and shut down your computer at least once before you turn on the computer and to a docking device or other external device, such as a mouse or keyboard (optional).
... connector, not the cable itself, and pull firmly but gently to avoid damaging the cable. Open the computer display and press the power button to turn on the AC adapter to the AC adapter connector on the computer. Connect the AC adapter to avoid damaging the cable. Figure 7. When you wrap.... 4 Power Button NOTE: It is recommended that you follow the angle of the connector on and shut down your computer at least once before you turn on the computer and to a docking device or other external device, such as a mouse or keyboard (optional).


