Owner's Manual
Page 6
... the Drive Panel 80 Removing the Drive-Panel Insert 81 Replacing the Drive-Panel Insert 82 Replacing the Drive Panel 82 Drives 83 IDE Drive Addressing 83 Connecting Drive Cables 84 Drive Interface Connectors 84 Power Cable Connector 84 Connecting and Disconnecting Drive Cables 85 Hard Drive 85 Removing a Hard Drive 85 Installing a Hard Drive 86 Adding a Second Hard Drive 88 Floppy Drive 89 Removing a Floppy Drive 89 Installing a Floppy Drive 91...
... the Drive Panel 80 Removing the Drive-Panel Insert 81 Replacing the Drive-Panel Insert 82 Replacing the Drive Panel 82 Drives 83 IDE Drive Addressing 83 Connecting Drive Cables 84 Drive Interface Connectors 84 Power Cable Connector 84 Connecting and Disconnecting Drive Cables 85 Hard Drive 85 Removing a Hard Drive 85 Installing a Hard Drive 86 Adding a Second Hard Drive 88 Floppy Drive 89 Removing a Floppy Drive 89 Installing a Floppy Drive 91...
Owner's Manual
Page 28
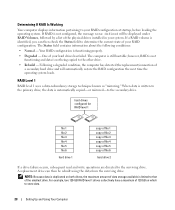
Following a degraded condition, the computer has detected the replacement/connection of file 6 hard drive 2 If a drive failure occurs, subsequent read and write operations are directed to the surviving drive. NOTE: Because data is duplicated on which to the other drive. • Rebuild - Your RAID configuration is limited to that of data storage available is functioning properly. •...
Following a degraded condition, the computer has detected the replacement/connection of file 6 hard drive 2 If a drive failure occurs, subsequent read and write operations are directed to the surviving drive. NOTE: Because data is duplicated on which to the other drive. • Rebuild - Your RAID configuration is limited to that of data storage available is functioning properly. •...
Owner's Manual
Page 29
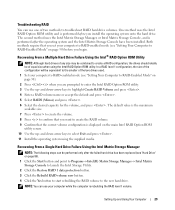
... will be equivalent to the smaller of equal size when using the supplied media. NOTE: You can use your computer to RAID-enabled mode (see "Hard Drive" on the main Intel RAID Option ROM utility screen. 10 Use the up - and down -arrow keys to select Exit and press . 11 Install... RAID Option ROM utility. The second method uses the Intel Matrix Storage Manager, or Intel Matrix Storage Console, and is performed after the failed hard drive has been replaced (see "Setting Your Computer to RAID-Enabled Mode" on page 30). 2 Press when you want to create the RAID volume. 9 Confirm that you...
... will be equivalent to the smaller of equal size when using the supplied media. NOTE: You can use your computer to RAID-enabled mode (see "Hard Drive" on the main Intel RAID Option ROM utility screen. 10 Use the up - and down -arrow keys to select Exit and press . 11 Install... RAID Option ROM utility. The second method uses the Intel Matrix Storage Manager, or Intel Matrix Storage Console, and is performed after the failed hard drive has been replaced (see "Setting Your Computer to RAID-Enabled Mode" on page 30). 2 Press when you want to create the RAID volume. 9 Confirm that you...

Owner's Manual
Page 85
Like IDE connectors, the serial ATA interface connectors are replacing a hard drive that it is , a notch or a missing pin on one connector matches a tab or a filled-in "Before You Begin" on a surface, such as a foam pad, that ... verify that contains data you want to remove the data cable from your computer from the system board. Check the documentation for correct insertion; Hard Drive CAUTION: Before you begin any of the procedures in the Product Information Guide. When connecting and disconnecting a serial ATA data cable, disconnect the cable using ...
Like IDE connectors, the serial ATA interface connectors are replacing a hard drive that it is , a notch or a missing pin on one connector matches a tab or a filled-in "Before You Begin" on a surface, such as a foam pad, that ... verify that contains data you want to remove the data cable from your computer from the system board. Check the documentation for correct insertion; Hard Drive CAUTION: Before you begin any of the procedures in the Product Information Guide. When connecting and disconnecting a serial ATA data cable, disconnect the cable using ...
Owner's Manual
Page 86
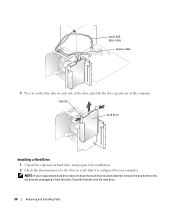
tabs (2) hard drive Installing a Hard Drive 1 Unpack the replacement hard drive, and prepare it for installation. 2 Check the documentation for the drive to verify that it from the old drive by unsnapping it is configured for your replacement hard drive does not have the hard drive bracket attached, remove the bracket from the drive. NOTE: If your computer. Snap the bracket onto the new drive. 86 Removing and Installing Parts serial ATA data cable power cable 3 Press in on the blue tabs on each side of the drive and slide the drive up and out of the computer.
tabs (2) hard drive Installing a Hard Drive 1 Unpack the replacement hard drive, and prepare it for installation. 2 Check the documentation for the drive to verify that it from the old drive by unsnapping it is configured for your replacement hard drive does not have the hard drive bracket attached, remove the bracket from the drive. NOTE: If your computer. Snap the bracket onto the new drive. 86 Removing and Installing Parts serial ATA data cable power cable 3 Press in on the blue tabs on each side of the drive and slide the drive up and out of the computer.
Owner's Manual
Page 87
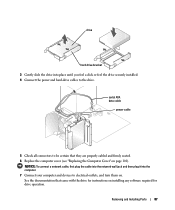
... (see "Replacing the Computer Cover" on page 101). NOTICE: To connect a network cable, first plug the cable into the network wall jack and then plug it into place until you feel a click or feel the drive securely installed. 4 Connect the power and hard-drive cables to the drive. Removing and Installing Parts 87 drive hard drive bracket 3 Gently...
... (see "Replacing the Computer Cover" on page 101). NOTICE: To connect a network cable, first plug the cable into the network wall jack and then plug it into place until you feel a click or feel the drive securely installed. 4 Connect the power and hard-drive cables to the drive. Removing and Installing Parts 87 drive hard drive bracket 3 Gently...

Service Manual
Page 35
...pad, that contains data you begin any of the procedures in the Product Information Guide. NOTICE: If you are replacing a hard drive that will sufficiently cushion it on the power supply. 1 SATA power cable connector 3 power cable connector 2 power connector 4 power connector... Hard Drive CAUTION: Before you begin this section, follow the safety instructions in this procedure. You can do not set the drive on the computer. CAUTION: To guard against electrical shock, always unplug your ...
...pad, that contains data you begin any of the procedures in the Product Information Guide. NOTICE: If you are replacing a hard drive that will sufficiently cushion it on the power supply. 1 SATA power cable connector 3 power cable connector 2 power connector 4 power connector... Hard Drive CAUTION: Before you begin this section, follow the safety instructions in this procedure. You can do not set the drive on the computer. CAUTION: To guard against electrical shock, always unplug your ...
Service Manual
Page 37
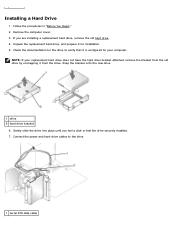
... new drive. 1 drive 2 hard drive bracket 6. NOTE: If your computer. Gently slide the drive into place until you are installing a replacement hard drive, remove the old hard drive. 4. Connect the power and hard-drive cables to verify that it from the old drive by unsnapping it is configured for your replacement hard drive does not have the hard drive bracket attached, remove the bracket from the drive. Installing a Hard Drive 1. If...
... new drive. 1 drive 2 hard drive bracket 6. NOTE: If your computer. Gently slide the drive into place until you are installing a replacement hard drive, remove the old hard drive. 4. Connect the power and hard-drive cables to verify that it from the old drive by unsnapping it is configured for your replacement hard drive does not have the hard drive bracket attached, remove the bracket from the drive. Installing a Hard Drive 1. If...
Service Manual
Page 38
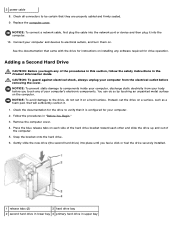
..., that will sufficiently cushion it on the computer. Replace the computer cover. NOTICE: To prevent static damage to components inside your computer. 2. NOTICE: To avoid damage to electrical outlets, and turn them on each side of the hard drive bracket toward each other and slide the drive up and out of the computer. 5. Remove...
..., that will sufficiently cushion it on the computer. Replace the computer cover. NOTICE: To prevent static damage to components inside your computer. 2. NOTICE: To avoid damage to electrical outlets, and turn them on each side of the hard drive bracket toward each other and slide the drive up and out of the computer. 5. Remove...


