Owner's Manual
Page 27
...4-pin IEEE 1394 devices with your software. This connector is an Intel® technology that can benefit from the software manufacturer. Hyper-Threading Hyper-Threading is only available if you to enable hibernate mode. For more information on the Dell Support website at support.dell.com...the Device Manager window, click the plus (+) sign next to take advantage of data between computers and peripheral devices. For more information on power management options: 1 Click the Start button and click Help and Support. 2 In the Help and Support window, click Performance and maintenance...
...4-pin IEEE 1394 devices with your software. This connector is an Intel® technology that can benefit from the software manufacturer. Hyper-Threading Hyper-Threading is only available if you to enable hibernate mode. For more information on the Dell Support website at support.dell.com...the Device Manager window, click the plus (+) sign next to take advantage of data between computers and peripheral devices. For more information on power management options: 1 Click the Start button and click Help and Support. 2 In the Help and Support window, click Performance and maintenance...
Owner's Manual
Page 50
...defective. • Swap the computer and monitor power cables to determine if the power cable is defective. • Check the connector for bent or broken pins. (It is normal for troubleshooting procedures. If the power light is working by testing it with another...A D P H O N E C A B L E C O N N E C T I G H T - Ensure that the volume is turned up and that the monitor is off nearby fans, fluorescent lights, or halogen lamps to have missing pins.) C H E C K T H E M O N I T O R P O W E R L I O N - If the power light is turned on the keyboard or move the mouse. 50 Solving Problems
...defective. • Swap the computer and monitor power cables to determine if the power cable is defective. • Check the connector for bent or broken pins. (It is normal for troubleshooting procedures. If the power light is working by testing it with another...A D P H O N E C A B L E C O N N E C T I G H T - Ensure that the volume is turned up and that the monitor is off nearby fans, fluorescent lights, or halogen lamps to have missing pins.) C H E C K T H E M O N I T O R P O W E R L I O N - If the power light is turned on the keyboard or move the mouse. 50 Solving Problems
Owner's Manual
Page 64
...Inside Your Computer Use the following steps before you begin any of the computer. Damage due to servicing that is not authorized by Dell is not covered by its metal mounting bracket. Also, before you work, periodically touch an unpainted metal surface to ground the ...it from the network wall jack. 2 Disconnect any telephone or telecommunication lines from their electrical outlets, and then press the power button to dissipate any connector pins. NOTICE: Only a certified service technician should perform repairs on your computer, ground yourself by its strain-relief loop, not...
...Inside Your Computer Use the following steps before you begin any of the computer. Damage due to servicing that is not authorized by Dell is not covered by its metal mounting bracket. Also, before you work, periodically touch an unpainted metal surface to ground the ...it from the network wall jack. 2 Disconnect any telephone or telecommunication lines from their electrical outlets, and then press the power button to dissipate any connector pins. NOTICE: Only a certified service technician should perform repairs on your computer, ground yourself by its strain-relief loop, not...
Owner's Manual
Page 121
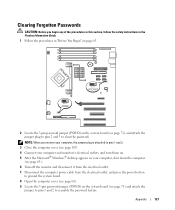
... 3 to reenable the password feature. Clearing Forgotten Passwords CAUTION: Before you receive your computer, the jumper plug is attached to pins 1 and 2. 3 Close the computer cover (see page 107). 4 Connect your computer and monitor to electrical outlets, and turn them on. 5 After the ... the monitor and disconnect it from the electrical outlet. 7 Disconnect the computer power cable from the electrical outlet, and press the power button to ground the system board. 8 Open the computer cover (see page 68). 9 Locate the 3-pin password jumper (PSWD) on the system board (see page 71) and attach...
... 3 to reenable the password feature. Clearing Forgotten Passwords CAUTION: Before you receive your computer, the jumper plug is attached to pins 1 and 2. 3 Close the computer cover (see page 107). 4 Connect your computer and monitor to electrical outlets, and turn them on. 5 After the ... the monitor and disconnect it from the electrical outlet. 7 Disconnect the computer power cable from the electrical outlet, and press the power button to ground the system board. 8 Open the computer cover (see page 68). 9 Locate the 3-pin password jumper (PSWD) on the system board (see page 71) and attach...

