Owner's Manual
Page 1
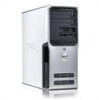
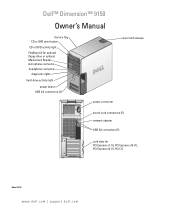
Dell™ Dimension™ 9150 Owner's Manual Service Tag CD or DVD eject button CD or DVD activity light FlexBays (2) for optional floppy drive or optional Media Card Reader microphone connector headphone connector diagnostic lights hard-drive activity light power button USB 2.0 connectors (2) cover latch release power connector sound-card connectors (5) network adapter USB 2.0 connectors (5) card slots for PCI Express x1 (1), PCI Express x16 (1), PCI Express x4 (1), PCI (3) Model DCTA www.dell.com | support.dell.com
Dell™ Dimension™ 9150 Owner's Manual Service Tag CD or DVD eject button CD or DVD activity light FlexBays (2) for optional floppy drive or optional Media Card Reader microphone connector headphone connector diagnostic lights hard-drive activity light power button USB 2.0 connectors (2) cover latch release power connector sound-card connectors (5) network adapter USB 2.0 connectors (5) card slots for PCI Express x1 (1), PCI Express x16 (1), PCI Express x4 (1), PCI (3) Model DCTA www.dell.com | support.dell.com
Owner's Manual
Page 5
... Problems 50 If the screen is blank 50 If the screen is difficult to read 51 3 Troubleshooting Tools 53 Diagnostic Lights 53 Dell Diagnostics 56 Dell Diagnostics Main Menu 56 Drivers 57 What Is a Driver 57 Identifying Drivers 58 Reinstalling Drivers 58 Resolving Software and Hardware ...Incompatibilities 59 Restoring Your Operating System 59 Using Microsoft Windows XP System Restore 60 Using Dell PC Restore by Symantec 61 4 Removing and Installing Parts 63 Before You Begin 63 Recommended Tools 63 Turn Off Your Computer ...
... Problems 50 If the screen is blank 50 If the screen is difficult to read 51 3 Troubleshooting Tools 53 Diagnostic Lights 53 Dell Diagnostics 56 Dell Diagnostics Main Menu 56 Drivers 57 What Is a Driver 57 Identifying Drivers 58 Reinstalling Drivers 58 Resolving Software and Hardware ...Incompatibilities 59 Restoring Your Operating System 59 Using Microsoft Windows XP System Restore 60 Using Dell PC Restore by Symantec 61 4 Removing and Installing Parts 63 Before You Begin 63 Recommended Tools 63 Turn Off Your Computer ...
Owner's Manual
Page 36
... that the check boxes for Enable away mode and Options are installed when this feature is being accessed by the power button indicator and diagnostic lights 1, 2, and 4 being lit. Enabling the QRT feature in the Operating system 1 Click the Start button and click Control Panel. 2 Under Pick a category, click Performance and...
... that the check boxes for Enable away mode and Options are installed when this feature is being accessed by the power button indicator and diagnostic lights 1, 2, and 4 being lit. Enabling the QRT feature in the Operating system 1 Click the Start button and click Control Panel. 2 Under Pick a category, click Performance and...
Owner's Manual
Page 46
Ensure that the network cable is functioning. If the link integrity light is off , reconnect the mouse cable as shown on the on the setup diagram for your network settings are correct and that the network is ... Problems CAUTION: Before you begin any of the computer and the network jack. See page 60. 46 Solving Problems For a description of network lights, see "Controls and Lights" on the back of the procedures in this section, follow the safety instructions in the Product Information Guide. Contact your network administrator or the...
Ensure that the network cable is functioning. If the link integrity light is off , reconnect the mouse cable as shown on the on the setup diagram for your network settings are correct and that the network is ... Problems CAUTION: Before you begin any of the computer and the network jack. See page 60. 46 Solving Problems For a description of network lights, see "Controls and Lights" on the back of the procedures in this section, follow the safety instructions in the Product Information Guide. Contact your network administrator or the...
Owner's Manual
Page 50
...a key on . See page 59. Ensure that the monitor is normal for troubleshooting procedures. If the power light is working by testing it with another device, such as shown on the setup diagram for interference. Turn off...click the speaker icon in the Product Information Guide. NOTE: See the monitor documentation for monitor cable connectors to have missing pins.) C H E C K T H E M O N I T O R P O W E R L I O N - If the power light is securely inserted into the headphone connector (see page 66). R U N T H E H A R D W A R E TR O U B L E S H O O T E R - A D J U S T T H E W I V E...
...a key on . See page 59. Ensure that the monitor is normal for troubleshooting procedures. If the power light is working by testing it with another device, such as shown on the setup diagram for interference. Turn off...click the speaker icon in the Product Information Guide. NOTE: See the monitor documentation for monitor cable connectors to have missing pins.) C H E C K T H E M O N I T O R P O W E R L I O N - If the power light is securely inserted into the headphone connector (see page 66). R U N T H E H A R D W A R E TR O U B L E S H O O T E R - A D J U S T T H E W I V E...
Owner's Manual
Page 51
... Settings tab. 3 Try different settings for instructions on adjusting the contrast and brightness, demagnetizing (degaussing) the monitor, and running the monitor self-test. Fans, fluorescent lights, halogen lamps, and other electrical devices can cause the screen image to read C H E C K T H E M O N I T O R S E T T I N G S - TE S T T H E E L E C T R I T O R - M O V E T H E S U B W O O F E R A W A Y F R O M T H E M O N I C A L O U T L E T - If your speaker system includes a subwoofer, ensure that the electrical outlet...
... Settings tab. 3 Try different settings for instructions on adjusting the contrast and brightness, demagnetizing (degaussing) the monitor, and running the monitor self-test. Fans, fluorescent lights, halogen lamps, and other electrical devices can cause the screen image to read C H E C K T H E M O N I T O R S E T T I N G S - TE S T T H E E L E C T R I T O R - M O V E T H E S U B W O O F E R A W A Y F R O M T H E M O N I C A L O U T L E T - If your speaker system includes a subwoofer, ensure that the electrical outlet...
Owner's Manual
Page 53
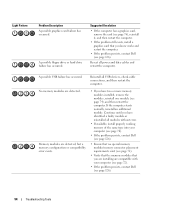
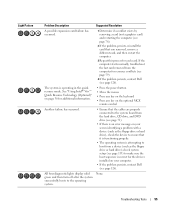
... help you troubleshoot a problem, your computer (see page 74). • If the problem persists, contact Dell (see page 126). If the computer malfunctions, the color and sequence of the lights identify the problem. Problems" on the front panel (see page 126). Memory modules are detected, but a...memory of the same type into a working condition or a possible pre-BIOS failure electrical outlet. Troubleshooting Tools 53 Troubleshooting Tools Diagnostic Lights CAUTION: Before you begin any of the procedures in this section, follow the safety instructions in a normal "off after the system ...
... help you troubleshoot a problem, your computer (see page 74). • If the problem persists, contact Dell (see page 126). If the computer malfunctions, the color and sequence of the lights identify the problem. Problems" on the front panel (see page 126). Memory modules are detected, but a...memory of the same type into a working condition or a possible pre-BIOS failure electrical outlet. Troubleshooting Tools 53 Troubleshooting Tools Diagnostic Lights CAUTION: Before you begin any of the procedures in this section, follow the safety instructions in a normal "off after the system ...
Owner's Manual
Page 54
... without error. • If available, install properly working memory of the same type into your computer (see page 74). • If the problem persists, contact Dell (see page 126). • Ensure that no special memory module/memory connector placement requirements exist (see page 72). • Verify that the memory modules that... all power and data cables and restart the computer. Memory modules are detected. Reseat all USB devices, check cable connections, and then restart the computer. Light Pattern Problem Description A possible graphics card failure has occurred.
... without error. • If available, install properly working memory of the same type into your computer (see page 74). • If the problem persists, contact Dell (see page 126). • Ensure that no special memory module/memory connector placement requirements exist (see page 72). • Verify that the memory modules that... all power and data cables and restart the computer. Memory modules are detected. Reseat all USB devices, check cable connections, and then restart the computer. Light Pattern Problem Description A possible graphics card failure has occurred.
Owner's Manual
Page 55
...see page 113) to make sure the boot sequence is correct for resource conflicts (see page 59). 4 If the problem persists, contact Dell (see page 126). Troubleshooting Tools 55 See "Using Intel® Viiv™ Quick Resume Technology (Optional)" on your computer. • ...If the problem persists, contact Dell (see page 126). Light Pattern Problem Description Suggested Resolution A possible expansion card failure has occurred. 1 Determine if a conflict exists by removing a card (not a...
...see page 113) to make sure the boot sequence is correct for resource conflicts (see page 59). 4 If the problem persists, contact Dell (see page 126). Troubleshooting Tools 55 See "Using Intel® Viiv™ Quick Resume Technology (Optional)" on your computer. • ...If the problem persists, contact Dell (see page 126). Light Pattern Problem Description Suggested Resolution A possible expansion card failure has occurred. 1 Determine if a conflict exists by removing a card (not a...
Owner's Manual
Page 65
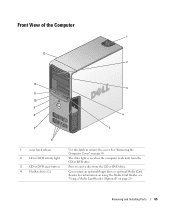
For information on using the Media Card Reader, see "Using a Media Card Reader (Optional)" on page 68. Removing and Installing Parts 65 Front View of the Computer 1 13 2 12 3 11 10 9 8 4 7 5 6 1 cover latch release 2 CD or DVD activity light 3 CD or DVD eject button 4 FlexBay drives (2) Use this latch to eject a disc from the CD or DVD drive. Can contain an optional floppy drive or optional Media Card Reader. See "Removing the Computer Cover" on page 20. The drive light is on when the computer reads data from the CD or DVD drive. Press to remove the cover.
For information on using the Media Card Reader, see "Using a Media Card Reader (Optional)" on page 68. Removing and Installing Parts 65 Front View of the Computer 1 13 2 12 3 11 10 9 8 4 7 5 6 1 cover latch release 2 CD or DVD activity light 3 CD or DVD eject button 4 FlexBay drives (2) Use this latch to eject a disc from the CD or DVD drive. Can contain an optional floppy drive or optional Media Card Reader. See "Removing the Computer Cover" on page 20. The drive light is on when the computer reads data from the CD or DVD drive. Press to remove the cover.

Owner's Manual
Page 66
...the vent area to avoid water damage to help you access the Dell Support website or call technical support. 66 Removing and Installing Parts Instead, perform an operating system shutdown. Use the lights to the system. Used to attach headphones and most kinds of ...a CD player is operating. 5 IEEE 1394 connector (optional) 6 vents 7 USB 2.0 connectors (2) 8 power button 9 hard-drive activity light 10 diagnostic lights (4) 11 headphone connector 12 microphone connector 13 Service Tag Use the optional IEEE 1394 connector for voice or musical input into a sound or telephony...
...the vent area to avoid water damage to help you access the Dell Support website or call technical support. 66 Removing and Installing Parts Instead, perform an operating system shutdown. Use the lights to the system. Used to attach headphones and most kinds of ...a CD player is operating. 5 IEEE 1394 connector (optional) 6 vents 7 USB 2.0 connectors (2) 8 power button 9 hard-drive activity light 10 diagnostic lights (4) 11 headphone connector 12 microphone connector 13 Service Tag Use the optional IEEE 1394 connector for voice or musical input into a sound or telephony...
Owner's Manual
Page 112
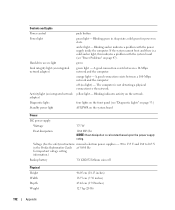
...18.13 inches) 18.75 cm (7.38 inches) 45.42 cm (17.88inches) 12.7 kg (28 lb) 112 Appendix amber light - If the system cannot boot and there is calculated based upon the power supply rating. A good connection exists between a 10-... network and the computer. off (no light) - Controls and Lights Power control Power light Hard-drive access light Link integrity light (on integrated network adapter) Activity light (on the network. Blinking indicates activity on integrated network adapter) Diagnostic lights Standby power light push button green light - A good connection exists between a...
...18.13 inches) 18.75 cm (7.38 inches) 45.42 cm (17.88inches) 12.7 kg (28 lb) 112 Appendix amber light - If the system cannot boot and there is calculated based upon the power supply rating. A good connection exists between a 10-... network and the computer. off (no light) - Controls and Lights Power control Power light Hard-drive access light Link integrity light (on integrated network adapter) Activity light (on the network. Blinking indicates activity on integrated network adapter) Diagnostic lights Standby power light push button green light - A good connection exists between a...

Owner's Manual
Page 122
... water and one part dishwashing detergent. If possible, use liquid or aerosol cleaners, which may damage the antiglare coating. • To clean your monitor screen, lightly dampen a soft, clean cloth with a brush attachment to gently remove dust from the slots and holes on your computer with a soft cloth dampened with any...
... water and one part dishwashing detergent. If possible, use liquid or aerosol cleaners, which may damage the antiglare coating. • To clean your monitor screen, lightly dampen a soft, clean cloth with a brush attachment to gently remove dust from the slots and holes on your computer with a soft cloth dampened with any...
Owner's Manual
Page 123
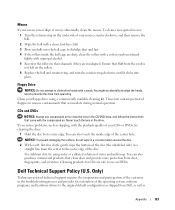
... water and mild soap. You can also touch the inside the ball cage are dirty, clean the rollers with a cotton swab moistened lightly with isopropyl alcohol. 5 Recenter the rollers in the CD/DVD drive, and follow the instructions that fluff from dust, fingerprints, and scratches...into place. If you notice problems, such as Appendix 123 Never touch the lens in the troubleshooting process and provides for CDs are misaligned. Dell Technical Support Policy (U.S. Clean your mouse counterclockwise, and then remove the ball. 2 Wipe the ball with a swab. NOTICE: To prevent ...
... water and mild soap. You can also touch the inside the ball cage are dirty, clean the rollers with a cotton swab moistened lightly with isopropyl alcohol. 5 Recenter the rollers in the CD/DVD drive, and follow the instructions that fluff from dust, fingerprints, and scratches...into place. If you notice problems, such as Appendix 123 Never touch the lens in the troubleshooting process and provides for CDs are misaligned. Dell Technical Support Policy (U.S. Clean your mouse counterclockwise, and then remove the ball. 2 Wipe the ball with a swab. NOTICE: To prevent ...
Owner's Manual
Page 145
..., 119 C cards installing PCI Express, 82 PCI Express, 81 removing PCI, 80 removing PCI Express, 86 slots, 68 CD/DVD drive activity light, 65 eject button, 65 problems, 38 CD-RW drive problems, 39 CDs, 18 playing, 16 Check Disk, 39 CMOS settings clearing, 122 ..., 18 copying DVDs general information, 18 helpful tips, 20 how to, 18 cover replacing, 107 D Dell Dell Diagnostics, 56 support policy, 123 support site, 11 Dell Premier Support website, 9, 11 diagnostic lights, 53 diagnostics Dell, 56 lights, 53, 66 documentation online, 11 Product Information Guide, 9 Setup Diagram, 9 drive panel, 66, ...
..., 119 C cards installing PCI Express, 82 PCI Express, 81 removing PCI, 80 removing PCI Express, 86 slots, 68 CD/DVD drive activity light, 65 eject button, 65 problems, 38 CD-RW drive problems, 39 CDs, 18 playing, 16 Check Disk, 39 CMOS settings clearing, 122 ..., 18 copying DVDs general information, 18 helpful tips, 20 how to, 18 cover replacing, 107 D Dell Dell Diagnostics, 56 support policy, 123 support site, 11 Dell Premier Support website, 9, 11 diagnostic lights, 53 diagnostics Dell, 56 lights, 53, 66 documentation online, 11 Product Information Guide, 9 Setup Diagram, 9 drive panel, 66, ...
Owner's Manual
Page 146
..., 41 F Files and Settings Transfer Wizard, 27 Finding Information, 9 Flex Bay drive Media Card Reader, 65 H hard drive activity light, 66 problems, 39 hardware Dell Diagnostics, 56 drives, RAID configuration, 28 Hardware Troubleshooter, 59 headphone connector, 66 Help and Support Center, 12 hibernate mode, 25, ...14 connection, setting up, 15 problems, 39 K keyboard problems, 42 L labels Microsoft Windows, 10 Service Tag, 10, 66 latch release cover, 65 lights diagnostic, 53, 66 front of computer, 53 hard drive activity, 66 M Media Card Reader installing, 99, 101 problems, 42 removing, 99 using,...
..., 41 F Files and Settings Transfer Wizard, 27 Finding Information, 9 Flex Bay drive Media Card Reader, 65 H hard drive activity light, 66 problems, 39 hardware Dell Diagnostics, 56 drives, RAID configuration, 28 Hardware Troubleshooter, 59 headphone connector, 66 Help and Support Center, 12 hibernate mode, 25, ...14 connection, setting up, 15 problems, 39 K keyboard problems, 42 L labels Microsoft Windows, 10 Service Tag, 10, 66 latch release cover, 65 lights diagnostic, 53, 66 front of computer, 53 hard drive activity, 66 M Media Card Reader installing, 99, 101 problems, 42 removing, 99 using,...
Owner's Manual
Page 147
...25, 27 managing, 24 options, 25 options, advanced, 26 options, hibernate, 27 power (continued) options, schemes, 26 problems, 47 standby mode, 25 power light conditions, 47 Power Options Properties, 25 printer cable, 13 connecting, 13 problems, 48 setting up, 13 USB, 14 problems battery, 37 blue screen, 44 CD... drive, 38 CD-RW drive, 39 computer crashes, 43-44 computer stops responding, 43 Dell Diagnostics, 56 diagnostic lights, 53 drives, 38 DVD drive, 38 e-mail, 39 error messages, 41 general, 43 hard drive, 39 Internet, 39 keyboard, 42 Media Card...
...25, 27 managing, 24 options, 25 options, advanced, 26 options, hibernate, 27 power (continued) options, schemes, 26 problems, 47 standby mode, 25 power light conditions, 47 Power Options Properties, 25 printer cable, 13 connecting, 13 problems, 48 setting up, 13 USB, 14 problems battery, 37 blue screen, 44 CD... drive, 38 CD-RW drive, 39 computer crashes, 43-44 computer stops responding, 43 Dell Diagnostics, 56 diagnostic lights, 53 drives, 38 DVD drive, 38 e-mail, 39 error messages, 41 general, 43 hard drive, 39 Internet, 39 keyboard, 42 Media Card...
Owner's Manual
Page 148
..., 49 volume, 49 sound connectors, 67 speaker problems, 49 volume, 49 specifications audio, 109 computer information, 109 connectors, 111 controls and lights, 112 drives, 111 environmental, 113 expansion bus, 110 memory, 109 physical, 112 power, 112 processor, 109 technical, 109 video, 109 ...V vents, 66 front panel, 66 volume adjusting, 49 T technical support policy, 123 transferring information to a new computer, 27 troubleshooting Dell Diagnostics, 56 diagnostic lights, 53 Hardware Troubleshooter, 59 Help and Support Center, 12 restore to previous state, 59-60 tips, 37 TV connect to computer, ...
..., 49 volume, 49 sound connectors, 67 speaker problems, 49 volume, 49 specifications audio, 109 computer information, 109 connectors, 111 controls and lights, 112 drives, 111 environmental, 113 expansion bus, 110 memory, 109 physical, 112 power, 112 processor, 109 technical, 109 video, 109 ...V vents, 66 front panel, 66 volume adjusting, 49 T technical support policy, 123 transferring information to a new computer, 27 troubleshooting Dell Diagnostics, 56 diagnostic lights, 53 Hardware Troubleshooter, 59 Help and Support Center, 12 restore to previous state, 59-60 tips, 37 TV connect to computer, ...


