Owner's Manual
Page 1
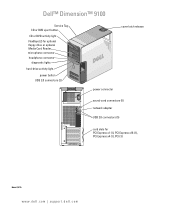
Dell™ Dimension™ 9100 Service Tag CD or DVD eject button CD or DVD activity light FlexBays (2) for optional floppy drive or optional Media Card Reader microphone connector headphone connector diagnostic lights hard-drive activity light power button USB 2.0 connectors (2) cover latch release power connector sound-card connectors (5) network adapter USB 2.0 connectors (5) card slots for PCI Express x1 (1), PCI Express x16 (1), PCI Express x4 (1), PCI (3) Model DCTA www.dell.com | support.dell.com
Dell™ Dimension™ 9100 Service Tag CD or DVD eject button CD or DVD activity light FlexBays (2) for optional floppy drive or optional Media Card Reader microphone connector headphone connector diagnostic lights hard-drive activity light power button USB 2.0 connectors (2) cover latch release power connector sound-card connectors (5) network adapter USB 2.0 connectors (5) card slots for PCI Express x1 (1), PCI Express x16 (1), PCI Express x4 (1), PCI (3) Model DCTA www.dell.com | support.dell.com
Owner's Manual
Page 4
IEEE 1394 27 Hyper-Threading 28 2 Solving Problems Troubleshooting Tips 29 Battery Problems 29 Drive Problems 30 CD and DVD drive problems 30 Hard drive problems 31 E-Mail, Modem, and Internet Problems 31 Error Messages 33 Media Card Reader Problems 34 Keyboard Problems 34 Lockups and Software Problems 35 The ...
IEEE 1394 27 Hyper-Threading 28 2 Solving Problems Troubleshooting Tips 29 Battery Problems 29 Drive Problems 30 CD and DVD drive problems 30 Hard drive problems 31 E-Mail, Modem, and Internet Problems 31 Error Messages 33 Media Card Reader Problems 34 Keyboard Problems 34 Lockups and Software Problems 35 The ...
Owner's Manual
Page 6
... 69 PCI Express Cards 73 Drive Panels 82 Removing the Drive Panel 82 Removing the Drive-Panel Insert 83 Replacing the Drive-Panel Insert 84 Replacing the Drive Panel 84 Drives 85 General Installation Guidelines 85 Hard Drive 86 Removing a Hard Drive 87 Installing a Hard Drive 88 Adding a Second Hard Drive 89 Floppy Drive 91 Removing a Floppy Drive 91 Installing a Floppy Drive 93 Media Card Reader 93...
... 69 PCI Express Cards 73 Drive Panels 82 Removing the Drive Panel 82 Removing the Drive-Panel Insert 83 Replacing the Drive-Panel Insert 84 Replacing the Drive Panel 84 Drives 85 General Installation Guidelines 85 Hard Drive 86 Removing a Hard Drive 87 Installing a Hard Drive 88 Adding a Second Hard Drive 89 Floppy Drive 91 Removing a Floppy Drive 91 Installing a Floppy Drive 93 Media Card Reader 93...
Owner's Manual
Page 11
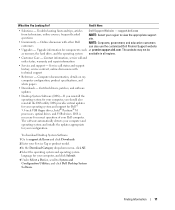
... Download Category drop-down menu, click All. 4 Select the operating system and operating system language for components, such at premier.support.dell.com. The website may not be as memory, the hard drive, and the operating system available in all regions. • Customer Care - DSS provides critical updates for your operating system and...
... Download Category drop-down menu, click All. 4 Select the operating system and operating system language for components, such at premier.support.dell.com. The website may not be as memory, the hard drive, and the operating system available in all regions. • Customer Care - DSS provides critical updates for your operating system and...

Owner's Manual
Page 19
... Do not burn a blank CD-R or CD-RW to its maximum capacity; Your DVD-writable drive can write to two different types of recording media: CD-Rs and CD-RWs (including high-speed CD-RWs). ...Blank DVD+Rs can be played only on MP3 players or on CDs. The computer reads your computer hard drive. Use blank CD-RWs to write to CDs or to erase, rewrite, or update data on computers ...stage of the disc creation process. After you create a DVD+R disc, you have two CD or DVD drives, select the drive into which you cannot write to that CD-R again (see the Sonic documentation for example, do not ...
... Do not burn a blank CD-R or CD-RW to its maximum capacity; Your DVD-writable drive can write to two different types of recording media: CD-Rs and CD-RWs (including high-speed CD-RWs). ...Blank DVD+Rs can be played only on MP3 players or on CDs. The computer reads your computer hard drive. Use blank CD-RWs to write to CDs or to erase, rewrite, or update data on computers ...stage of the disc creation process. After you create a DVD+R disc, you have two CD or DVD drives, select the drive into which you cannot write to that CD-R again (see the Sonic documentation for example, do not ...
Owner's Manual
Page 25
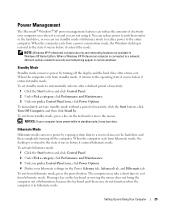
...the computer out of hibernation, because the keyboard and the mouse do not function when the computer is on the hard drive and then completely turning off the display and the hard drive after a defined period of inactivity, click the Start button, click Turn Off Computer, and then click Stand by...When the computer exits from a power conservation mode, the Windows desktop is connected to a network, different options related to just the monitor or the hard drive, or you are not using it may take a short time to exit from standby mode, press a key on the Power Schemes tab, Advanced tab...
...the computer out of hibernation, because the keyboard and the mouse do not function when the computer is on the hard drive and then completely turning off the display and the hard drive after a defined period of inactivity, click the Start button, click Turn Off Computer, and then click Stand by...When the computer exits from a power conservation mode, the Windows desktop is connected to a network, different options related to just the monitor or the hard drive, or you are not using it may take a short time to exit from standby mode, press a key on the Power Schemes tab, Advanced tab...
Owner's Manual
Page 26
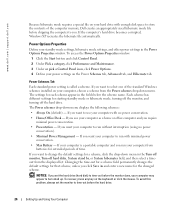
...and then select a timeout from the Power schemes drop-down menu. To avoid this problem, always set the hard drive (hard disk) to time-out before the hard drive. 26 Setting Up and Using Your Computer Power Options Properties Define your standby mode settings, hibernate mode settings, ...you require minimal power conservation. • Presentation - www.dell.com | support.dell.com Because hibernate mode requires a special file on your hard drive with enough disk space to store the contents of the computer memory, Dell creates an appropriately sized hibernate mode file before shipping the ...
...and then select a timeout from the Power schemes drop-down menu. To avoid this problem, always set the hard drive (hard disk) to time-out before the hard drive. 26 Setting Up and Using Your Computer Power Options Properties Define your standby mode settings, hibernate mode settings, ...you require minimal power conservation. • Presentation - www.dell.com | support.dell.com Because hibernate mode requires a special file on your hard drive with enough disk space to store the contents of the computer memory, Dell creates an appropriately sized hibernate mode file before shipping the ...

Owner's Manual
Page 31
.... If you write to a digital telephone network. R W D I N G T O A C D / D V D - E-Mail, Modem, and Internet Problems CAUTION: Before you begin any of data when writing. Solving Problems 31 TU R N O F F S T A N D B Y M O D E I N W I N D O W S B E F O R E W R I T I S C - Hard drive problems RUN CHECK DISK - 1 Click the Start button and click My Computer. 2 Right-click Local Disk C:. 3 Click Properties. 4 Click the Tools tab. 5 Under Error-checking...
.... If you write to a digital telephone network. R W D I N G T O A C D / D V D - E-Mail, Modem, and Internet Problems CAUTION: Before you begin any of data when writing. Solving Problems 31 TU R N O F F S T A N D B Y M O D E I N W I N D O W S B E F O R E W R I T I S C - Hard drive problems RUN CHECK DISK - 1 Click the Start button and click My Computer. 2 Right-click Local Disk C:. 3 Click Properties. 4 Click the Tools tab. 5 Under Error-checking...
Owner's Manual
Page 36
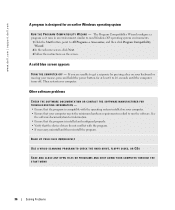
...the operating system installed on your keyboard or moving your computer. BACK UP YOUR FILES IMMEDIATELY USE A VIRUS-SCANNING PROGRAM TO CHECK THE HARD DRIVE, FLOPPY DISKS, OR CDS SAVE AND CLOSE ANY OPEN FILES OR PROGRAMS AND SHUT DOWN YOUR COMPUTER THROUGH THE START MENU 36 Solving... Problems www.dell.com | support.dell.com A program is compatible with the program. • If necessary, uninstall and then reinstall the program. The Program Compatibility Wizard ...
...the operating system installed on your keyboard or moving your computer. BACK UP YOUR FILES IMMEDIATELY USE A VIRUS-SCANNING PROGRAM TO CHECK THE HARD DRIVE, FLOPPY DISKS, OR CDS SAVE AND CLOSE ANY OPEN FILES OR PROGRAMS AND SHUT DOWN YOUR COMPUTER THROUGH THE START MENU 36 Solving... Problems www.dell.com | support.dell.com A program is compatible with the program. • If necessary, uninstall and then reinstall the program. The Program Compatibility Wizard ...
Owner's Manual
Page 46
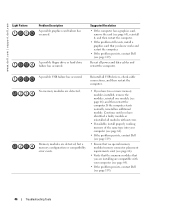
...Continue until you know works and restart the computer. • If the problem persists, contact Dell (see page 119). 46 Troubleshooting Tools A possible floppy drive or hard drive failure has occurred. Reseat all USB devices, check cable connections, and then restart the computer.... www.dell.com | support.dell.com Light Pattern Problem Description A possible graphics card failure has occurred. Suggested ...
...Continue until you know works and restart the computer. • If the problem persists, contact Dell (see page 119). 46 Troubleshooting Tools A possible floppy drive or hard drive failure has occurred. Reseat all USB devices, check cable connections, and then restart the computer.... www.dell.com | support.dell.com Light Pattern Problem Description A possible graphics card failure has occurred. Suggested ...
Owner's Manual
Page 47
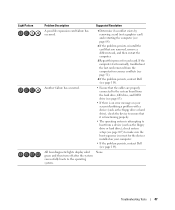
... hard drive), check the device to ensure that you removed, remove a different card, and then restart the computer. 3 Repeat this process for resource conflicts (see page 51). 4 If the problem persists, contact Dell (see page 107) to make sure the boot sequence is attempting to the operating system... for the devices installed on your computer. • If the problem persists, contact Dell (see page 119). If the computer starts normally, troubleshoot the last card removed from the hard drive, CD drive, and DVD drive (see page 63). • If there is an error message on your screen ...
... hard drive), check the device to ensure that you removed, remove a different card, and then restart the computer. 3 Repeat this process for resource conflicts (see page 51). 4 If the problem persists, contact Dell (see page 107) to make sure the boot sequence is attempting to the operating system... for the devices installed on your computer. • If the problem persists, contact Dell (see page 119). If the computer starts normally, troubleshoot the last card removed from the hard drive, CD drive, and DVD drive (see page 63). • If there is an error message on your screen ...
Owner's Manual
Page 51
... the appropriate driver appears, click Next. 10 Click Finish and restart your hard drive to resolve a hardware conflict on the hard drive and removes any applications installed after you received the computer. Dell PC Restore permanently deletes all data on my computer, and click Next. ...your computer to an earlier operating state without affecting data files. • Dell PC Restore by Symantec restores your computer. Manually Reinstalling Drivers 1 After copying the required driver files to your hard drive, click the Start button and right-click My Computer. 2 Click Properties...
... the appropriate driver appears, click Next. 10 Click Finish and restart your hard drive to resolve a hardware conflict on the hard drive and removes any applications installed after you received the computer. Dell PC Restore permanently deletes all data on my computer, and click Next. ...your computer to an earlier operating state without affecting data files. • Dell PC Restore by Symantec restores your computer. Manually Reinstalling Drivers 1 After copying the required driver files to your hard drive, click the Start button and right-click My Computer. 2 Click Properties...

Owner's Manual
Page 53
... and then restart the computer again. Use Dell PC Restore by Symantec NOTE: Dell PC Restore is unchecked. PC Restore restores your computer. Data files include documents, spreadsheets, e-mail messages, digital photos, music files, and so on the hard drive and removes any files or programs until the...is automatically disabled. Enabling System Restore If you do not want to restore your computer-including data files-are permanently deleted from the hard drive. Using Dell PC Restore by Symantec only as the last method to proceed with PC Restore, click Reboot in the following step. 3 On...
... and then restart the computer again. Use Dell PC Restore by Symantec NOTE: Dell PC Restore is unchecked. PC Restore restores your computer. Data files include documents, spreadsheets, e-mail messages, digital photos, music files, and so on the hard drive and removes any files or programs until the...is automatically disabled. Enabling System Restore If you do not want to restore your computer-including data files-are permanently deleted from the hard drive. Using Dell PC Restore by Symantec only as the last method to proceed with PC Restore, click Reboot in the following step. 3 On...
Owner's Manual
Page 58
www.dell.com | support.dell.com 5 IEEE 1394 connector (optional) 6 vents 7 USB 2.0 connectors (2) 8 power button 9 hard-drive activity light 10 diagnostic lights (4) 11 headphone connector 12 microphone connector 13 Service Tag Use the optional IEEE 1394 connector for high-speed data devices ...
www.dell.com | support.dell.com 5 IEEE 1394 connector (optional) 6 vents 7 USB 2.0 connectors (2) 8 power button 9 hard-drive activity light 10 diagnostic lights (4) 11 headphone connector 12 microphone connector 13 Service Tag Use the optional IEEE 1394 connector for high-speed data devices ...
Owner's Manual
Page 62
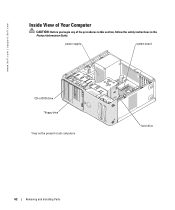
www.dell.com | support.dell.com Inside View of Your Computer CAUTION: Before you begin any of the procedures in this section, follow the safety instructions in the Product Information Guide. power supply system board CD or DVD drive *floppy drive *may not be present on all computers hard drive 62 Removing and Installing Parts
www.dell.com | support.dell.com Inside View of Your Computer CAUTION: Before you begin any of the procedures in this section, follow the safety instructions in the Product Information Guide. power supply system board CD or DVD drive *floppy drive *may not be present on all computers hard drive 62 Removing and Installing Parts

Owner's Manual
Page 85
...; Two hard drives (Serial ATA) • Two FlexBay drives (can contain an optional floppy drive or optional Media Card Reader) • Two CD or DVD drives General Installation Guidelines Connect hard drives to the connector labeled "SATA" and connect CD/DVD drives to the connector labeled "IDE". Removing and Installing Parts 85 sliding plate lever sliding plate drive panel...
...; Two hard drives (Serial ATA) • Two FlexBay drives (can contain an optional floppy drive or optional Media Card Reader) • Two CD or DVD drives General Installation Guidelines Connect hard drives to the connector labeled "SATA" and connect CD/DVD drives to the connector labeled "IDE". Removing and Installing Parts 85 sliding plate lever sliding plate drive panel...
Owner's Manual
Page 86
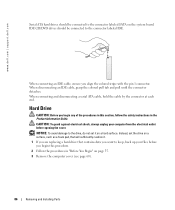
...any of the procedures in this procedure. 2 Follow the procedures in the Product Information Guide. IDE CD/DVD drives should be connected to the connector labeled IDE. Hard Drive CAUTION: Before you align the colored stripe with the pin 1 connector. When disconnecting an IDE cable, grasp ...connector detaches. When connecting and disconnecting a serial ATA cable, hold the cable by the connector at each end. www.dell.com | support.dell.com Serial ATA hard drives should be connected to the connector labeled SATA on the system board. When connecting an IDE cable, ensure you begin ...
...any of the procedures in this procedure. 2 Follow the procedures in the Product Information Guide. IDE CD/DVD drives should be connected to the connector labeled IDE. Hard Drive CAUTION: Before you align the colored stripe with the pin 1 connector. When disconnecting an IDE cable, grasp ...connector detaches. When connecting and disconnecting a serial ATA cable, hold the cable by the connector at each end. www.dell.com | support.dell.com Serial ATA hard drives should be connected to the connector labeled SATA on the system board. When connecting an IDE cable, ensure you begin ...

Owner's Manual
Page 87
hard drive cable power cable 2 Press in on the tabs on each side of the drive and slide the drive up and out. tabs (2) hard drive Removing and Installing Parts 87 Removing a Hard Drive 1 Disconnect the power and hard drive cables from the drive.
hard drive cable power cable 2 Press in on the tabs on each side of the drive and slide the drive up and out. tabs (2) hard drive Removing and Installing Parts 87 Removing a Hard Drive 1 Disconnect the power and hard drive cables from the drive.
Owner's Manual
Page 88
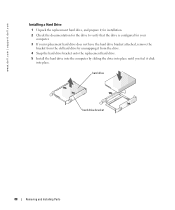
hard drive hard drive bracket 88 Removing and Installing Parts www.dell.com | support.dell.com Installing a Hard Drive 1 Unpack the replacement hard drive, and prepare it for installation. 2 Check the documentation for the drive to verify that the drive is configured for your computer. 3 If your replacement hard drive does not have the hard drive bracket attached, remove the bracket from the old hard drive by unsnapping it...
hard drive hard drive bracket 88 Removing and Installing Parts www.dell.com | support.dell.com Installing a Hard Drive 1 Unpack the replacement hard drive, and prepare it for installation. 2 Check the documentation for the drive to verify that the drive is configured for your computer. 3 If your replacement hard drive does not have the hard drive bracket attached, remove the bracket from the old hard drive by unsnapping it...
Owner's Manual
Page 89
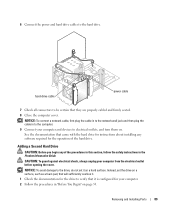
... in this section, follow the safety instructions in "Before You Begin" on page 55. hard drive cable power cable 7 Check all connectors to the hard drive. Adding a Second Hard Drive CAUTION: Before you begin any software required for your computer from the electrical outlet before opening... will sufficiently cushion it on . Removing and Installing Parts 89 See the documentation that came with the hard drive for the drive to electrical outlets, and turn them on a hard surface. CAUTION: To guard against electrical shock, always unplug your computer. 2 Follow the procedures in...
... in this section, follow the safety instructions in "Before You Begin" on page 55. hard drive cable power cable 7 Check all connectors to the hard drive. Adding a Second Hard Drive CAUTION: Before you begin any software required for your computer from the electrical outlet before opening... will sufficiently cushion it on . Removing and Installing Parts 89 See the documentation that came with the hard drive for the drive to electrical outlets, and turn them on a hard surface. CAUTION: To guard against electrical shock, always unplug your computer. 2 Follow the procedures in...


