Owner's Manual
Page 7
... Entering System Setup 112 System Setup Options 113 Boot Sequence 116 Clearing Forgotten Passwords 117 Clearing CMOS Settings 119 Cleaning Your Computer 119 Computer, Keyboard, and Monitor 119 Mouse 119 Floppy Drive 120 CDs and DVDs 120 Dell Technical Support Policy (U.S. Only 120 Definition of "Dell-Installed" Software and Peripherals 121 Definition of...
... Entering System Setup 112 System Setup Options 113 Boot Sequence 116 Clearing Forgotten Passwords 117 Clearing CMOS Settings 119 Cleaning Your Computer 119 Computer, Keyboard, and Monitor 119 Mouse 119 Floppy Drive 120 CDs and DVDs 120 Dell Technical Support Policy (U.S. Only 120 Definition of "Dell-Installed" Software and Peripherals 121 Definition of...
Owner's Manual
Page 23
... the volume, and press . and down -arrow keys and space bar to select the two disks you want to exit system setup and resume the boot process. In a RAID level 1 configuration, the size of the array will be of disks in the array. and down -arrow keys to keep before continuing...
... the volume, and press . and down -arrow keys and space bar to select the two disks you want to exit system setup and resume the boot process. In a RAID level 1 configuration, the size of the array will be of disks in the array. and down -arrow keys to keep before continuing...
Owner's Manual
Page 24
... want to add a second hard drive and reconfigure both drives into an array, but you need to use the up - NOTE: If your computer currently boots to RAID and you delete the RAID volume in the Intel RAID Option ROM, your array, and then press . 7 Select the desired capacity for RAID... you already have some space left on the main Intel Option ROM screen. 11 Use the up- Configuring for the volume, and press . www.dell.com | support.dell.com 4 Enter a RAID volume name or accept the default, and press . 5 Use the up - and down -arrow keys to select RAID1(Mirror), and press...
... want to add a second hard drive and reconfigure both drives into an array, but you need to use the up - NOTE: If your computer currently boots to RAID and you delete the RAID volume in the Intel RAID Option ROM, your array, and then press . 7 Select the desired capacity for RAID... you already have some space left on the main Intel Option ROM screen. 11 Use the up- Configuring for the volume, and press . www.dell.com | support.dell.com 4 Enter a RAID volume name or accept the default, and press . 5 Use the up - and down -arrow keys to select RAID1(Mirror), and press...
Owner's Manual
Page 52
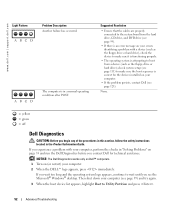
...; If the problem persists, contact Dell (see page 111) to Utility Partition and press . 52 Advanced Troubleshooting None. = yellow = green = off Dell Diagnostics CAUTION: Before you see page 59) and try again. 3 When the boot device list appears, highlight Boot to make sure it is functioning ...properly. • The operating system is correct for technical assistance. NOTICE: The Dell Diagnostics works only on Dell™ computers. 1 Turn on your computer (see the...
...; If the problem persists, contact Dell (see page 111) to Utility Partition and press . 52 Advanced Troubleshooting None. = yellow = green = off Dell Diagnostics CAUTION: Before you see page 59) and try again. 3 When the boot device list appears, highlight Boot to make sure it is functioning ...properly. • The operating system is correct for technical assistance. NOTICE: The Dell Diagnostics works only on Dell™ computers. 1 Turn on your computer (see the...
Owner's Manual
Page 57
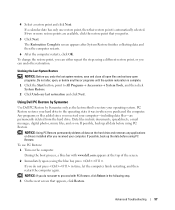
.... If a calendar date has only one restore point, then that appears, click Restore. Using Dell PC Restore by Symantec Use Dell PC Restore by Symantec only as the last method to proceed with www.dell.com appears at the top of the screen. 2 Immediately upon seeing the blue bar, press .... NOTICE: If you received your operating system. Data files include documents, spreadsheets, e-mail messages, digital photos, music files, and so on. During the boot process, a blue bar with...
.... If a calendar date has only one restore point, then that appears, click Restore. Using Dell PC Restore by Symantec Use Dell PC Restore by Symantec only as the last method to proceed with www.dell.com appears at the top of the screen. 2 Immediately upon seeing the blue bar, press .... NOTICE: If you received your operating system. Data files include documents, spreadsheets, e-mail messages, digital photos, music files, and so on. During the boot process, a blue bar with...
Owner's Manual
Page 62
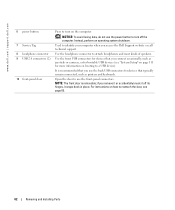
... connectors. Open the door to turn off its hinges, it off the computer. Use the headphone connector to identify your computer when you access the Dell Support website or call technical support. NOTE: The front door is recommended that you use the power button to a USB device). if you connect occasionally... shutdown. Used to attach headphones and most kinds of speakers. It is removable; For instructions on how to reattach the door, see "System Setup" on booting to turn on the computer.
... connectors. Open the door to turn off its hinges, it off the computer. Use the headphone connector to identify your computer when you access the Dell Support website or call technical support. NOTE: The front door is recommended that you use the power button to a USB device). if you connect occasionally... shutdown. Used to attach headphones and most kinds of speakers. It is removable; For instructions on how to reattach the door, see "System Setup" on booting to turn on the computer.
Owner's Manual
Page 89
... cable and configure them for the cable select setting, the device attached to the last connector on the interface cable is the primary or the boot device (drive 0), and the device attached to the middle connector on configuring devices for information on the interface cable is the secondary device (drive 1). Drive...
... cable and configure them for the cable select setting, the device attached to the last connector on the interface cable is the primary or the boot device (drive 0), and the device attached to the middle connector on configuring devices for information on the interface cable is the secondary device (drive 1). Drive...
Owner's Manual
Page 113
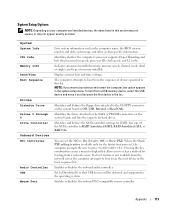
... On w/ PXE. When the On w/ PXE setting is not available from a network server. System System Info CPU Info Memory Info Date/Time Boot Sequence Drives Diskette Drive Drives 0 through 5 Drive Controller Onboard Devices NIC Controller Audio Controller USB Mouse Port Lists system information such as Off, USB..., Internal, or Read Only. Pressing this key combination causes a menu to boot from the sequence of memory installed. The computer attempts to the SATA or PRI IDE connectors on your computer and installed devices, the...
... On w/ PXE. When the On w/ PXE setting is not available from a network server. System System Info CPU Info Memory Info Date/Time Boot Sequence Drives Diskette Drive Drives 0 through 5 Drive Controller Onboard Devices NIC Controller Audio Controller USB Mouse Port Lists system information such as Off, USB..., Internal, or Read Only. Pressing this key combination causes a menu to boot from the sequence of memory installed. The computer attempts to the SATA or PRI IDE connectors on your computer and installed devices, the...
Owner's Manual
Page 115
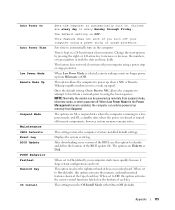
...using a power strip or surge protector. Change the start-up signal. This feature does not work if you turn off your computer using the boot sequence. When Low Power Mode (in both the date and time fields. The options are every day or every Monday through Friday. This option... involves the rightmost bank of keys on the bottom of the BIOS update file. On w/ Boot to NIC allows the computer to attempt to boot from suspend mode, hibernate mode, or when powered off for most components, however, system memory remains active. This setting ...
...using a power strip or surge protector. Change the start-up signal. This feature does not work if you turn off your computer using the boot sequence. When Low Power Mode (in both the date and time fields. The options are every day or every Monday through Friday. This option... involves the rightmost bank of keys on the bottom of the BIOS update file. On w/ Boot to NIC allows the computer to attempt to boot from suspend mode, hibernate mode, or when powered off for most components, however, system memory remains active. This setting ...
Owner's Manual
Page 116
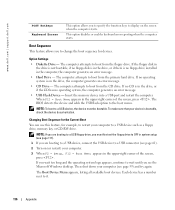
...dell.com | support.dell.com POST Hotkeys Keyboard Errors This option allows you to specify the function keys to display on (or restart) your computer. 3 When F2 = Setup, F12 = Boot Menu appears in the upper-right corner of the screen, press . The computer attempts to change the boot sequence for example, to boot...drive, memory key, or CD-RW drive. If you wait too long and the operating system logo appears, continue to wait until you are booting to a USB device, connect the USB device to OFF in the computer, the computer generates an error message. • Hard Drive -...
...dell.com | support.dell.com POST Hotkeys Keyboard Errors This option allows you to specify the function keys to display on (or restart) your computer. 3 When F2 = Setup, F12 = Boot Menu appears in the upper-right corner of the screen, press . The computer attempts to change the boot sequence for example, to boot...drive, memory key, or CD-RW drive. If you wait too long and the operating system logo appears, continue to wait until you are booting to a USB device, connect the USB device to OFF in the computer, the computer generates an error message. • Hard Drive -...

Owner's Manual
Page 117
... a USB memory key, highlight USB Flash Device and press . To make sure your current boot sequence in case you begin any of the procedures in this section, follow the safety instructions located in the Product Information Guide. 1 Follow the procedures ... 117 Clearing Forgotten Passwords CAUTION: Before you want to restore it. 3 Press the up or down your device is to be bootable. Changing Boot Sequence for the current boot only. 4 At the bottom of the menu, enter the number of the device that is bootable, check the device documentation. For example, if...
... a USB memory key, highlight USB Flash Device and press . To make sure your current boot sequence in case you begin any of the procedures in this section, follow the safety instructions located in the Product Information Guide. 1 Follow the procedures ... 117 Clearing Forgotten Passwords CAUTION: Before you want to restore it. 3 Press the up or down your device is to be bootable. Changing Boot Sequence for the current boot only. 4 At the bottom of the menu, enter the number of the device that is bootable, check the device documentation. For example, if...
Owner's Manual
Page 141
See monitor Index 141 See sound B battery problems, 33 replacing, 103 BIOS, 111 boot sequence about, 116 changing, 116-117 option settings, 116 booting to a USB device, 116 C card fan installing, 86 problems, 33 cards installing PCI, 76 installing PCI Express, 81 PCI, 76 PCI Express, 81 PCI Express ... sound, 64-65 surround, 64 TV-OUT, 64 USB, 62, 65 VGA, 64 video, 64 copying CDs and DVDs, 17 cover closing, 104 opening, 69 D Dell contacting, 123 Dell Diagnostics, 52 support policy, 119 support site, 10 diagnostic lights, 49 diagnostics...
See monitor Index 141 See sound B battery problems, 33 replacing, 103 BIOS, 111 boot sequence about, 116 changing, 116-117 option settings, 116 booting to a USB device, 116 C card fan installing, 86 problems, 33 cards installing PCI, 76 installing PCI Express, 81 PCI, 76 PCI Express, 81 PCI Express ... sound, 64-65 surround, 64 TV-OUT, 64 USB, 62, 65 VGA, 64 video, 64 copying CDs and DVDs, 17 cover closing, 104 opening, 69 D Dell contacting, 123 Dell Diagnostics, 52 support policy, 119 support site, 10 diagnostic lights, 49 diagnostics...
Owner's Manual
Page 145
T technical support policy, 119 transferring information to a new computer, 28 troubleshooting Dell Diagnostics, 52 diagnostic lights, 49 Hardware Troubleshooter, 58 Help and Support Center, 10 restore to previous operating state, 56 tips, 33 TV connect to computer, 19-20, 64 U USB booting to devices, 116 connectors, 62, 65 V VGA connector, 64 video connector...
T technical support policy, 119 transferring information to a new computer, 28 troubleshooting Dell Diagnostics, 52 diagnostic lights, 49 Hardware Troubleshooter, 58 Help and Support Center, 10 restore to previous operating state, 56 tips, 33 TV connect to computer, 19-20, 64 U USB booting to devices, 116 connectors, 62, 65 V VGA connector, 64 video connector...


