
Owner's Manual
Page 75
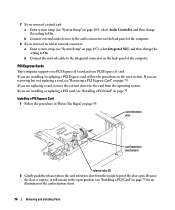
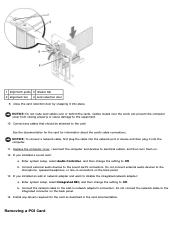
... dirt out of the computer. 8 Close the card retention door by snapping it into place to secure the card(s). Do not connect external audio devices to the microphone, speaker/headphone, or line-in connectors on the back panel. 12 If you are removing the card permanently, install ...computer cover from the inside to electrical outlets, and then turn them on. 11 If you need a filler bracket, contact Dell (see "Contacting Dell" on . 6 Remove the card's driver from the operating system. See the documentation for the card for the card as described in network adapter's connectors. NOTE: ...
... dirt out of the computer. 8 Close the card retention door by snapping it into place to secure the card(s). Do not connect external audio devices to the microphone, speaker/headphone, or line-in connectors on the back panel. 12 If you are removing the card permanently, install ...computer cover from the inside to electrical outlets, and then turn them on. 11 If you need a filler bracket, contact Dell (see "Contacting Dell" on . 6 Remove the card's driver from the operating system. See the documentation for the card for the card as described in network adapter's connectors. NOTE: ...
Owner's Manual
Page 76
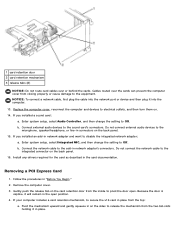
... setup (see "System Setup" on page 107), select Integrated NIC, and then change the setting to On. If you are replacing a card, remove the current driver for the card from the inside to pivot the door open position (see "Installing a PCI Card" on the back panel of the card retention door... PCI Express x16 card and one PCI Express x1 card. 7 If you removed a sound card: a Enter system setup (see "System Setup" on page 107), select Audio Controller, and then change the setting to On. If you are removing but not replacing a card, see "Installing a PCI Card" on page 73. b Connect the...
... setup (see "System Setup" on page 107), select Integrated NIC, and then change the setting to On. If you are replacing a card, remove the current driver for the card from the inside to pivot the door open position (see "Installing a PCI Card" on the back panel of the card retention door... PCI Express x16 card and one PCI Express x1 card. 7 If you removed a sound card: a Enter system setup (see "System Setup" on page 107), select Audio Controller, and then change the setting to On. If you are removing but not replacing a card, see "Installing a PCI Card" on page 73. b Connect the...

Owner's Manual
Page 79
...4 If you installed an add-in network adapter and want to disable the integrated network adapter: a Enter system setup (see "Contacting Dell" on page 107), select Audio Controller, and then change the setting to the microphone, speaker/headphone, or line-in connectors on the back panel. 14 If you... Express Card 1 Follow the procedures in "Before You Begin" on page 59. 2 Gently push the release tab on . 8 Remove the card's driver from closing properly or cause damage to the sound card's connectors. Cables routed over the cards can prevent the computer cover from the operating system.
...4 If you installed an add-in network adapter and want to disable the integrated network adapter: a Enter system setup (see "Contacting Dell" on page 107), select Audio Controller, and then change the setting to the microphone, speaker/headphone, or line-in connectors on the back panel. 14 If you... Express Card 1 Follow the procedures in "Before You Begin" on page 59. 2 Gently push the release tab on . 8 Remove the card's driver from closing properly or cause damage to the sound card's connectors. Cables routed over the cards can prevent the computer cover from the operating system.

Owner's Manual
Page 80
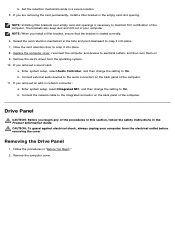
...on the back panel of the procedures in this section, follow the safety instructions in "Before You Begin" on page 107), select Audio Controller, and then change the setting to the integrated connector on the back panel of the computer. 11 Install any of the ... the network cable to On. sliding plate lever sliding plate drive panel 80 Removing and Installing Parts Drive Panel CAUTION: Before you begin any drivers required for the card as described in the card documentation. CAUTION: To guard against electrical shock, always unplug your computer from the electrical outlet...
...on the back panel of the procedures in this section, follow the safety instructions in "Before You Begin" on page 107), select Audio Controller, and then change the setting to the integrated connector on the back panel of the computer. 11 Install any of the ... the network cable to On. sliding plate lever sliding plate drive panel 80 Removing and Installing Parts Drive Panel CAUTION: Before you begin any drivers required for the card as described in the card documentation. CAUTION: To guard against electrical shock, always unplug your computer from the electrical outlet...
Owner's Manual
Page 139
Index A audio. See sound B battery problems, 31 replacing, 100 BIOS, 107 boot sequence about, 113 changing, 114 option settings, 113 booting to a USB device, 114 C cards installing ... support site, 10 diagnostic lights, 47 diagnostics Dell, 50 lights, 47, 62 documentation End User License Agreement, 9 ergonomics, 9 Finding Information, 9 online, 10 Product Information Guide, 9 regulatory, 9 safety, 9 Setup Diagram, 9 warranty, 9 drive panel, 62, 80 removing, 80 replacing, 82 drive-panel insert removing, 81 replacing, 82 drivers about, 51 identifying, 52 Index 139
Index A audio. See sound B battery problems, 31 replacing, 100 BIOS, 107 boot sequence about, 113 changing, 114 option settings, 113 booting to a USB device, 114 C cards installing ... support site, 10 diagnostic lights, 47 diagnostics Dell, 50 lights, 47, 62 documentation End User License Agreement, 9 ergonomics, 9 Finding Information, 9 online, 10 Product Information Guide, 9 regulatory, 9 safety, 9 Setup Diagram, 9 warranty, 9 drive panel, 62, 80 removing, 80 replacing, 82 drive-panel insert removing, 81 replacing, 82 drivers about, 51 identifying, 52 Index 139
Owner's Manual
Page 142
...27 problems, 37-38 sound problems, 43 volume, 43 speaker problems, 43 volume, 43 specifications audio, 104 computer information, 104 connectors, 105 controls and lights, 106 drives, 105 environmental, 107 ..., 106 power, 106 processor, 103 technical, 103 video, 104 standby mode, 25 support contacting Dell, 120 policy, 118 support website, 10 system board, 67 System Restore, 53-54 system setup... vents, 62 front panel, 62 volume adjusting, 43 W warranty information, 9 Windows XP Device Driver Rollback, 52 Files and Settings Transfer Wizard, 27 Hardware Troubleshooter, 53 Help and Support Center, ...
...27 problems, 37-38 sound problems, 43 volume, 43 speaker problems, 43 volume, 43 specifications audio, 104 computer information, 104 connectors, 105 controls and lights, 106 drives, 105 environmental, 107 ..., 106 power, 106 processor, 103 technical, 103 video, 104 standby mode, 25 support contacting Dell, 120 policy, 118 support website, 10 system board, 67 System Restore, 53-54 system setup... vents, 62 front panel, 62 volume adjusting, 43 W warranty information, 9 Windows XP Device Driver Rollback, 52 Files and Settings Transfer Wizard, 27 Hardware Troubleshooter, 53 Help and Support Center, ...
Service Manual
Page 24
... to Off. Do not connect external audio devices to the integrated connector on the back panel. 14. If you installed a sound card: a. Enter system setup, select Integrated NIC, and then change the setting to the card. Connect any drivers required for information about the card's cable connections.... and then plug it into the computer. 11. Close the card retention door by snapping it into place. Enter system setup, select Audio Controller, and then change the setting to the sound card's connectors. b. Do not connect the network cable to the microphone, speaker/...
... to Off. Do not connect external audio devices to the integrated connector on the back panel. 14. If you installed a sound card: a. Enter system setup, select Integrated NIC, and then change the setting to the card. Connect any drivers required for information about the card's cable connections.... and then plug it into the computer. 11. Close the card retention door by snapping it into place. Enter system setup, select Audio Controller, and then change the setting to the sound card's connectors. b. Do not connect the network cable to the microphone, speaker/...

Service Manual
Page 25
... NOTE: Installing filler brackets over empty card-slot openings is captive, it will remain in the empty card-slot opening. b. Connect external audio devices to maintain FCC certification of the computer. 9. b. Remove the computer cover. If you are installing or replacing a PCI Express card... an add-in "Before You Begin." 2. Enter system setup, select Integrated NIC, and then change the setting to On. Remove the card's driver from the operating system. Gently push the release tab on . 7. If you removed a sound card: a. Close the card retention door by ...
... NOTE: Installing filler brackets over empty card-slot openings is captive, it will remain in the empty card-slot opening. b. Connect external audio devices to maintain FCC certification of the computer. 9. b. Remove the computer cover. If you are installing or replacing a PCI Express card... an add-in "Before You Begin." 2. Enter system setup, select Integrated NIC, and then change the setting to On. Remove the card's driver from the operating system. Gently push the release tab on . 7. If you removed a sound card: a. Close the card retention door by ...
Service Manual
Page 28
... the microphone, speaker/headphone, or line-in the card documentation. Install any drivers required for the card as described in connectors on the back panel. 15. Removing a PCI Express Card 1. Connect external audio devices to electrical outlets, and then turn them on the card retention door ...Pivot the mechanism upward and gently squeeze in on the back panel. 16. Follow the procedures in the open . Enter system setup, select Audio Controller, and then change the setting to release the mechanism from the top: a. Enter system setup, select Integrated NIC, and then change ...
... the microphone, speaker/headphone, or line-in the card documentation. Install any drivers required for the card as described in connectors on the back panel. 15. Removing a PCI Express Card 1. Connect external audio devices to electrical outlets, and then turn them on the card retention door ...Pivot the mechanism upward and gently squeeze in on the back panel. 16. Follow the procedures in the open . Enter system setup, select Audio Controller, and then change the setting to release the mechanism from the top: a. Enter system setup, select Integrated NIC, and then change ...
Service Manual
Page 29
... your computer from the operating system. 10. Remove the card's driver from the electrical outlet before removing the cover. Removing the Drive Panel 1. Reseat the card retention mechanism in network connector: a. b. Connect external audio devices to snap it into place. 7. b. Close the card retention... a secure location. 5. Remove the computer cover. NOTE: When you removed an add-in the tabs and pivot downward to the audio connectors on the back panel of the procedures in this section, follow the safety instructions in the empty card-slot opening. Enter system...
... your computer from the operating system. 10. Remove the card's driver from the electrical outlet before removing the cover. Removing the Drive Panel 1. Reseat the card retention mechanism in network connector: a. b. Connect external audio devices to snap it into place. 7. b. Close the card retention... a secure location. 5. Remove the computer cover. NOTE: When you removed an add-in the tabs and pivot downward to the audio connectors on the back panel of the procedures in this section, follow the safety instructions in the empty card-slot opening. Enter system...


