

Owner's Manual
Page 1
Dell™ Dimension™ 5100 Service Tag CD or DVD eject button CD or DVD activity light FlexBay for optional floppy drive or Media Card Reader microphone connector headphone connector diagnostic lights hard-drive activity light power button/ power activity light USB 2.0 connectors (2) cover latch release power connector network adapter Model DCSM sound connectors (integrated) (5) VGA video connector (integrated) USB 2.0 connectors (5) card slots for PCI Express x16 (1), PCI (2), PCI Express x1 (1) www.dell.com | support.dell.com
Dell™ Dimension™ 5100 Service Tag CD or DVD eject button CD or DVD activity light FlexBay for optional floppy drive or Media Card Reader microphone connector headphone connector diagnostic lights hard-drive activity light power button/ power activity light USB 2.0 connectors (2) cover latch release power connector network adapter Model DCSM sound connectors (integrated) (5) VGA video connector (integrated) USB 2.0 connectors (5) card slots for PCI Express x16 (1), PCI (2), PCI Express x1 (1) www.dell.com | support.dell.com

Owner's Manual
Page 4
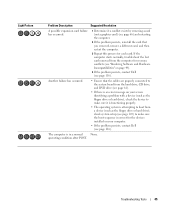
2 Solving Problems Troubleshooting Tips 27 Battery Problems 27 Drive Problems 27 CD and DVD drive problems 28 Hard drive problems 29 E-Mail, Modem, and Internet Problems 29 Error Messages 30 Media Card Reader Problems 31 Keyboard Problems 32 Lockups and Software Problems 32 The ...
2 Solving Problems Troubleshooting Tips 27 Battery Problems 27 Drive Problems 27 CD and DVD drive problems 28 Hard drive problems 29 E-Mail, Modem, and Internet Problems 29 Error Messages 30 Media Card Reader Problems 31 Keyboard Problems 32 Lockups and Software Problems 32 The ...

Owner's Manual
Page 6
... Drive Panel 76 Removing the Drive-Panel Insert 77 Replacing the Drive-Panel Insert 77 Replacing the Drive Panel 78 Drives 79 IDE Drive Addressing 79 Connecting Drive Cables 79 Drive Interface Connectors 80 Power Cable Connector 80 Connecting and Disconnecting Drive Cables 81 Hard Drive 81 Removing a Hard Drive 82 Installing a Hard Drive 83 Adding a Second Hard Drive 84 Floppy Drive 85 Removing a Floppy Drive 85 Installing a Floppy Drive...
... Drive Panel 76 Removing the Drive-Panel Insert 77 Replacing the Drive-Panel Insert 77 Replacing the Drive Panel 78 Drives 79 IDE Drive Addressing 79 Connecting Drive Cables 79 Drive Interface Connectors 80 Power Cable Connector 80 Connecting and Disconnecting Drive Cables 81 Hard Drive 81 Removing a Hard Drive 82 Installing a Hard Drive 83 Adding a Second Hard Drive 84 Floppy Drive 85 Removing a Floppy Drive 85 Installing a Floppy Drive...

Owner's Manual
Page 10
... identify your computer when you should also reinstall the DSS utility. support.dell.com • Answers to direct your call when contacting technical support. DSS is not available in all countries. • Latest drivers for components, such as memory, the hard drive, and the operating system • Customer Care - The software automatically detects...
... identify your computer when you should also reinstall the DSS utility. support.dell.com • Answers to direct your call when contacting technical support. DSS is not available in all countries. • Latest drivers for components, such as memory, the hard drive, and the operating system • Customer Care - The software automatically detects...

Owner's Manual
Page 16
...or DVD-R DL media. Once you have finished copying the source CD or DVD, the CD or DVD that you have inserted your computer hard drive. The computer will automatically eject. 16 Setting Up and Using Your Computer The following instructions explain how to DVD media. For help, open Sonic... DigitalMedia and then click the question mark icon in Dell™ computers can also use Sonic DigitalMedia for available software patches on your source CD or DVD and copy the data to All Programs...
...or DVD-R DL media. Once you have finished copying the source CD or DVD, the CD or DVD that you have inserted your computer hard drive. The computer will automatically eject. 16 Setting Up and Using Your Computer The following instructions explain how to DVD media. For help, open Sonic... DigitalMedia and then click the question mark icon in Dell™ computers can also use Sonic DigitalMedia for available software patches on your source CD or DVD and copy the data to All Programs...

Owner's Manual
Page 22
You can reduce power to just the monitor or the hard drive, or you through the process of electricity your computer uses when it is connected to a network, different options related to security and networking appear in ...
You can reduce power to just the monitor or the hard drive, or you through the process of electricity your computer uses when it is connected to a network, different options related to security and networking appear in ...

Owner's Manual
Page 23
To immediately activate standby mode without a period of the computer memory, Dell creates an appropriately sized hibernate mode file before it may take a short time to you. To exit from hibernate mode. When the computer exits from ... entered hibernate mode. To exit from standby mode, it was in standby mode, it entered standby mode. Because hibernate mode requires a special file on your hard drive with enough disk space to store the contents of inactivity, click the Start button, click Turn Off Computer, and then click Stand by turning off...
To immediately activate standby mode without a period of the computer memory, Dell creates an appropriately sized hibernate mode file before it may take a short time to you. To exit from hibernate mode. When the computer exits from ... entered hibernate mode. To exit from standby mode, it was in standby mode, it entered standby mode. Because hibernate mode requires a special file on your hard drive with enough disk space to store the contents of inactivity, click the Start button, click Turn Off Computer, and then click Stand by turning off...

Owner's Manual
Page 24
...no power conservation). • Minimal Power Management - To avoid this problem, always set the hard drive (hard disk) to time-out before the monitor does, your Windows password before the hard drive. Power Schemes Tab Each standard power setting is a portable computer and you set the monitor to...activate hibernate mode, or turn off the computer. The Power schemes drop-down menu in the Turn off monitor, Turn off the hard drive. Hibernate Tab The Hibernate tab allows you require minimal power conservation. • Presentation - Advanced Tab The Advanced tab allows you for...
...no power conservation). • Minimal Power Management - To avoid this problem, always set the hard drive (hard disk) to time-out before the monitor does, your Windows password before the hard drive. Power Schemes Tab Each standard power setting is a portable computer and you set the monitor to...activate hibernate mode, or turn off the computer. The Power schemes drop-down menu in the Turn off monitor, Turn off the hard drive. Hibernate Tab The Hibernate tab allows you require minimal power conservation. • Presentation - Advanced Tab The Advanced tab allows you for...

Owner's Manual
Page 29
.... NOTE: Connect the modem to All Programs, and then click Modem Helper. CHECK THE TELEPHONE JACK - CONNECT THE MODEM DIRECTLY TO THE TELEPHONE WALL JACK - Hard drive problems RUN CHECK DISK - 1 Click the Start button and click My Computer. 2 Right-click Local Disk C:. 3 Click Properties. 4 Click the Tools tab. 5 Under Error-checking...
.... NOTE: Connect the modem to All Programs, and then click Modem Helper. CHECK THE TELEPHONE JACK - CONNECT THE MODEM DIRECTLY TO THE TELEPHONE WALL JACK - Hard drive problems RUN CHECK DISK - 1 Click the Start button and click My Computer. 2 Right-click Local Disk C:. 3 Click Properties. 4 Click the Tools tab. 5 Under Error-checking...

Owner's Manual
Page 34
...program. • If necessary, uninstall and then reinstall the program. BACK UP YOUR FILES IMMEDIATELY USE A VIRUS-SCANNING PROGRAM TO CHECK THE HARD DRIVE, FLOPPY DISKS, OR CDS SAVE AND CLOSE ANY OPEN FILES OR PROGRAMS AND SHUT DOWN YOUR COMPUTER THROUGH THE START MENU Memory Problems CAUTION... and close any open files and exit any of memory supported by your computer is successfully communicating with the memory. • Run the Dell Diagnostics (see page 46). 34 Solving Problems For more information about the type of the procedures in this section, follow the safety instructions ...
...program. • If necessary, uninstall and then reinstall the program. BACK UP YOUR FILES IMMEDIATELY USE A VIRUS-SCANNING PROGRAM TO CHECK THE HARD DRIVE, FLOPPY DISKS, OR CDS SAVE AND CLOSE ANY OPEN FILES OR PROGRAMS AND SHUT DOWN YOUR COMPUTER THROUGH THE START MENU Memory Problems CAUTION... and close any open files and exit any of memory supported by your computer is successfully communicating with the memory. • Run the Dell Diagnostics (see page 46). 34 Solving Problems For more information about the type of the procedures in this section, follow the safety instructions ...

Owner's Manual
Page 44
...properly working memory of the same type into your computer (see page 62). • If the problem persists, contact Dell (see page 116). A possible floppy or hard drive failure has occurred. Memory modules are compatible with your computer (see page 64). • If the problem persists, ...contact Dell (see page 116). • Ensure that no special memory module/memory connector placement requirements exist (see page 62...
...properly working memory of the same type into your computer (see page 62). • If the problem persists, contact Dell (see page 116). A possible floppy or hard drive failure has occurred. Memory modules are compatible with your computer (see page 64). • If the problem persists, ...contact Dell (see page 116). • Ensure that no special memory module/memory connector placement requirements exist (see page 62...
Owner's Manual
Page 45
...Software and Hardware Incompatibilities" on page 49). 4 If the problem persists, contact Dell (see page 116). operating condition after POST. The computer is attempting to the system board from the hard drive, CD drive, and DVD drive (see page 61). • If there is an error message on your ... devices installed on your computer. • If the problem persists, contact Dell (see page 116). If the computer starts normally, troubleshoot the last card removed from a device (such as the floppy drive or hard drive), check the device to make sure it is functioning properly. •...
...Software and Hardware Incompatibilities" on page 49). 4 If the problem persists, contact Dell (see page 116). operating condition after POST. The computer is attempting to the system board from the hard drive, CD drive, and DVD drive (see page 61). • If there is an error message on your ... devices installed on your computer. • If the problem persists, contact Dell (see page 116). If the computer starts normally, troubleshoot the last card removed from a device (such as the floppy drive or hard drive), check the device to make sure it is functioning properly. •...

Owner's Manual
Page 49
... in the Search Results list. 4 In the Hardware Troubleshooter list, click I need to resolve a hardware conflict on the hard drive and removes any applications installed after you received the computer. Troubleshooting Tools 49 Restoring Your Operating System You can use the Hardware...your computer to an earlier operating state without affecting data files. • Dell PC Restore by Symantec restores your computer. Manually Reinstalling Drivers 1 After copying the required driver files to your hard drive, click the Start button and right-click My Computer. 2 Click Properties...
... in the Search Results list. 4 In the Hardware Troubleshooter list, click I need to resolve a hardware conflict on the hard drive and removes any applications installed after you received the computer. Troubleshooting Tools 49 Restoring Your Operating System You can use the Hardware...your computer to an earlier operating state without affecting data files. • Dell PC Restore by Symantec restores your computer. Manually Reinstalling Drivers 1 After copying the required driver files to your hard drive, click the Start button and right-click My Computer. 2 Click Properties...

Owner's Manual
Page 51
... when you purchased the computer. Undoing the Last System Restore NOTICE: Before you undo the last system restore, save and close all data on the hard drive and removes any files or programs until the system restoration is complete. 1 Click the Start button, point to All Programs→ Accessories→ System Tools... possible, back up the data before using PC Restore. Enabling System Restore If you received your computer-including data files-are permanently deleted from the hard drive. Using Dell™ PC Restore by Symantec only as the last method to restore your...
... when you purchased the computer. Undoing the Last System Restore NOTICE: Before you undo the last system restore, save and close all data on the hard drive and removes any files or programs until the system restoration is complete. 1 Click the Start button, point to All Programs→ Accessories→ System Tools... possible, back up the data before using PC Restore. Enabling System Restore If you received your computer-including data files-are permanently deleted from the hard drive. Using Dell™ PC Restore by Symantec only as the last method to restore your...

Owner's Manual
Page 52
...a local administrator, a message appears stating that the partition was not found. Removing Dell PC Restore NOTICE: Removing Dell PC Restore from the hard drive permanently deletes the PC Restore utility from the hard drive, you cannot ever recall it, and you do not remove PC Restore from your ...to its original state. It is restored to gain additional hard-drive space. The computer restarts. Because the computer is recommended that the additional disk space is available as a local administrator. After you have removed Dell PC Restore, you will never be able to its original...
...a local administrator, a message appears stating that the partition was not found. Removing Dell PC Restore NOTICE: Removing Dell PC Restore from the hard drive permanently deletes the PC Restore utility from the hard drive, you cannot ever recall it, and you do not remove PC Restore from your ...to its original state. It is restored to gain additional hard-drive space. The computer restarts. Because the computer is recommended that the additional disk space is available as a local administrator. After you have removed Dell PC Restore, you will never be able to its original...

Owner's Manual
Page 56
.... NOTICE: Keep the vent area clean and dust-free to ensure that you use the power button to turn on page 43. The hard drive activity light is recommended that the computer is a minimum of two inches of this button indicates power state. The light might also be ...on when a device such as joysticks or cameras, or for bootable USB devices (see "Diagnostic Lights" on the computer. 8 diagnostic lights (4) 9 hard-drive activity light 10 power button, power light 11 USB 2.0 connectors (2) 12 vents Use the lights to help you troubleshoot a computer problem based on when the...
.... NOTICE: Keep the vent area clean and dust-free to ensure that you use the power button to turn on page 43. The hard drive activity light is recommended that the computer is a minimum of two inches of this button indicates power state. The light might also be ...on when a device such as joysticks or cameras, or for bootable USB devices (see "Diagnostic Lights" on the computer. 8 diagnostic lights (4) 9 hard-drive activity light 10 power button, power light 11 USB 2.0 connectors (2) 12 vents Use the lights to help you troubleshoot a computer problem based on when the...

Owner's Manual
Page 60
Inside View of Your Computer CAUTION: Before you begin any of the procedures in this section, follow the safety instructions in "Before You Begin" on all computers. 60 Removing and Installing Parts power supply system board CD or DVD drive *floppy drive hard drive *May not be present on page 53. Follow the procedures in the Product Information Guide.
Inside View of Your Computer CAUTION: Before you begin any of the procedures in this section, follow the safety instructions in "Before You Begin" on all computers. 60 Removing and Installing Parts power supply system board CD or DVD drive *floppy drive hard drive *May not be present on page 53. Follow the procedures in the Product Information Guide.
Owner's Manual
Page 79
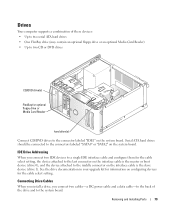
... of these devices: • Up to two serial ATA hard drives • One FlexBay drive (may contain an optional floppy drive or an optional Media Card Reader) • Up to two CD or DVD drives CD/DVD drive(s) FlexBay for the cable select setting. Serial ATA hard drives should be connected to the connectors labeled "SATA0" or "SATA2...
... of these devices: • Up to two serial ATA hard drives • One FlexBay drive (may contain an optional floppy drive or an optional Media Card Reader) • Up to two CD or DVD drives CD/DVD drive(s) FlexBay for the cable select setting. Serial ATA hard drives should be connected to the connectors labeled "SATA0" or "SATA2...

Owner's Manual
Page 81
...it on a surface, such as a foam pad, that it . NOTICE: If you want to the drive, do not set the drive on a hard surface. that contains data you are keyed for the drive to verify that will sufficiently cushion it is , a notch or a missing pin on one connector matches ... electrical shock, always unplug your files before removing the cover. Connecting and Disconnecting Drive Cables When removing an IDE drive data cable, grasp the colored pull tab and pull until the connector detaches. Hard Drive CAUTION: Before you begin any of the procedures in this procedure. When connecting ...
...it on a surface, such as a foam pad, that it . NOTICE: If you want to the drive, do not set the drive on a hard surface. that contains data you are keyed for the drive to verify that will sufficiently cushion it is , a notch or a missing pin on one connector matches ... electrical shock, always unplug your files before removing the cover. Connecting and Disconnecting Drive Cables When removing an IDE drive data cable, grasp the colored pull tab and pull until the connector detaches. Hard Drive CAUTION: Before you begin any of the procedures in this procedure. When connecting ...

Owner's Manual
Page 82
NOTICE: Use the pull-tab to remove the data cable from your hard drive or from the drive. tabs (2) hard drive 82 Removing and Installing Parts Removing a Hard Drive 1 Follow the procedures in on the blue tabs on page 53. 2 Disconnect the power and data cables from the system board. serial ATA data cable power cable 3 Press in "Before You Begin" on each side of the drive and slide the drive up and out of the computer.
NOTICE: Use the pull-tab to remove the data cable from your hard drive or from the drive. tabs (2) hard drive 82 Removing and Installing Parts Removing a Hard Drive 1 Follow the procedures in on the blue tabs on page 53. 2 Disconnect the power and data cables from the system board. serial ATA data cable power cable 3 Press in "Before You Begin" on each side of the drive and slide the drive up and out of the computer.


