

Dell Dimension 4200 Solutions Guide
Page 41
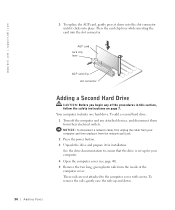
Adding Parts 41 computer cover* drive cables power cables power supply hard drive filler brackets for empty card-cage slots (4) system board * Depending on page 7. CAUTION: Before you do not inadvertently disconnect cables from the system board. NOTICE: Be careful when opening the computer cover to ensure that you begin any of the procedures in this section, follow the safety instructions on the types of drives installed in your computer, the cover may not open as widely as shown in the figure.
Adding Parts 41 computer cover* drive cables power cables power supply hard drive filler brackets for empty card-cage slots (4) system board * Depending on page 7. CAUTION: Before you do not inadvertently disconnect cables from the system board. NOTICE: Be careful when opening the computer cover to ensure that you begin any of the procedures in this section, follow the safety instructions on the types of drives installed in your computer, the cover may not open as widely as shown in the figure.
Dell Dimension 4200 Solutions Guide
Page 42
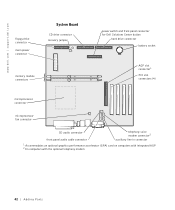
... main power connector System Board CD drive connector recovery jumper memory module connectors power switch and front panel connector for Dell Solutions Center button hard drive connector battery socket AGP slot connector1 PCI slot connectors (4) microprocessor connector microprocessor fan connector CD audio connector front panel audio cable connector telephony voice modem connector2 auxiliary...
... main power connector System Board CD drive connector recovery jumper memory module connectors power switch and front panel connector for Dell Solutions Center button hard drive connector battery socket AGP slot connector1 PCI slot connectors (4) microprocessor connector microprocessor fan connector CD audio connector front panel audio cable connector telephony voice modem connector2 auxiliary...

Dell Dimension 4200 Solutions Guide
Page 43
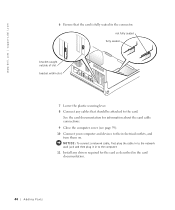
card bracket securing lever card slot connector system board Adding Parts 43 CAUTION: Before you begin any attached devices, and disconnect them from their electrical outlets. NOTICE: To disconnect a network cable, ...
card bracket securing lever card slot connector system board Adding Parts 43 CAUTION: Before you begin any attached devices, and disconnect them from their electrical outlets. NOTICE: To disconnect a network cable, ...
Dell Dimension 4200 Solutions Guide
Page 44
... the card documentation for the card as described in the card documentation. 44 Adding Parts not fully seated fully seated bracket caught outside of slot bracket within slot 7 Lower the plastic securing lever. 8 Connect any drivers required for information about the card cable connections. 9 Close the computer cover (see...To connect a network cable, first plug the cable in to the network wall jack and then plug it in the connector. www.dell.com | support.dell.com 6 Ensure that the card is fully seated in to the computer. 11 Install any cables that should be attached to their electrical...
... the card documentation for the card as described in the card documentation. 44 Adding Parts not fully seated fully seated bracket caught outside of slot bracket within slot 7 Lower the plastic securing lever. 8 Connect any drivers required for information about the card cable connections. 9 Close the computer cover (see...To connect a network cable, first plug the cable in to the network wall jack and then plug it in the connector. www.dell.com | support.dell.com 6 Ensure that the card is fully seated in to the computer. 11 Install any cables that should be attached to their electrical...
Dell Dimension 4200 Solutions Guide
Page 46
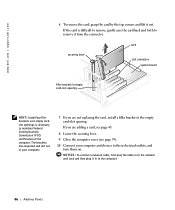
... dust and dirt out of the computer. card securing lever slot connector system board filler bracket in empty card-slot opening . www.dell.com | support.dell.com 6 To remove the card, grasp the card by the top corners and lift it in the empty card-slot opening HINT: Installing filler brackets over empty cardslot openings...
... dust and dirt out of the computer. card securing lever slot connector system board filler bracket in empty card-slot opening . www.dell.com | support.dell.com 6 To remove the card, grasp the card by the top corners and lift it in the empty card-slot opening HINT: Installing filler brackets over empty cardslot openings...
Dell Dimension 4200 Solutions Guide
Page 49
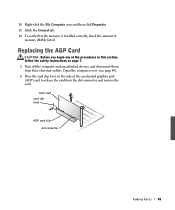
... safety instructions on the side of memory (RAM) listed. AGP card card clip lever AGP card clip slot connector Adding Parts 49 CAUTION: Before you begin any attached devices, and disconnect them from the slot connector, and remove the card. 10 Right-click the My Computer icon and then click Properties 11...
... safety instructions on the side of memory (RAM) listed. AGP card card clip lever AGP card clip slot connector Adding Parts 49 CAUTION: Before you begin any attached devices, and disconnect them from the slot connector, and remove the card. 10 Right-click the My Computer icon and then click Properties 11...
Dell Dimension 4200 Solutions Guide
Page 50
... to the computer cover with screws. To remove the rails, gently ease the rails up for installation. AGP card card clip lever AGP card clip slot connector CAUTION: Before you begin any attached devices, and disconnect them from the network wall jack. 2 Press the power button. 3 Unpack the drive...5 Remove the two long, green plastic rails from the inside of the procedures in this section, follow the safety instructions on page 7. www.dell.com | support.dell.com 3 To replace the AGP card, gently press it down . 50 Adding Parts These rails are not attached to ensure that the drive is...
... to the computer cover with screws. To remove the rails, gently ease the rails up for installation. AGP card card clip lever AGP card clip slot connector CAUTION: Before you begin any attached devices, and disconnect them from the network wall jack. 2 Press the power button. 3 Unpack the drive...5 Remove the two long, green plastic rails from the inside of the procedures in this section, follow the safety instructions on page 7. www.dell.com | support.dell.com 3 To replace the AGP card, gently press it down . 50 Adding Parts These rails are not attached to ensure that the drive is...


