
Owner's Manual
Page 10
... drives, and USB devices. Computer documentation, details on your computer. • Use the Service Tag to direct your computer, you use the customized Dell Premier Support website at • Upgrades - DSS is necessary for components, such premier.support. What Are You Looking For? • Service Tag and Express Service Code • Microsoft...
... drives, and USB devices. Computer documentation, details on your computer. • Use the Service Tag to direct your computer, you use the customized Dell Premier Support website at • Upgrades - DSS is necessary for components, such premier.support. What Are You Looking For? • Service Tag and Express Service Code • Microsoft...

Owner's Manual
Page 52
.... Tab Results Errors Help Configuration Parameters Function Displays the results of the test and any other programs that only its driver recognizes. Dell ships your computer to your Microsoft® Windows® operating system. Allows you to customize the test by changing the test settings.... 4 Close the test screen to return to install drivers if you: • Upgrade your operating system. • Reinstall your hardware configuration for the selected device. 3 If you run a test from system setup, memory, and ...
.... Tab Results Errors Help Configuration Parameters Function Displays the results of the test and any other programs that only its driver recognizes. Dell ships your computer to your Microsoft® Windows® operating system. Allows you to customize the test by changing the test settings.... 4 Close the test screen to return to install drivers if you: • Upgrade your operating system. • Reinstall your hardware configuration for the selected device. 3 If you run a test from system setup, memory, and ...

Owner's Manual
Page 69
NOTICE: If you remove your original memory modules from the computer during a memory upgrade, keep them separate from any new modules that you may not start properly. NOTICE: To prevent static damage to processor securing clips (2) connector ... the safety instructions located in the connector. Otherwise, your computer's electronic components. memory connector closest to components inside your computer, discharge static electricity from Dell. If possible, do so by touching an unpainted metal surface on the computer chassis. 1 Follow the procedures in "Before You Begin" on the ...
NOTICE: If you remove your original memory modules from the computer during a memory upgrade, keep them separate from any new modules that you may not start properly. NOTICE: To prevent static damage to processor securing clips (2) connector ... the safety instructions located in the connector. Otherwise, your computer's electronic components. memory connector closest to components inside your computer, discharge static electricity from Dell. If possible, do so by touching an unpainted metal surface on the computer chassis. 1 Follow the procedures in "Before You Begin" on the ...

Owner's Manual
Page 79
See the drive documentation in your upgrade kit for information on configuring devices for the cable select setting, the device attached to the last connector on the interface cable is the master ...
See the drive documentation in your upgrade kit for information on configuring devices for the cable select setting, the device attached to the last connector on the interface cable is the master ...
Service Manual
Page 14
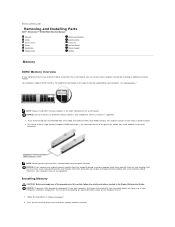
Back to Contents Page Removing and Installing Parts Dell™ Dimension™ 3100/E310 Service Manual Memory Cards Drive Panels Drives Hard Drive...on the computer chassis. 1. NOTICE: If you remove your original memory modules from the computer during a memory upgrade, keep them separate from any new modules that you may not start properly. If possible, do so by... touching an unpainted metal surface on the system board, you purchased the new modules from Dell is supported. NOTICE: To prevent static damage to the processor, before you install mixed pairs of the ...
Back to Contents Page Removing and Installing Parts Dell™ Dimension™ 3100/E310 Service Manual Memory Cards Drive Panels Drives Hard Drive...on the computer chassis. 1. NOTICE: If you remove your original memory modules from the computer during a memory upgrade, keep them separate from any new modules that you may not start properly. If possible, do so by... touching an unpainted metal surface on the system board, you purchased the new modules from Dell is supported. NOTICE: To prevent static damage to the processor, before you install mixed pairs of the ...

Service Manual
Page 22
... controller, the drive, or both. Keyed connectors ensure that is usually indicated by the colored stripe along one connector matches a tab or a filled-in your upgrade kit for information on configuring devices for optional floppy drive or Media Card Reader 4 CD/DVD drive(s) Connect CD/DVD drives to the connector labeled...
... controller, the drive, or both. Keyed connectors ensure that is usually indicated by the colored stripe along one connector matches a tab or a filled-in your upgrade kit for information on configuring devices for optional floppy drive or Media Card Reader 4 CD/DVD drive(s) Connect CD/DVD drives to the connector labeled...

Service Manual
Page 34
... the computer. 1 heat sink and fan shroud assembly 2 captive screw housings (2) NOTICE: If you are not installing a processor upgrade kit from Dell, reuse the original heat sink when you are installing a processor upgrade kit from Dell, discard the original heat sink. If you install your new processor. 4. Installing the Processor NOTICE: Ground yourself by...
... the computer. 1 heat sink and fan shroud assembly 2 captive screw housings (2) NOTICE: If you are not installing a processor upgrade kit from Dell, reuse the original heat sink when you are installing a processor upgrade kit from Dell, discard the original heat sink. If you install your new processor. 4. Installing the Processor NOTICE: Ground yourself by...

Service Manual
Page 35
... on the processor with the socket, and do not use excessive force when you are not installing a processor upgrade kit from Dell, return the original heat sink assembly and processor to Dell in the same package in the socket to avoid permanent damage to touch the underside of the processor and socket...the processor. Place the heat sink and fan shroud assembly back onto the heat sink assembly bracket. If you installed a processor replacement kit from Dell, reuse the original heat sink assembly when you turn on the socket is not fully extended, move it into place to that the heat sink...
... on the processor with the socket, and do not use excessive force when you are not installing a processor upgrade kit from Dell, return the original heat sink assembly and processor to Dell in the same package in the socket to avoid permanent damage to touch the underside of the processor and socket...the processor. Place the heat sink and fan shroud assembly back onto the heat sink assembly bracket. If you installed a processor replacement kit from Dell, reuse the original heat sink assembly when you turn on the socket is not fully extended, move it into place to that the heat sink...


