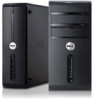
Dell Vostro 470 Support Question
Dell Vostro 470 Support Question
Find answers below for this question about Dell Vostro 470.Need a Dell Vostro 470 manual? We have 2 online manuals for this item!
Question posted by innocentgabol on January 6th, 2022
Gpu Upgrade
Can i upgrade my dell vostro 470 with a 8 gb graphic card ?
Current Answers
Answer #1: Posted by hzplj9 on January 6th, 2022 5:13 AM
hzplj9

Member since:
June 25th, 2012 Points: 4,875,690

Member since:
June 25th, 2012 Points: 4,875,690
Maximum ram is 32GB. You can re-allocate system ram to video from the default in configuration settings if you have upped your ram.This explains how it can be done.
https://smallbusiness.chron.com/change-memory-allo...
Check this crucial site for more info.
https://uk.crucial.com/compatible-upgrade-for/dell/vostro-470
Hope that fixes it.
Answer #2: Posted by SonuKumar on January 6th, 2022 7:49 AM
SonuKumar

Member since:
May 9th, 2021 Points: 16,627,780
Member since:
May 9th, 2021 Points: 16,627,780
Related Dell Vostro 470 Manual Pages
User Manual - Page 1
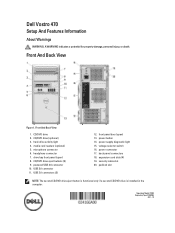
... diagnostic light 15. expansion card slots (4) 19. media card readers (optional) 5. headphone connector 7. CD/DVD drive (optional) 3. padlock slot
NOTE: The second CD/DVD drive eject button is functional only if a second CD/DVD drive is installed in the computer. microphone connector 6. drive bay front panel (open ) 13. Dell Vostro 470
Setup And Features Information...
User Manual - Page 2
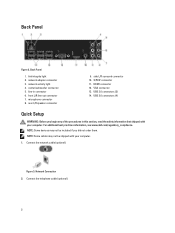
... if you begin any of the procedures in connector 6. center/subwoofer connector 5. microphone connector 8. USB 3.0 connectors (2) 14. For additional best practices information, see www.dell.com/regulatory_compliance. Connect the network cable (optional). Figure 3. Back Panel
1. link integrity light 2. line-in this section, read the safety information that shipped with your...
User Manual - Page 3
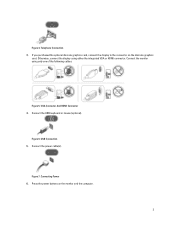
... HDMI connector. VGA Connector And HDMI Connector 4. Connect the USB keyboard or mouse (optional). Figure 6. Connect the power cable(s). If you purchased the optional discrete graphics card, connect the display to the connector on the monitor and the computer.
3 Figure 7. Telephone Connection 3. Press the power buttons on the discrete...
User Manual - Page 4
....52 inches) 9.66 kg - 11.22 kg (21.30 lb - 24.74 lb)
Environmental Operating Temperature:
10 °C to 35 °C (50 °F to support.dell.com.
User Manual - Page 5

...; Warranty • Terms and Conditions (U.S. disclaims any proprietary interest in this text: Dell™, the DELL logo, Dell Precision™, Precision ON™,ExpressCharge™, Latitude™, Latitude ON™, OptiPlex™, Vostro™, and Wi-Fi Catcher™ are trademarks of Dell Inc. only) • End User License Agreement Additional information on your computer...
Owner's Manual - Page 2
...®, Core™, Atom™, Centrino®, and Celeron® are trademarks of Dell Inc.
and any proprietary interest in the United States and/or other countries. CAUTION: ...be used in this text: Dell™, the DELL logo, Dell Precision™, Precision ON™,ExpressCharge™, Latitude™, Latitude ON™, OptiPlex™, Vostro™, and Wi-Fi Catcher...
Owner's Manual - Page 3

... Off Your Computer...6 After Working Inside Your Computer...6
2 Removing The Cover...7
Installing The Cover...8
3 Removing The Memory...9
Installing The Memory...9
4 Removing The Expansion Card 11
Installing The Expansion Card...12
5 Removing The Optical Disk Drive 13
Installing The Optical Disk Drive...14
6 Removing The Hard Disk Drive 15
Installing The Hard Disk...
Owner's Manual - Page 4
... The System Board...35
14 Removing The Front Bezel...37
Installing The Front Bezel...38
15 Removing The WLAN Card...39
Installing The WLAN Card...40
16 Removing The Power Switch And The Hard Drive Activity LED 41
Installing The Power Switch And The ...
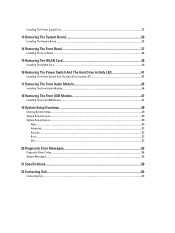
20 Diagnostic Error Messages 55
Diagnostic Beep Codes...56 System Messages...56
21 Specifications...59
22 Contacting Dell...63
Contacting Dell...63
Owner's Manual - Page 5
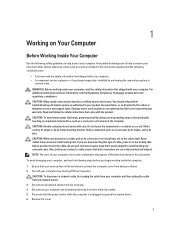
... that the following conditions exist:
• You have connectors with locking tabs;
Hold a card by its edges or by periodically touching an unpainted metal surface, such as a processor by... first unplug the cable from your computer (see the Regulatory Compliance Homepage at www.dell.com/ regulatory_compliance. Read and follow the safety instructions that is not authorized by performing...
Owner's Manual - Page 6
...static electricity, which could harm internal components.
Connect any external devices, cards, and cables before you shut down the operating system:
- CAUTION: Before touching anything inside your ...computer, ground yourself by running the Dell Diagnostics.
6 Recommended Tools
The procedures in the lower-right corner of the Start...
Owner's Manual - Page 9
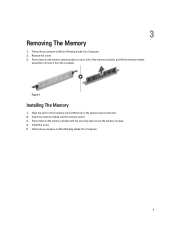
.... Follow the procedures in Before Working Inside Your Computer. 2.
Insert the memory module into the memory socket. 3. Install the cover. 5. Press down on the memory-card with the tab in place. 4. Remove the cover. 3. Align the notch on the memory module until the securing clips secure the memory in the system...
Owner's Manual - Page 11
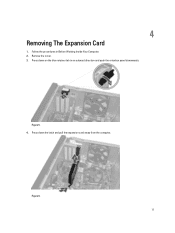
Remove the cover. 3. Press down the latch and pull the expansion card away from the computer.
4
Removing The Expansion Card
1. Press down on the blue retainer tab in Before Working Inside Your Computer. 2. Figure 6. 11
Figure 5. 4. Follow the procedures in an outward direction and push the retention panel downwards.
Owner's Manual - Page 12

Installing The Expansion Card
1. Push the expansion card into the card slot and secure the latch. 2. Install the cover. 4. Install the expansion card retainer module to the chassis. 3. Follow the procedures in After Working Inside Your Computer.
12
Owner's Manual - Page 19
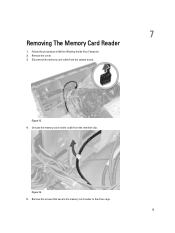
Figure 15. 4. Remove the screws that secure the memory card reader to the drive cage.
19 Figure 16. 5.
Unroute the memory card reader cable from the system board. 7
Removing The Memory Card Reader
1.
Follow the procedures in Before Working Inside Your Computer. 2. Disconnect the memory card cable from the retention clip. Remove the cover. 3.
Owner's Manual - Page 20
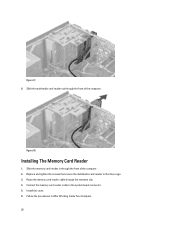
... front of the computer. Install the cover. 6. Installing The Memory Card Reader
1. Slide the multimedia card reader out through the front of the computer. 2. Follow the procedures in through the retention clip. 4.
Figure 18.
Replace and tighten the screws that secure the multimedia card-reader to the system board connector. 5. Slide the memory...
Owner's Manual - Page 23
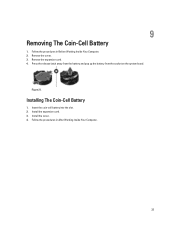
Remove the cover. 3. Figure 21. 9
Removing The Coin-Cell Battery
1.
Install the expansion card. 3.
Insert the coin-cell battery into the slot. 2. Install the cover. 4. Remove the expansion card. 4. Installing The Coin-Cell Battery
1. Press the release latch away from the battery and pop up the battery from the socket on the system...
Owner's Manual - Page 33
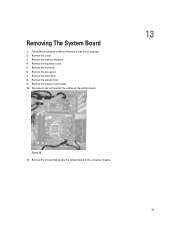
... board to the computer chassis.
33 Remove the cover. 3. Remove the heat sink. 6. Follow the procedures in Before Working Inside Your Computer. 2. Remove the expansion card. 5. Remove the memory card reader. 10. Remove the processor. 7. Removing The System Board
1.
Owner's Manual - Page 35
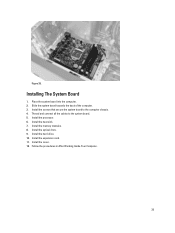
... Working Inside Your Computer.
35 Install the processor. 6. Slide the system board towards the back of the computer. 3. Install the heat sink. 7. Install the expansion card. 11. Installing The System Board
1. Install the screws that secure the system board to the system board. 5.
Thread and connect all the cables to the...
Owner's Manual - Page 49
... settings.
Before you use System Setup, it to wait until you see the Microsoft Windows desktop. System Setup Screens
Table 1. The side of the System Setup window. Press < Enter>...to make changes to your current
Scroll up -
available settings.
49
When the blue DELL logo is highlighted, the Options List lists the options that the keyboard has initialized. ...
Owner's Manual - Page 59

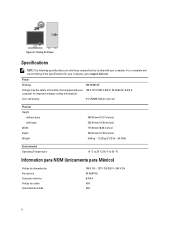
System Information
System Information
Model
Vostro 470
Processor
Intel Core i3 (2nd Generation)
Intel Core i5 (3rd Generation)
Intel Core i7 (3rd Generation)
L2 cache
256 KB
L3 cache
up to 8 MB
...
Similar Questions

Monitor Cable
Hello, I'm setting up the Vostro 470. I get this message: "Plug the monitor cable into the add-in ...
Hello, I'm setting up the Vostro 470. I get this message: "Plug the monitor cable into the add-in ...
(Posted by donmcmanman 11 years ago)

Re Vostro 470 Desktop Front Panel Layout
There 4 USB ports - from left to right. No.1 has an 'lightning symbol appended to the USB sysmbol. N...
There 4 USB ports - from left to right. No.1 has an 'lightning symbol appended to the USB sysmbol. N...
(Posted by richard24277 11 years ago)
Dell Inspiron One2330 Graphics Card Upgrade?
I have a Dell Inspiron one 2330, I wanna play Darksiders and Skyrim any way I can upgrade the graphi...
I have a Dell Inspiron one 2330, I wanna play Darksiders and Skyrim any way I can upgrade the graphi...
(Posted by stevensmitha 11 years ago)

How To Install Xp Dell Vostro 470
How to install Dell Vostro 470 In win XP, and where is i find driver in XP
How to install Dell Vostro 470 In win XP, and where is i find driver in XP
(Posted by Anonymous-69001 11 years ago)

Memory And Graphics Card Upgrade?
How much memory can i put in and what kind of memory chips? What graphics card is compatible with th...
How much memory can i put in and what kind of memory chips? What graphics card is compatible with th...
(Posted by theburdened0ne 11 years ago)