Dell Vostro 470 Support Question
Dell Vostro 470 Support Question
Find answers below for this question about Dell Vostro 470.Need a Dell Vostro 470 manual? We have 2 online manuals for this item!
Question posted by richard24277 on December 27th, 2012
Re Vostro 470 Desktop Front Panel Layout
There 4 USB ports - from left to right. No.1 has an 'lightning symbol appended to the USB sysmbol. No.2 has just the USB sysmbol. Nos 3 & 4 have a 'SS' prefix to the USB symbol. QUESTION-1 What doe these symbols signify? QUESTION-2 Where is this information documented?
Current Answers
Answer #1: Posted by NiranjanvijaykumarAtDell on December 29th, 2012 3:56 AM
NiranjanvijaykumarAtDell

Member since:
May 12th, 2012 Points: 807,180

Member since:
May 12th, 2012 Points: 807,180
Hello richard24277,
I am from Dell Social Media and Community.
The first two USB Ports are 2.0 and the other are 3.0 hence discriminated by the color of the USB ports and SS indicates Super Speed.
Please follow the link below to find the Owners manual for your system for your reference.
http://support.dell.com/support/edocs/systems/vos470/en/OM/om_en.pdf
If this has not helped you or if you need any further assistance, feel free to message me on Twitter. I will be happy to assist and Happy Holidays to you and your family.
Dell-Niranjan
Twitter: @NiranjanatDell
NiranjanAtDell
Dell Inc
Related Dell Vostro 470 Manual Pages
User Manual - Page 1
... 18. CD/DVD drive (optional) 3. USB 3.0 connectors (2)
12. front panel door (open ) 8. security cable slot 20. voltage selector switch 16. Regulatory Model: D10M Regulatory Type: D10M002
2011 - 10 CD/DVD drive 2. hard-drive activity light 4. power button 14.
microphone connector 6. powered USB 2.0 connector 10. Dell Vostro 470
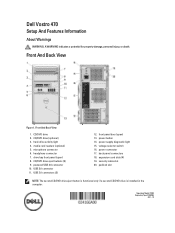
Setup And Features Information
About Warnings...
User Manual - Page 2
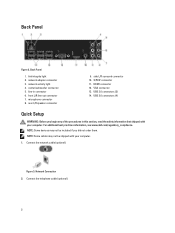
... connector 3. line-in this section, read the safety information that shipped with your computer. USB 3.0 connectors (2) 14. link integrity light 2. USB 2.0 connectors (4)
Quick Setup
WARNING: Before you did not order them. Connect the network ... light 4. rear L/R speaker connector
9. Connect the telephone cable (optional).
2 Network Connection 2. Back Panel
Figure 2. Back...
User Manual - Page 3
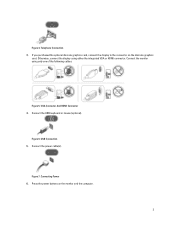
... the display using only one of the following cables:
Figure 5. Connect the monitor using either the integrated VGA or HDMI connector. Telephone Connection 3. Connect the USB keyboard or mouse (optional).
Connecting Power 6. Figure 6. If you purchased the optional discrete graphics card, connect the display to the connector on the monitor and...
User Manual - Page 5

...Dell™, the DELL logo, Dell Precision™, Precision ON™,ExpressCharge™, Latitude™, Latitude ON™, OptiPlex™, Vostro™, and Wi-Fi Catcher™ are either the entities claiming the marks and names or their products, Dell Inc. is ...Xeon®, Core™, Atom™, Centrino®, and Celeron® are trademarks of Dell Inc. All rights reserved.
Owner's Manual - Page 2
...Devices, Inc. Blu-ray Disc™ is a trademark owned by Dell Inc. A00 All rights reserved. is under license. and any use of such mark by the Blu-ray Disc ...Dell Precision™, Precision ON™,ExpressCharge™, Latitude™, Latitude ON™, OptiPlex™, Vostro™, and Wi-Fi Catcher™ are not followed. is strictly forbidden. and other countries...
Owner's Manual - Page 4
... The Hard Drive Activity LED 42
17 Removing The Front Audio Module 45
Installing The Front Audio Module...46
18 Removing The Front USB Module 47
Installing The Front USB Module...47
19 System Setup Overview...49
Entering System Setup...49 System Setup Screens...49 System Setup Options...50
Main...50 Advanced...
Owner's Manual - Page 6
.... After Working Inside Your Computer
After you complete any replacement procedure, ensure you shut down the operating system:
- Recommended Tools
The procedures in the lower-right corner of the Start menu as the metal at the back of the computer.
Connect any external devices, cards, and cables before you work, periodically...
Owner's Manual - Page 11
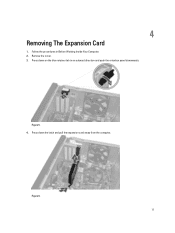
Figure 5. 4. Press down on the blue retainer tab in Before Working Inside Your Computer. 2. 4
Removing The Expansion Card
1. Follow the procedures in an outward direction and push the retention panel downwards.
Press down the latch and pull the expansion card away from the computer.
Figure 6. 11 Remove the cover. 3.
Owner's Manual - Page 47
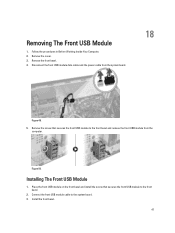
... data cable and the power cable from the
computer. Remove the cover. 3.
Place the front USB module on the front bezel and install the screw that secures the front USB module to the front bezel and remove the front USB module from the system board.
18
Figure 49. 5. Figure 50. Removing The Front...
Owner's Manual - Page 49
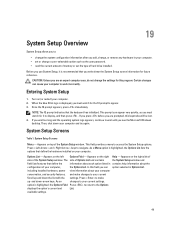
...on (or restart) your current settings. If you press before you see the Microsoft Windows desktop. If you wait too long and the operating system logo appears, continue to wait until...and
field lists features that the keyboard has initialized. System Setup Screens
Table 1. Press < Left Arrow > and < Right Arrow > keys to access the System Setup options. As a Menu option is highlighted, ...
Owner's Manual - Page 50
... within the active system setup field. NOTE: Not all settings listed in the System Setup.
< Up Arrow > or < Down Arrow >
Select an item to display.
< Left Arrow > or < Right Arrow >
Select a menu to display.
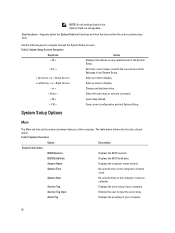
- Key Functions- System Setup Options
Main
The Main tab lists out the primary hardware features of each option.
Owner's Manual - Page 52
Default: Enabled
Enable or disable the CPU XD feature.
CPU Configuration USB Configuration Option Front USB Ports Rear USB Ports Side USB Ports
Description Enable or disable the Front USB Ports. Default: Enabled
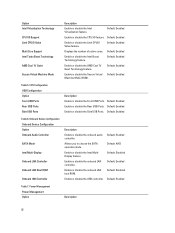
Table 6. Onboard Device Configuration Onboard Device Configuration Option Onboard Audio Controller
SATA Mode
Intel Multi-Display
Onboard LAN Controller
Onboard LAN Boot ROM
...
Owner's Manual - Page 53
Default: Enabled
Enable or disable the USB ports in Sleep State Auto Power On Auto Power On Mode Auto Power On Date Auto Power On Time
Enable or Disable the Wake Up by Integrated LAN/WLAN AC Recovery USB PowerShare in S4/S5 State USB PowerShare in sleep state.
Default: Normal
Enable or disable the...
Owner's Manual - Page 55
... failure or loose cable. Strike RTC Jumper may be malfunctioning or motherboard failure
Disconnect the USB device. A parameter out of them.
For help the user identify the cause and action... received is correct.
S.M.A.R.T error, possible hard disk drive failure.
55 No timer tick interrupt
USB over current error
CAUTION -
A chip on hard disk drive, the hard disk drive cable ...
Owner's Manual - Page 57
... error
Disconnect the USB device. A parameter out of them.
Dell recommends that a parameter has exceeded its normal operating ...8226; Enter system setup and ensure that the boot sequence information is correct.
The USB device needs more power for it to connect the USB device, or if the device has two USB cables, connect both of range may or may not indicate a potential hard drive...
Owner's Manual - Page 59

... (internal SATA drives only)
RAID 0, RAID 1, RAID 5 and RAID 10
Table 11. Dimensions Dimensions Height
without base with your computer. System Information
System Information
Model
Vostro 470
Processor
Intel Core i3 (2nd Generation)
Intel Core i5 (3rd Generation)
Intel Core i7 (3rd Generation)
L2 cache
256 KB
L3 cache
up to 1600...
Owner's Manual - Page 60
..., 8 GB, 12 GB, and 16 GB. 2 GB 32 GB
NA Intel HD Graphics 2500/4000 one HDMI port
two 9-pin USB 3.0-compliant ports
10/100/1000 Mbps integrated network card
Ports Ports Back panel Ports Network Adapter USB
Audio
Video
Front Panel Ports USB Table 15. NOTE: The capacities supported by your computer may vary depending on the computer.
one RJ...
Similar Questions


Dell Inspiron 545mt Panel Layout Mod A Reset Switch And No Click Power Switch
my istar rackmount case has a dell 545mt motherboard case has power on switch with no click and rese...
my istar rackmount case has a dell 545mt motherboard case has power on switch with no click and rese...
(Posted by kickingsaturday1 10 years ago)

How To Install Xp Dell Vostro 470
How to install Dell Vostro 470 In win XP, and where is i find driver in XP
How to install Dell Vostro 470 In win XP, and where is i find driver in XP
(Posted by Anonymous-69001 11 years ago)
About Dell Vostro 220s Desktop
i have dell vostro 220s desktop, it was working properly but then suddenly next time when i put on t...
i have dell vostro 220s desktop, it was working properly but then suddenly next time when i put on t...
(Posted by slsaju 13 years ago)