Dell Vostro 470 Support Question
Dell Vostro 470 Support Question
Find answers below for this question about Dell Vostro 470.Need a Dell Vostro 470 manual? We have 2 online manuals for this item!
Question posted by Anonymous-69001 on July 31st, 2012
How To Install Xp Dell Vostro 470
How to install Dell Vostro 470 In win XP, and where is i find driver in XP
Current Answers
Answer #1: Posted by DellChinmaySharma on July 31st, 2012 10:30 PM
DellChinmaySharma

Member since:
July 19th, 2012 Points: 6,850

Member since:
July 19th, 2012 Points: 6,850
Hi Anonymous-69001,
My name is Chinmay and I work for the Social Media and Community Team at Dell.
You can find the drivers for the Windows XP for your Vostro system from the website : support.dell.com
You can also refer to the same drivers link as below :
http://www.dell.com/support/drivers/us/en/19/DriversHome/NeedProductSelection?fkey=Drivers_PS
Just enter the service tag and you will get a list of all the drivers for your computer.
In order to install windows XP , you should have a Operating system disc for it. I will request you to add me as a friend and private message the service tag of your computer. So that I can assist you in a better way.
Glad to assist you.
Thank you.
Dell_Chinmay_S
Dell Social Media Responder
Related Dell Vostro 470 Manual Pages
User Manual - Page 1
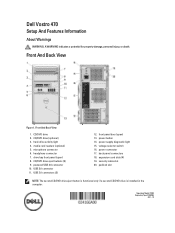
...3. front panel door (open ) 8. power supply diagnostic light 15. back panel connectors 18.
Dell Vostro 470
Setup And Features Information
About Warnings
WARNING: A WARNING indicates a potential for property damage, personal ...drive eject button is functional only if a second CD/DVD drive is installed in the computer. USB 2.0 connector 11. Front And Back View
Figure 1. Front And Back...
User Manual - Page 2
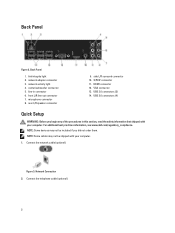
... USB 3.0 connectors (2) 14. NOTE: Some cables may not be shipped with your computer.
1. network adapter connector 3. For additional best practices information, see www.dell.com/regulatory_compliance. network activity light 4. side L/R surround connector 10.
Back Panel
Figure 2. Connect the network cable (optional). rear L/R speaker connector
9. VGA connector 13...
User Manual - Page 4
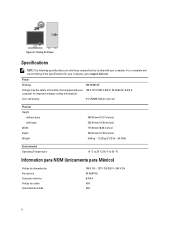
... coin cell
Physical Height
without base with your computer. Turning On Power
Specifications
NOTE: The following specifications are only those required by law to support.dell.com. Power
Wattage
350 W/460 W
Voltage (see the safety information that shipped with base Width Depth Weight
360.00 mm (14.17 inches) 362.90...
User Manual - Page 5

...License Agreement Additional information on your computer and the regulatory compliance website at support.dell.com/manuals.
is under license. and any proprietary interest in trademarks and trade... in this text: Dell™, the DELL logo, Dell Precision™, Precision ON™,ExpressCharge™, Latitude™, Latitude ON™, OptiPlex™, Vostro™, and Wi-Fi...
Owner's Manual - Page 2
CAUTION: A CAUTION indicates potential damage to either trademarks or registered trademarks of Dell Inc. Reproduction of these materials in this text: Dell™, the DELL logo, Dell Precision™, Precision ON™,ExpressCharge™, Latitude™, Latitude ON™, OptiPlex™, Vostro™, and Wi-Fi Catcher™ are trademarks of Microsoft Corporation in the U.S. ...
Owner's Manual - Page 3
... Inside Your Computer...5 Recommended Tools...6 Turning Off Your Computer...6 After Working Inside Your Computer...6
2 Removing The Cover...7
Installing The Cover...8
3 Removing The Memory...9
Installing The Memory...9
4 Removing The Expansion Card 11
Installing The Expansion Card...12
5 Removing The Optical Disk Drive 13
Installing The Optical Disk Drive...14
6 Removing The Hard Disk Drive 15...
Owner's Manual - Page 4
... 47
Installing The Front USB Module...47
19 System Setup Overview...49
Entering System Setup...49 System Setup Screens...49 System Setup Options...50
Main...50 Advanced...51 Security...53 Boot...53 Exit...53
20 Diagnostic Error Messages 55
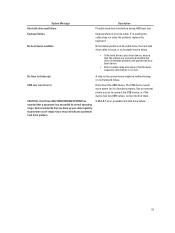
Diagnostic Beep Codes...56 System Messages...56
21 Specifications...59
22 Contacting Dell...
Owner's Manual - Page 5
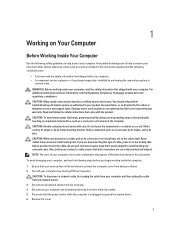
...the network device. 3.
Read and follow the safety instructions that is not authorized by Dell is unplugged to prevent the computer cover from being scratched. 2. CAUTION: Handle components... protect your computer and certain components may only be replaced or--if purchased separately--installed by performing the removal procedure in
reverse order.
Remove the cover.
5 Hold ...
Owner's Manual - Page 6
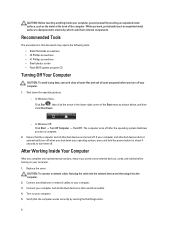
... To avoid losing data, save and close all open programs before turning on your computer. 5. The computer turns off . In Windows XP: Click Start → Turn Off Computer → Turn Off .
While you turn off . After Working Inside Your Computer
After you... to your computer. 3. CAUTION: Before touching anything inside your computer, ground yourself by running the Dell Diagnostics.
6
Owner's Manual - Page 8
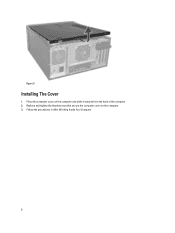
Installing The Cover
1. Place the computer cover on the computer. 3. Replace and tighten the thumbscrews that secure the computer cover on the computer and slide it inwards from the back of the computer. 2.
Follow the procedures in After Working Inside Your Computer.
8 Figure 3.
Owner's Manual - Page 9
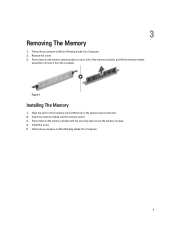
... Inside Your Computer.
9 Figure 4. Press down on each side of the memory modules and lift the memory module
upwards to remove it from the computer.
Installing The Memory
1. Insert the memory module into the memory socket. 3. Press down on the memory retaining tabs on the memory module until the securing clips...
Owner's Manual - Page 12

Install the cover. 4. Push the expansion card into the card slot and secure the latch. 2. Install the expansion card retainer module to the chassis. 3. Installing The Expansion Card
1. Follow the procedures in After Working Inside Your Computer.
12
Owner's Manual - Page 14
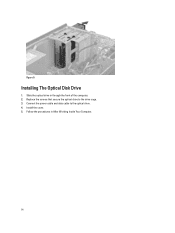
Slide the optical drive in After Working Inside Your Computer.
14 Follow the procedures in through the front of the computer. 2. Figure 9. Replace the screws that secure the optical drive to the optical drive. 4. Connect the power cable and data cable to the drive cage. 3. Installing The Optical Disk Drive
1. Install the cover. 5.
Owner's Manual - Page 16
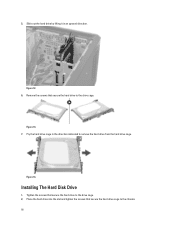
... secure the hard drive to remove the hard drive from the hard drive cage. Pry the hard drive cage in an upward direction.
Figure 13. 7. Installing The Hard Disk Drive
1.
Tighten the screws that secure the hard drive to the chassis. 16 Place the hard drive into the slot and tighten...
Owner's Manual - Page 17

3. Install the cover. 5. Follow the procedures in After Working Inside Your Computer.
17 Connect the power cable and data cable to the hard drive. 4.
Owner's Manual - Page 20
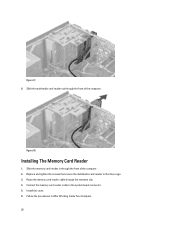
... and tighten the screws that secure the multimedia card-reader to the system board connector. 5. Connect the memory card reader cable to the drive cage. 3. Installing The Memory Card Reader
1. Figure 17. 6. Slide the memory card-reader in After Working Inside Your Computer. 20 Follow the procedures in through the front...
Owner's Manual - Page 49
... Appears on your computer.
Press < Enter> to wait until you see the Microsoft Windows desktop. option is highlighted, the Options List lists the options that you write down the list with...to the Options
displays the option's current and
List. When the blue DELL logo is recommended that define the hardware installed on the left Options Field - Once the F2 prompt appears, press ...
Owner's Manual - Page 55
...may or may be malfunctioning or motherboard failure
Disconnect the USB device. Dell recommends that the boot sequence information is installed properly and partitioned as a boot device.
• Enter system ... computer failed to complete the boot routine three at booting this checkpoint and contact Dell Technical Support. RTC is not listed in the following examples, see the documentation ...
Owner's Manual - Page 57
...drive is your boot device, ensure that the cables are connected and that the drive is installed properly and partitioned as a boot device.
• Enter system setup and ensure that you ... bootable partition on the system board might be malfunctioning or motherboard failure.
CAUTION - Dell recommends that the boot sequence information is correct. System Message Hard-disk drive read failure...
Owner's Manual - Page 59

... to ship with base Width Depth Weight
Table 12. For more information regarding the configuration of your computer. Table 10. System Information
System Information
Model
Vostro 470
Processor
Intel Core i3 (2nd Generation)
Intel Core i5 (3rd Generation)
Intel Core i7 (3rd Generation)
L2 cache
256 KB
L3 cache
up to view...
Similar Questions


How To Install Dell Inspiron One 2205 Drivers And Utilities Cd Download
(Posted by Duetga 10 years ago)

I Have Installed Windows And Cannot Find Drivers Disk
Where to download the drivers fpr my dell 570 inspiron desktop computer
Where to download the drivers fpr my dell 570 inspiron desktop computer
(Posted by purplelady3 10 years ago)

Re Vostro 470 Desktop Front Panel Layout
There 4 USB ports - from left to right. No.1 has an 'lightning symbol appended to the USB sysmbol. N...
There 4 USB ports - from left to right. No.1 has an 'lightning symbol appended to the USB sysmbol. N...
(Posted by richard24277 11 years ago)