
Owner's Manual
Page 10
... asked NOTE: Select your operating system and support for your computer, you use the customized Dell Premier Support website at • Upgrades - If you reinstall the operating system for Dell™ 3.5-inch USB floppy drives, Intel® Pentium® M processors, optical drives, and USB devices. as memory, the hard drive, and the operating system...
... asked NOTE: Select your operating system and support for your computer, you use the customized Dell Premier Support website at • Upgrades - If you reinstall the operating system for Dell™ 3.5-inch USB floppy drives, Intel® Pentium® M processors, optical drives, and USB devices. as memory, the hard drive, and the operating system...

Owner's Manual
Page 69
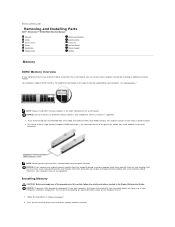
Otherwise, your computer may have, even if you purchased the new modules from Dell. memory connector closest to components inside your computer, discharge static electricity from your... not pair an original memory module with the crossbar in the Product Information Guide. NOTICE: To prevent static damage to processor securing clips (2) connector 3 Align the notch on page 57. 2 Press out the securing clip at each end of... NOTICE: If you remove your original memory modules from the computer during a memory upgrade, keep them separate from any new modules that you may not start properly.
Otherwise, your computer may have, even if you purchased the new modules from Dell. memory connector closest to components inside your computer, discharge static electricity from your... not pair an original memory module with the crossbar in the Product Information Guide. NOTICE: To prevent static damage to processor securing clips (2) connector 3 Align the notch on page 57. 2 Press out the securing clip at each end of... NOTICE: If you remove your original memory modules from the computer during a memory upgrade, keep them separate from any new modules that you may not start properly.
Service Manual
Page 14
... 1, the connector closest to Contents Page Removing and Installing Parts Dell™ Dimension™ 3100/E310 Service Manual Memory Cards Drive Panels Drives Hard Drive Floppy Drive Media Card Reader CD/DVD Drive Processor System Board Power Supply Battery Memory DDR2 Memory Overview If your ... is covered under your computer warranty. NOTICE: If you remove your original memory modules from the computer during a memory upgrade, keep them separate from Dell. If possible, do so by touching an unpainted metal surface on the type of your computer's electronic components. Otherwise,...
... 1, the connector closest to Contents Page Removing and Installing Parts Dell™ Dimension™ 3100/E310 Service Manual Memory Cards Drive Panels Drives Hard Drive Floppy Drive Media Card Reader CD/DVD Drive Processor System Board Power Supply Battery Memory DDR2 Memory Overview If your ... is covered under your computer warranty. NOTICE: If you remove your original memory modules from the computer during a memory upgrade, keep them separate from Dell. If possible, do so by touching an unpainted metal surface on the type of your computer's electronic components. Otherwise,...

Service Manual
Page 34
...remove the processor from Dell, discard the original heat sink. Installing the Processor NOTICE: Ground yourself by sliding the release lever out from Dell, reuse the original heat sink when you install your new processor. 4. Then, pull the lever back to release the processor. 1 processor cover 2 processor 3 socket...heat sink and fan shroud assembly 2 captive screw housings (2) NOTICE: If you are installing a processor upgrade kit from the socket. If you are not installing a processor upgrade kit from beneath the center cover latch on the pins in the release position so that the...
...remove the processor from Dell, discard the original heat sink. Installing the Processor NOTICE: Ground yourself by sliding the release lever out from Dell, reuse the original heat sink when you install your new processor. 4. Then, pull the lever back to release the processor. 1 processor cover 2 processor 3 socket...heat sink and fan shroud assembly 2 captive screw housings (2) NOTICE: If you are installing a processor upgrade kit from the socket. If you are not installing a processor upgrade kit from beneath the center cover latch on the pins in the release position so that the...

Service Manual
Page 35
... to avoid permanent damage to the processor and the computer when you are not installing a processor upgrade kit from Dell, return the original heat sink assembly and processor to secure the processor. If you installed a processor replacement kit from Dell, reuse the original heat sink assembly when you install the processor. 5. When the processor is positioned correctly. 6. Rotate the heat...
... to avoid permanent damage to the processor and the computer when you are not installing a processor upgrade kit from Dell, return the original heat sink assembly and processor to secure the processor. If you installed a processor replacement kit from Dell, reuse the original heat sink assembly when you install the processor. 5. When the processor is positioned correctly. 6. Rotate the heat...


