
Owner's Manual
Page 1
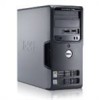
Dell™ Dimension™ 3100/E310 Owner's Manual Service Tag CD or DVD activity light FlexBay for optional floppy drive or Media Card Reader headphone connector diagnostic lights 1234 CD or DVD eject button USB 2.0 connectors (2) hard drive activity light power button cover latch release card slots for PCI (2), PCI Express x1 (1) power connector sound-card connectors USB 2.0 connectors (4) network adapter VGA video connector (integrated) Model DCSM www.dell.com | support.dell.com
Dell™ Dimension™ 3100/E310 Owner's Manual Service Tag CD or DVD activity light FlexBay for optional floppy drive or Media Card Reader headphone connector diagnostic lights 1234 CD or DVD eject button USB 2.0 connectors (2) hard drive activity light power button cover latch release card slots for PCI (2), PCI Express x1 (1) power connector sound-card connectors USB 2.0 connectors (4) network adapter VGA video connector (integrated) Model DCSM www.dell.com | support.dell.com
Owner's Manual
Page 3
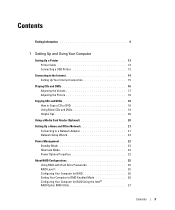
... 21 Network Setup Wizard 22 Power Management 22 Standby Mode 23 Hibernate Mode 23 Power Options Properties 23 About RAID Configurations 25 Using RAID with Hard Drive Passwords 25 RAID Level 1 25 Configuring Your Computer for RAID 26 Setting Your Computer to RAID-Enabled Mode 26 Configuring Your Computer for RAID Using...
... 21 Network Setup Wizard 22 Power Management 22 Standby Mode 23 Hibernate Mode 23 Power Options Properties 23 About RAID Configurations 25 Using RAID with Hard Drive Passwords 25 RAID Level 1 25 Configuring Your Computer for RAID 26 Setting Your Computer to RAID-Enabled Mode 26 Configuring Your Computer for RAID Using...
Owner's Manual
Page 4
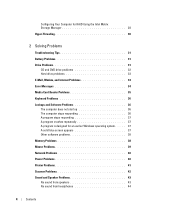
Configuring Your Computer for RAID Using the Intel Matrix Storage Manager 28 Hyper-Threading 30 2 Solving Problems Troubleshooting Tips 31 Battery Problems 31 Drive Problems 31 CD and DVD drive problems 32 Hard drive problems 33 E-Mail, Modem, and Internet Problems 33 Error Messages 34 Media Card Reader Problems 35 Keyboard Problems 36 Lockups and...
Configuring Your Computer for RAID Using the Intel Matrix Storage Manager 28 Hyper-Threading 30 2 Solving Problems Troubleshooting Tips 31 Battery Problems 31 Drive Problems 31 CD and DVD drive problems 32 Hard drive problems 33 E-Mail, Modem, and Internet Problems 33 Error Messages 34 Media Card Reader Problems 35 Keyboard Problems 36 Lockups and...
Owner's Manual
Page 6
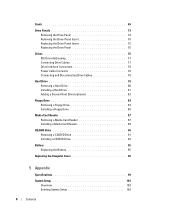
... Insert 75 Replacing the Drive-Panel Insert 75 Replacing the Drive Panel 76 Drives 76 IDE Drive Addressing 77 Connecting Drive Cables 77 Drive Interface Connectors 78 Power Cable Connector 78 Connecting and Disconnecting Drive Cables 79 Hard Drive 79 Removing a Hard Drive 80 Installing a Hard Drive 81 Adding a Second Hard Drive (optional 82 Floppy Drive 83 Removing a Floppy Drive 83 Installing a Floppy Drive 85 Media Card Reader...
... Insert 75 Replacing the Drive-Panel Insert 75 Replacing the Drive Panel 76 Drives 76 IDE Drive Addressing 77 Connecting Drive Cables 77 Drive Interface Connectors 78 Power Cable Connector 78 Connecting and Disconnecting Drive Cables 79 Hard Drive 79 Removing a Hard Drive 80 Installing a Hard Drive 81 Adding a Second Hard Drive (optional 82 Floppy Drive 83 Removing a Floppy Drive 83 Installing a Floppy Drive 85 Media Card Reader...

Owner's Manual
Page 10
... reinstall the operating system for correct operation of your computer, you use the customized Dell Premier Support website at • Upgrades - dell.com. as memory, the hard drive, and the operating system • Customer Care - DSS is necessary for your Dell computer. The software automatically detects your computer and operating system and installs the updates...
... reinstall the operating system for correct operation of your computer, you use the customized Dell Premier Support website at • Upgrades - dell.com. as memory, the hard drive, and the operating system • Customer Care - DSS is necessary for your Dell computer. The software automatically detects your computer and operating system and installs the updates...

Owner's Manual
Page 19
...to that disc later. Use blank CD-Rs to both CD and DVD recording media. After creating a CD-R, you have two CD or DVD drives, select the drive into which you plan to erase, rewrite, or update information on that CD-R again (see the Sonic documentation for more information). When prompted, ...and click the Disc Copy button. After you create a DVD+/-R disc, you have inserted your computer hard drive. CD-Writable Drives Media Type CD-R CD-RW Read Yes Yes Write Yes Yes Rewritable No Yes DVD-Writable Drives Media Type CD-R CD-RW DVD+R DVD-R DVD+RW DVD-RW DVD+R DL Read Yes Yes...
...to that disc later. Use blank CD-Rs to both CD and DVD recording media. After creating a CD-R, you have two CD or DVD drives, select the drive into which you plan to erase, rewrite, or update information on that CD-R again (see the Sonic documentation for more information). When prompted, ...and click the Disc Copy button. After you create a DVD+/-R disc, you have inserted your computer hard drive. CD-Writable Drives Media Type CD-R CD-RW Read Yes Yes Write Yes Yes Rewritable No Yes DVD-Writable Drives Media Type CD-R CD-RW DVD+R DVD-R DVD+RW DVD-RW DVD+R DL Read Yes Yes...

Owner's Manual
Page 22
... on computer network cable Network Setup Wizard The Microsoft® Windows® XP operating system provides a Network Setup Wizard to just the monitor or the hard drive, or you are not using it is on the screen. You can reduce power to guide you through the process of electricity your computer uses...
... on computer network cable Network Setup Wizard The Microsoft® Windows® XP operating system provides a Network Setup Wizard to just the monitor or the hard drive, or you are not using it is on the screen. You can reduce power to guide you through the process of electricity your computer uses...

Owner's Manual
Page 23
To set standby mode to you. To immediately activate standby mode without a period of the computer memory, Dell creates an appropriately sized hibernate mode file before shipping the computer to automatically activate after a time-out. Hibernate Mode Hibernate mode ... 2 Under Pick a category, click Performance and Maintenance. 3 Under or pick a Control Panel icon, click Power Options. 4 Define your hibernate settings on your hard drive with enough disk space to the operating state it was in before it entered hibernate mode. Standby Mode Standby mode conserves power by turning off...
To set standby mode to you. To immediately activate standby mode without a period of the computer memory, Dell creates an appropriately sized hibernate mode file before shipping the computer to automatically activate after a time-out. Hibernate Mode Hibernate mode ... 2 Under Pick a category, click Performance and Maintenance. 3 Under or pick a Control Panel icon, click Power Options. 4 Define your hibernate settings on your hard drive with enough disk space to the operating state it was in before it entered hibernate mode. Standby Mode Standby mode conserves power by turning off...

Owner's Manual
Page 24
..., System stand by, or System hibernates field, and then select a timeout from the displayed list. If you want to time-out before the hard drive. If your computer is called a scheme. To recover, press any key on the Power Schemes tab, Advanced tab, and Hibernate tab. If you want your... to prompt you want your computer may appear to change the default settings for the changed scheme. To avoid this problem, always set the hard drive (hard disk) to time-out before the monitor does, your computer to activate standby mode, activate hibernate mode, or turn off the...
..., System stand by, or System hibernates field, and then select a timeout from the displayed list. If you want to time-out before the hard drive. If your computer is called a scheme. To recover, press any key on the Power Schemes tab, Advanced tab, and Hibernate tab. If you want your... to prompt you want your computer may appear to change the default settings for the changed scheme. To avoid this problem, always set the hard drive (hard disk) to time-out before the monitor does, your computer to activate standby mode, activate hibernate mode, or turn off the...

Owner's Manual
Page 25
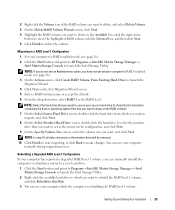
...RAID controller on your computer can only create a RAID configuration using a hard-drive security option available in the computer industry for different types of uses, Dell offers RAID level 1 on the Hibernate tab. The drives should not use the hibernate settings you want to allow data access. NOTE...: RAID levels do not represent a hierarchy. Using RAID with Hard Drive Passwords If you should be cleared to...
...RAID controller on your computer can only create a RAID configuration using a hard-drive security option available in the computer industry for different types of uses, Dell offers RAID level 1 on the Hibernate tab. The drives should not use the hibernate settings you want to allow data access. NOTE...: RAID levels do not represent a hierarchy. Using RAID with Hard Drive Passwords If you should be cleared to...

Owner's Manual
Page 26
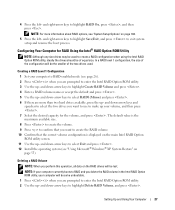
... 2 segment 3 segment 4 segment 5 segment 6 hard drive 1 segment 1 duplicated segment 2 duplicated segment 3 duplicated segment 4 duplicated segment 5 duplicated segment 6 duplicated hard drive 2 If a drive failure occurs, subsequent read and write operations are directed to the surviving drive. For instructions on which to store data. and down... on page 79. Setting Your Computer to RAID-Enabled Mode 1 Enter system setup (see "Hard Drive" on both drives, two 120-GB RAID level 1 drives collectively have installed the operating system and the Intel Matrix Storage Console. You can then be...
... 2 segment 3 segment 4 segment 5 segment 6 hard drive 1 segment 1 duplicated segment 2 duplicated segment 3 duplicated segment 4 duplicated segment 5 duplicated segment 6 duplicated hard drive 2 If a drive failure occurs, subsequent read and write operations are directed to the surviving drive. For instructions on which to store data. and down... on page 79. Setting Your Computer to RAID-Enabled Mode 1 Enter system setup (see "Hard Drive" on both drives, two 120-GB RAID level 1 drives collectively have installed the operating system and the Intel Matrix Storage Console. You can then be...
Owner's Manual
Page 27
... about RAID options, see "Using Microsoft® Windows® XP System Restore" on page 104. 5 Press the left - NOTE: For more than two hard drives available, press the up - and right-arrow keys to select Exit and press . 12 Install the operating system (see "System Setup Options" on page 55... ROM utility. 2 Use the up - Setting Up and Using Your Computer 27 4 Press the left - The default value is displayed on the RAID drives will be lost. Deleting a RAID Volume NOTE: When you want to use to create a RAID configuration when using the Intel RAID Option ROM utility, ...
... about RAID options, see "Using Microsoft® Windows® XP System Restore" on page 104. 5 Press the left - NOTE: For more than two hard drives available, press the up - and right-arrow keys to select Exit and press . 12 Install the operating system (see "System Setup Options" on page 55... ROM utility. 2 Use the up - Setting Up and Using Your Computer 27 4 Press the left - The default value is displayed on the RAID drives will be lost. Deleting a RAID Volume NOTE: When you want to use to create a RAID configuration when using the Intel RAID Option ROM utility, ...

Owner's Manual
Page 28
... then click the right arrow. Configuring Your Computer for creating a partition on it, and you want to add a second hard drive and reconfigure both drives into a volume, but you still have one hard drive with a partition, and leaves any data, you want to create your computer to RAID-enabled mode (see page 26). ... the operating system installed on the new RAID volume. NOTE: If you do not see page 29). Click a second hard drive until two drives appear in the Selected window, and then click Next. 7 In the Specify Volume Size window, select the Volume Size desired and click Next....
... then click the right arrow. Configuring Your Computer for creating a partition on it, and you want to add a second hard drive and reconfigure both drives into a volume, but you still have one hard drive with a partition, and leaves any data, you want to create your computer to RAID-enabled mode (see page 26). ... the operating system installed on the new RAID volume. NOTE: If you do not see page 29). Click a second hard drive until two drives appear in the Selected window, and then click Next. 7 In the Specify Volume Size window, select the Volume Size desired and click Next....
Owner's Manual
Page 29
...removed. 10 Click Finish to start migrating, or click Back to make changes. NOTE: In step 10, all data contained on the member drive will be the hard drive containing the data or operating system files that you have not yet set your computer to RAID-enabled mode (see page 26). 3 On the... NOTE: If you do not see an Actions menu option, you want to migrate, and click Next. 8 On the Select Member Hard Drive screen, double-click the hard drive to select the member drive that you want to keep on the first Migration Wizard screen. 5 Enter a RAID volume name or accept the default. 6 From the...
...removed. 10 Click Finish to start migrating, or click Back to make changes. NOTE: In step 10, all data contained on the member drive will be the hard drive containing the data or operating system files that you have not yet set your computer to RAID-enabled mode (see page 26). 3 On the... NOTE: If you do not see an Actions menu option, you want to migrate, and click Next. 8 On the Select Member Hard Drive screen, double-click the hard drive to select the member drive that you want to keep on the first Migration Wizard screen. 5 Enter a RAID volume name or accept the default. 6 From the...
Owner's Manual
Page 33
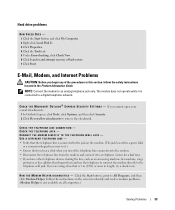
... the Product Information Guide. Follow the instructions on the modem. (The jack has either a green label or a connector-shaped icon next to a digital telephone network. Hard drive problems RUN CHECK DISK - 1 Click the Start button and click My Computer. 2 Right-click Local Disk C:. 3 Click Properties. 4 Click the Tools tab. 5 Under Error-checking...
... the Product Information Guide. Follow the instructions on the modem. (The jack has either a green label or a connector-shaped icon next to a digital telephone network. Hard drive problems RUN CHECK DISK - 1 Click the Start button and click My Computer. 2 Right-click Local Disk C:. 3 Click Properties. 4 Click the Tools tab. 5 Under Error-checking...

Owner's Manual
Page 38
... INFORMATION - • Ensure that the program is successfully communicating with the memory. • Run the Dell Diagnostics (see page 51). 38 Solving Problems BACK UP YOUR FILES IMMEDIATELY USE A VIRUS-SCANNING PROGRAM TO CHECK THE HARD DRIVE, FLOPPY DISKS, OR CDS SAVE AND CLOSE ANY OPEN FILES OR PROGRAMS AND SHUT DOWN YOUR...
... INFORMATION - • Ensure that the program is successfully communicating with the memory. • Run the Dell Diagnostics (see page 51). 38 Solving Problems BACK UP YOUR FILES IMMEDIATELY USE A VIRUS-SCANNING PROGRAM TO CHECK THE HARD DRIVE, FLOPPY DISKS, OR CDS SAVE AND CLOSE ANY OPEN FILES OR PROGRAMS AND SHUT DOWN YOUR...

Owner's Manual
Page 48
...modules that you are installing are compatible with your computer (see "Installing Memory" on page 66). • If the problem persists, contact Dell for technical assistance. Memory modules are detected. A possible USB failure has occurred. No memory modules are detected, but a memory configuration or ...identified a faulty module or reinstalled all USB devices, check cable connections, and then restart the computer. A possible floppy drive or hard drive failure has Reseat all power and data cables and restart occurred. Suggested Resolution If the problem persists, contact...
...modules that you are installing are compatible with your computer (see "Installing Memory" on page 66). • If the problem persists, contact Dell for technical assistance. Memory modules are detected. A possible USB failure has occurred. No memory modules are detected, but a memory configuration or ...identified a faulty module or reinstalled all USB devices, check cable connections, and then restart the computer. A possible floppy drive or hard drive failure has Reseat all power and data cables and restart occurred. Suggested Resolution If the problem persists, contact...

Owner's Manual
Page 49
...attempting to make sure the boot sequence is an error message on your screen identifying a problem with a device (such as the floppy drive or hard drive); Another failure has occurred. • Ensure that you removed, remove a different card, and then restart the computer. 3 Repeat this...computer (see "Cards" on your computer. • If the problem persists, contact Dell for technical assistance. If the computer starts normally, troubleshoot the last card removed from the hard drive, CD drive, and DVD drive (see "System Board Components" on page 65). • If there is correct ...
...attempting to make sure the boot sequence is an error message on your screen identifying a problem with a device (such as the floppy drive or hard drive); Another failure has occurred. • Ensure that you removed, remove a different card, and then restart the computer. 3 Repeat this...computer (see "Cards" on your computer. • If the problem persists, contact Dell for technical assistance. If the computer starts normally, troubleshoot the last card removed from the hard drive, CD drive, and DVD drive (see "System Board Components" on page 65). • If there is correct ...

Owner's Manual
Page 54
... without affecting data files. • Dell PC Restore by Symantec restores your operating system in the Search Results list. 4 In the Hardware Troubleshooter list, click I need to resolve the incompatibility. Restoring Your Operating System You can use the Hardware Troubleshooter to resolve a hardware conflict on the hard drive and removes any applications installed...
... without affecting data files. • Dell PC Restore by Symantec restores your operating system in the Search Results list. 4 In the Hardware Troubleshooter list, click I need to resolve the incompatibility. Restoring Your Operating System You can use the Hardware Troubleshooter to resolve a hardware conflict on the hard drive and removes any applications installed...

Owner's Manual
Page 56
...To use PC Restore: 1 Turn on . NOTICE: If you reinstall Windows XP with PC Restore, click Reboot in all data on the hard drive and removes any files or programs until the system restoration is unchecked. NOTICE: Using PC Restore permanently deletes all countries. To see if System ... status lights. 2 Immediately upon seeing the lights flash, press . The restore process takes approximately 6-10 minutes to restore your computer- Using Dell™ PC Restore by Symantec only as the last method to complete. 56 Advanced Troubleshooting If you do not want to All Programs→...
...To use PC Restore: 1 Turn on . NOTICE: If you reinstall Windows XP with PC Restore, click Reboot in all data on the hard drive and removes any files or programs until the system restoration is unchecked. NOTICE: Using PC Restore permanently deletes all countries. To see if System ... status lights. 2 Immediately upon seeing the lights flash, press . The restore process takes approximately 6-10 minutes to restore your computer- Using Dell™ PC Restore by Symantec only as the last method to complete. 56 Advanced Troubleshooting If you do not want to All Programs→...


