
User Guide
Page 51
... telephony connector (J25) CD audio connector (J8) back of computer floppy drive connector (J18) control panel connector (J28) battery socket (BT1) CMOS jumper (JP2) front-panel I/O connector (J27) password jumper (JP1) front-panel audio connector (J29) PCI card slots (3) (PCI1, PCI2, PCI3) Adding Cards CAUTION: Before you begin any of the procedures...
... telephony connector (J25) CD audio connector (J8) back of computer floppy drive connector (J18) control panel connector (J28) battery socket (BT1) CMOS jumper (JP2) front-panel I/O connector (J27) password jumper (JP1) front-panel audio connector (J29) PCI card slots (3) (PCI1, PCI2, PCI3) Adding Cards CAUTION: Before you begin any of the procedures...

User Guide
Page 61
Removing and Installing Parts 61 tabs (2) insert 8 Ensure that the jumper setting on page 62, from the front of the computer and insert them into the drive. You only need two alignment screws for information). 9 Remove two extra alignment screws, shown in the illustration on the new drive is set for "cable select" (see the documentation that came with four. others come with only two extra alignment screws; drive alignment screws (2) NOTE: Some computers come with the drive for this procedure.
Removing and Installing Parts 61 tabs (2) insert 8 Ensure that the jumper setting on page 62, from the front of the computer and insert them into the drive. You only need two alignment screws for information). 9 Remove two extra alignment screws, shown in the illustration on the new drive is set for "cable select" (see the documentation that came with four. others come with only two extra alignment screws; drive alignment screws (2) NOTE: Some computers come with the drive for this procedure.
User Guide
Page 75
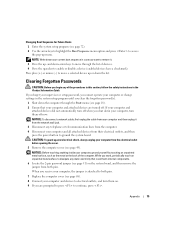
...have a checkmark). Clearing Forgotten Passwords CAUTION: Before you shut down your computer, turn them on the system board, and then remove the jumper from the electrical outlet before opening the cover. 5 Remove the computer cover (see page 49). When you receive your computer, the...device up or down the computer through the Start menu (see page 18). 2 Ensure that could harm internal components. 6 Locate the 2-pin password jumper (see page 51) on . 9 If you work, periodically touch an unpainted metal surface to dissipate any static electricity that your computer and attached ...
...have a checkmark). Clearing Forgotten Passwords CAUTION: Before you shut down your computer, turn them on the system board, and then remove the jumper from the electrical outlet before opening the cover. 5 Remove the computer cover (see page 49). When you receive your computer, the...device up or down the computer through the Start menu (see page 18). 2 Ensure that could harm internal components. 6 Locate the 2-pin password jumper (see page 51) on . 9 If you work, periodically touch an unpainted metal surface to dissipate any static electricity that your computer and attached ...
User Guide
Page 76
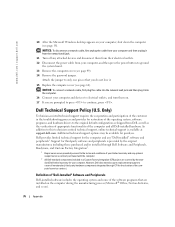
...board. 13 Remove the computer cover (see page 49). 14 Remove the password jumper. However, Dell also extends a parts replacement program to cover all nonstandard, third-party hardware components integrated through Dell Software and Peripherals, Readyware, and Custom Factory Integration2. 1 Repair services are provided ... for third-party software and peripherals is available at support.dell.com. Definition of "Dell-Installed" Software and Peripherals Dell-installed software includes the operating system and some of your computer. Attach the jumper to only one pin so that are installed on the...
...board. 13 Remove the computer cover (see page 49). 14 Remove the password jumper. However, Dell also extends a parts replacement program to cover all nonstandard, third-party hardware components integrated through Dell Software and Peripherals, Readyware, and Custom Factory Integration2. 1 Repair services are provided ... for third-party software and peripherals is available at support.dell.com. Definition of "Dell-Installed" Software and Peripherals Dell-installed software includes the operating system and some of your computer. Attach the jumper to only one pin so that are installed on the...

