Dell Dimension 2200 Owner's Manual
Page 5
... Reinstalling Windows XP 52 Reinstalling Windows 2000 54 3 Adding Parts Front and Back View of the Computer 58 Removing the Computer Cover 60 Rotating the Power Supply 62 Looking Inside Your Computer 65 System Board 66 Adding a 3.5-Inch Drive 67 Adding Cards 73 Removing Cards 77 Contents 5
... Reinstalling Windows XP 52 Reinstalling Windows 2000 54 3 Adding Parts Front and Back View of the Computer 58 Removing the Computer Cover 60 Rotating the Power Supply 62 Looking Inside Your Computer 65 System Board 66 Adding a 3.5-Inch Drive 67 Adding Cards 73 Removing Cards 77 Contents 5

Dell Dimension 2200 Owner's Manual
Page 9
... an auto-sensing voltage circuit do not have a voltage selection switch on the outside of the following: - A manual voltage selection switch - Computers with a fixed-voltage power supply do not have a voltage selection switch on the back panel and operate at the correct operating voltage. 115V Safety Instructions 9 When Using Your Computer As... (see the regulatory label on the back panel and automatically detect the correct operating voltage. - Safety Instructions Use the following safe-handling guidelines. A fixed-voltage power supply -
... an auto-sensing voltage circuit do not have a voltage selection switch on the outside of the following: - A manual voltage selection switch - Computers with a fixed-voltage power supply do not have a voltage selection switch on the back panel and operate at the correct operating voltage. 115V Safety Instructions 9 When Using Your Computer As... (see the regulatory label on the back panel and automatically detect the correct operating voltage. - Safety Instructions Use the following safe-handling guidelines. A fixed-voltage power supply -

Dell Dimension 2200 Owner's Manual
Page 11
Also, do not place your computer in a closed-in your online Dell documentation or otherwise provided to the system board, wait 5 seconds after turning off the computer before removing a component from the system board or disconnecting a device ... 11 Safety Instructions (continued) • To help avoid possible damage to you open the computer cover, perform the following steps in electrical power, use a surge suppressor, line conditioner, or uninterruptible power supply (UPS). • Be sure nothing rests on your computer's cables and that the cables are not located where they can cause...
Also, do not place your computer in a closed-in your online Dell documentation or otherwise provided to the system board, wait 5 seconds after turning off the computer before removing a component from the system board or disconnecting a device ... 11 Safety Instructions (continued) • To help avoid possible damage to you open the computer cover, perform the following steps in electrical power, use a surge suppressor, line conditioner, or uninterruptible power supply (UPS). • Be sure nothing rests on your computer's cables and that the cables are not located where they can cause...
Dell Dimension 2200 Owner's Manual
Page 57
SECTION 3 Adding Parts Front and Back View of the Computer Removing the Computer Cover Rotating the Power Supply Looking Inside Your Computer Adding a 3.5-Inch Drive Adding Cards Adding Memory Replacing the Computer Cover 3
SECTION 3 Adding Parts Front and Back View of the Computer Removing the Computer Cover Rotating the Power Supply Looking Inside Your Computer Adding a 3.5-Inch Drive Adding Cards Adding Memory Replacing the Computer Cover 3

Dell Dimension 2200 Owner's Manual
Page 62
... shock, always unplug your computer and then unplug it from the network wall jack. 3 Disconnect the computer power cable from the electrical outlet before opening the cover. www.dell.com | support.dell.com Rotating the Power Supply CAUTION: Before you begin any of the procedures in this section, follow the safety instructions on the system...
... shock, always unplug your computer and then unplug it from the network wall jack. 3 Disconnect the computer power cable from the electrical outlet before opening the cover. www.dell.com | support.dell.com Rotating the Power Supply CAUTION: Before you begin any of the procedures in this section, follow the safety instructions on the system...

Dell Dimension 2200 Owner's Manual
Page 63
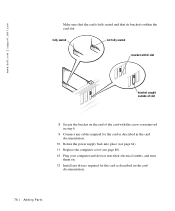
power supply release latch drive power cables Adding Pa rts 63 5 Lay the computer on its side as shown in the following illustration. Rotate the power supply out of the computer while keeping the drive power cables clear. Press the release latch while lifting the power supply.
power supply release latch drive power cables Adding Pa rts 63 5 Lay the computer on its side as shown in the following illustration. Rotate the power supply out of the computer while keeping the drive power cables clear. Press the release latch while lifting the power supply.

Dell Dimension 2200 Owner's Manual
Page 64
power supply drive power cables 64 A d d i n g Pa r ts www.dell.com | support.dell.com When you rotate the power supply back into position until its release latch clicks. Rotate the power supply into the computer, gently lift the and hold the drive cables out of the latch. Lay the drive power cables along the top of the way.
power supply drive power cables 64 A d d i n g Pa r ts www.dell.com | support.dell.com When you rotate the power supply back into position until its release latch clicks. Rotate the power supply into the computer, gently lift the and hold the drive cables out of the latch. Lay the drive power cables along the top of the way.

Dell Dimension 2200 Owner's Manual
Page 65
Looking Inside Your Computer CAUTION: Before you begin any of the procedures in this section, follow the safety instructions on page 9. release latch and padlock ring I/O panel drive bay drive bay hard drive power supply AC power receptacle Adding Pa rts 65
Looking Inside Your Computer CAUTION: Before you begin any of the procedures in this section, follow the safety instructions on page 9. release latch and padlock ring I/O panel drive bay drive bay hard drive power supply AC power receptacle Adding Pa rts 65

Dell Dimension 2200 Owner's Manual
Page 69
6 Remove the front-panel insert. insert tabs (2) release tab 7 Rotate the power supply (see page 62). Then rotate the insert toward you, and remove it from the front panel. Adding Pa rts 69 From the back of the front panel, press the release tab to the side.
6 Remove the front-panel insert. insert tabs (2) release tab 7 Rotate the power supply (see page 62). Then rotate the insert toward you, and remove it from the front panel. Adding Pa rts 69 From the back of the front panel, press the release tab to the side.

Dell Dimension 2200 Owner's Manual
Page 72
... locate the extra connector on the drive. 13 If you attach the extra connector to the new drive in step 11, remove the tape from power supply NOTICE: When you didn't install a controller card in the following step, match the colored strip on the cable with pin 1 on the cable and ...attach it to the drive. www.dell.com | support.dell.com 12 Connect a power cable to the new drive. pin 1 cable 72 A d d i n g Pa r ts power cable from the wide cable connector and reattach the connector to the original drive.
... locate the extra connector on the drive. 13 If you attach the extra connector to the new drive in step 11, remove the tape from power supply NOTICE: When you didn't install a controller card in the following step, match the colored strip on the cable with pin 1 on the cable and ...attach it to the drive. www.dell.com | support.dell.com 12 Connect a power cable to the new drive. pin 1 cable 72 A d d i n g Pa r ts power cable from the wide cable connector and reattach the connector to the original drive.
Dell Dimension 2200 Owner's Manual
Page 73
...devices into their electrical outlets, and turn them from the wall outlet, and then press the power button to ground the system board. 4 Remove the computer cover (see page 60). 5 Rotate the power supply (see page 62). NOTICE: To disconnect a network cable, first unplug the cable from ...your computer and then unplug it from the network wall jack. 3 Disconnect the computer power cable from their corresponding slots on the computer (see page 20...
...devices into their electrical outlets, and turn them from the wall outlet, and then press the power button to ground the system board. 4 Remove the computer cover (see page 60). 5 Rotate the power supply (see page 62). NOTICE: To disconnect a network cable, first unplug the cable from ...your computer and then unplug it from the network wall jack. 3 Disconnect the computer power cable from their corresponding slots on the computer (see page 20...
Dell Dimension 2200 Owner's Manual
Page 76
fully seated not fully seated bracket within the card slot. www.dell.com | support.dell.com Make sure that the card is fully seated and that its bracket is within slot bracket caught outside of slot 8 Secure the bracket on ... the card with the screw you removed in step 6. 9 Connect any cables required for the card as described in the card documentation. 10 Rotate the power supply back into place (see page 64). 11 Replace the computer cover (see page 80). 12 Plug your computer and devices into their electrical outlets, and...
fully seated not fully seated bracket within the card slot. www.dell.com | support.dell.com Make sure that the card is fully seated and that its bracket is within slot bracket caught outside of slot 8 Secure the bracket on ... the card with the screw you removed in step 6. 9 Connect any cables required for the card as described in the card documentation. 10 Rotate the power supply back into place (see page 64). 11 Replace the computer cover (see page 80). 12 Plug your computer and devices into their electrical outlets, and...
Dell Dimension 2200 Owner's Manual
Page 77
...electrical outlets, and turn them on page 9. Removing Cards CAUTION: Before you are removing the card permanently, reinstall a filler bracket. 10 Rotate the power supply back into their electrical outlets. CAUTION: To guard against electrical shock, always unplug your computer and devices into place (see page 64). 11 Replace...the computer (see page 62). 6 Disconnect any cables connected to ground the system board. 4 Remove the computer cover (see page 60). 5 Rotate the power supply (see page 20). 2 Turn off any of the procedures in this section, follow the safety instructions on .
...electrical outlets, and turn them on page 9. Removing Cards CAUTION: Before you are removing the card permanently, reinstall a filler bracket. 10 Rotate the power supply back into their electrical outlets. CAUTION: To guard against electrical shock, always unplug your computer and devices into place (see page 64). 11 Replace...the computer (see page 62). 6 Disconnect any cables connected to ground the system board. 4 Remove the computer cover (see page 60). 5 Rotate the power supply (see page 20). 2 Turn off any of the procedures in this section, follow the safety instructions on .
Dell Dimension 2200 Owner's Manual
Page 78
... devices and disconnect them from their electrical outlets. www.dell.com | support.dell.com HINT: Memory purchased from Dell is difficult to remove, gently ease the module back and forth to ground the system board. 4 Open the computer cover (see page 60). 5 Rotate the power supply (see page 20). 2 Turn off any of the memory...
... devices and disconnect them from their electrical outlets. www.dell.com | support.dell.com HINT: Memory purchased from Dell is difficult to remove, gently ease the module back and forth to ground the system board. 4 Open the computer cover (see page 60). 5 Rotate the power supply (see page 20). 2 Turn off any of the memory...
Dell Dimension 2200 Owner's Manual
Page 80
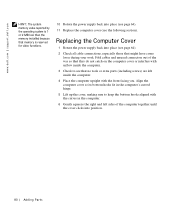
...connectors out of the computer together until the cover clicks into position. 80 A d d i n g Pa r ts Replacing the Computer Cover 1 Rotate the power supply back into place (see page 64). 11 Replace the computer cover (see the following section). Align the computer cover so its bottom hooks fit in ...upright with the front facing you. www.dell.com | support.dell.com HINT: The system memory value reported by the operating system is 1 or 2 MB less than the memory installed because that memory is reserved for video functions. 10 Rotate the power supply back into place (see that might have...
...connectors out of the computer together until the cover clicks into position. 80 A d d i n g Pa r ts Replacing the Computer Cover 1 Rotate the power supply back into place (see page 64). 11 Replace the computer cover (see the following section). Align the computer cover so its bottom hooks fit in ...upright with the front facing you. www.dell.com | support.dell.com HINT: The system memory value reported by the operating system is 1 or 2 MB less than the memory installed because that memory is reserved for video functions. 10 Rotate the power supply back into place (see that might have...
Dell Dimension 2200 Owner's Manual
Page 84
www.dell.com | support.dell.com Controls and Lights Power control Power light Hard-drive access light Diagnostic code lights push button green green four bicolor (amber and green) located on back panel Power DC power supply: Wattage Heat dissipation Voltage (switch-selectable on back panel) Backup battery 145 W 495 BTU (fully loaded computer without monitor) 90 to...
www.dell.com | support.dell.com Controls and Lights Power control Power light Hard-drive access light Diagnostic code lights push button green green four bicolor (amber and green) located on back panel Power DC power supply: Wattage Heat dissipation Voltage (switch-selectable on back panel) Backup battery 145 W 495 BTU (fully loaded computer without monitor) 90 to...

Dell Dimension 2200 Owner's Manual
Page 89
... system setup program so that you can restore the correct settings in step 8 (see page 86). 2 Remove the computer cover (see page 60). 3 Rotate the power supply (see page 66) and pry the battery out of its socket with your fingers or with the same or equivalent type recommended by the manufacturer...
... system setup program so that you can restore the correct settings in step 8 (see page 86). 2 Remove the computer cover (see page 60). 3 Rotate the power supply (see page 66) and pry the battery out of its socket with your fingers or with the same or equivalent type recommended by the manufacturer...
Dell Dimension 2200 Owner's Manual
Page 90
... of the operating system, application software, and hardware drivers to this technician-assisted technical support, online technical support is available at support.dell.com. battery socket (BATTERY) battery 6 Rotate the power supply back into place (see page 64). 7 Replace the computer cover (see page 80), and plug your computer and devices into the...
... of the operating system, application software, and hardware drivers to this technician-assisted technical support, online technical support is available at support.dell.com. battery socket (BATTERY) battery 6 Rotate the power supply back into place (see page 64). 7 Replace the computer cover (see page 80), and plug your computer and devices into the...
Dell Dimension 2200 Owner's Manual
Page 112
... causes, including accident, abuse, misuse, problems with electrical power, servicing not authorized by Dell, usage not in accordance with product instructions, failure to new in accordance with either a one year beginning on Dell's standard price list are not installed in one or more... Damage due to shipping the products to a Dell system through the Dell Software and Peripherals program) are new or equivalent to perform required preventive maintenance, and problems caused by use of parts and components not supplied by Dell. or Canada come with industry-standard practices. ...
... causes, including accident, abuse, misuse, problems with electrical power, servicing not authorized by Dell, usage not in accordance with product instructions, failure to new in accordance with either a one year beginning on Dell's standard price list are not installed in one or more... Damage due to shipping the products to a Dell system through the Dell Software and Peripherals program) are new or equivalent to perform required preventive maintenance, and problems caused by use of parts and components not supplied by Dell. or Canada come with industry-standard practices. ...
Dell Dimension 2200 Owner's Manual
Page 138
... fixing problems, 40 setting up, 20 Network Setup Wizard, 20 O operating system reinstallation, 54 P password clearing system setup, 88 PCI card, 73 power fixing problems, 26 turning off, 20 power supply rotating, 62 printer connecting, 16 fixing problems, 32 reinstalling driver, 18 printer (continued) setting up , 27 Windows, 41 138 Index modem fixing...
... fixing problems, 40 setting up, 20 Network Setup Wizard, 20 O operating system reinstallation, 54 P password clearing system setup, 88 PCI card, 73 power fixing problems, 26 turning off, 20 power supply rotating, 62 printer connecting, 16 fixing problems, 32 reinstalling driver, 18 printer (continued) setting up , 27 Windows, 41 138 Index modem fixing...


