Dell Dimension 2200 Owner's Manual
Page 6
...Policy 112 One-Year Limited Warranty (U.S. Only 114 Three-Year Limited Warranty (U.S. Only 118 Four-Year Limited Warranty (U.S. Adding Memory 78 Replacing the Computer Cover 80 4 Appendix Specifications 82 Standard Settings 86 Viewing Settings 87 System Setup Program Screens 87 ...Clearing Forgotten Passwords 88 Replacing the Battery 89 Dell Technical Support Policy (U.S. Only 112 Two-Year Limited Warranty (U.S. Only 90 Definition of "Dell-Installed" Software and Peripherals . . . . . 91 Definition of "Third-Party" Software ...
...Policy 112 One-Year Limited Warranty (U.S. Only 114 Three-Year Limited Warranty (U.S. Only 118 Four-Year Limited Warranty (U.S. Adding Memory 78 Replacing the Computer Cover 80 4 Appendix Specifications 82 Standard Settings 86 Viewing Settings 87 System Setup Program Screens 87 ...Clearing Forgotten Passwords 88 Replacing the Battery 89 Dell Technical Support Policy (U.S. Only 112 Two-Year Limited Warranty (U.S. Only 90 Definition of "Dell-Installed" Software and Peripherals . . . . . 91 Definition of "Third-Party" Software ...
Dell Dimension 2200 Owner's Manual
Page 41
... icon. 3 Select the program that you want to remove. 5 Click the Change or Remove Program icon. 6 See the program documentation for installation instructions. NOT ENOUGH MEMORY OR RESOURCES. CLOSE SOME PROGRAMS AND T R Y A GA I N - To remove and then reinstall the program: Windows XP 1 Click the Start button. 2 Click Control Panel. 3 Click Add...
... icon. 3 Select the program that you want to remove. 5 Click the Change or Remove Program icon. 6 See the program documentation for installation instructions. NOT ENOUGH MEMORY OR RESOURCES. CLOSE SOME PROGRAMS AND T R Y A GA I N - To remove and then reinstall the program: Windows XP 1 Click the Start button. 2 Click Control Panel. 3 Click Add...
Dell Dimension 2200 Owner's Manual
Page 57
SECTION 3 Adding Parts Front and Back View of the Computer Removing the Computer Cover Rotating the Power Supply Looking Inside Your Computer Adding a 3.5-Inch Drive Adding Cards Adding Memory Replacing the Computer Cover 3
SECTION 3 Adding Parts Front and Back View of the Computer Removing the Computer Cover Rotating the Power Supply Looking Inside Your Computer Adding a 3.5-Inch Drive Adding Cards Adding Memory Replacing the Computer Cover 3
Dell Dimension 2200 Owner's Manual
Page 78
... your computer. 1 Shut down the computer (see page 62). 6 If necessary, remove a memory module: a Press out the securing clip at each end of the memory connector. b Grasp the module and pull up. www.dell.com | support.dell.com HINT: Memory purchased from Dell is difficult to remove, gently ease the module back and forth to ground...
... your computer. 1 Shut down the computer (see page 62). 6 If necessary, remove a memory module: a Press out the securing clip at each end of the memory connector. b Grasp the module and pull up. www.dell.com | support.dell.com HINT: Memory purchased from Dell is difficult to remove, gently ease the module back and forth to ground...
Dell Dimension 2200 Owner's Manual
Page 79
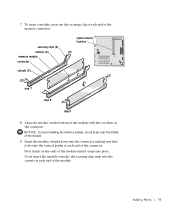
securing clips (2) notches (2) memory module connector system board location cutouts (2) step 7 step 8 step 9 8 Align the notches on the ends of the module until it fits ...end of the module. 7 To insert a module, press out the securing clip at each end of the connector. NOTICE: To avoid breaking the memory module, do not press near the middle of the module. 9 Insert the module straight down into the connector, making sure that it snaps into... vertical guides at each end of the module with the crossbars in the connector. Press firmly on the bottom of the memory connector.
securing clips (2) notches (2) memory module connector system board location cutouts (2) step 7 step 8 step 9 8 Align the notches on the ends of the module until it fits ...end of the module. 7 To insert a module, press out the securing clip at each end of the connector. NOTICE: To avoid breaking the memory module, do not press near the middle of the module. 9 Insert the module straight down into the connector, making sure that it snaps into... vertical guides at each end of the module with the crossbars in the connector. Press firmly on the bottom of the memory connector.
Dell Dimension 2200 Owner's Manual
Page 80
Replacing the Computer Cover 1 Rotate the power supply back into place (see page 64). 2 Check all cable connections, especially those that memory is reserved for video functions. 10 Rotate the power supply back into position. 80 A d d i n g Pa r ts Align the computer cover... upright with airflow inside the computer. 3 Check to see the following section). www.dell.com | support.dell.com HINT: The system memory value reported by the operating system is 1 or 2 MB less than the memory installed because that might have come loose during your work. Fold cables and unused connectors...
Replacing the Computer Cover 1 Rotate the power supply back into place (see page 64). 2 Check all cable connections, especially those that memory is reserved for video functions. 10 Rotate the power supply back into position. 80 A d d i n g Pa r ts Align the computer cover... upright with airflow inside the computer. 3 Check to see the following section). www.dell.com | support.dell.com HINT: The system memory value reported by the operating system is 1 or 2 MB less than the memory installed because that might have come loose during your work. Fold cables and unused connectors...
Dell Dimension 2200 Owner's Manual
Page 82
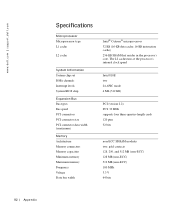
...MHz supports four three-quarter-length cards 120 pins 32 bits non-ECC SDRAM modules two; www.dell.com | support.dell.com Specifications Microprocessor Microprocessor type L1 cache L2 cache System Information System chip set DMA channels Interrupt ...levels System BIOS chip Expansion Bus Bus types Bus speed PCI connectors PCI connector size PCI connector data width (maximum) Memory Architecture Memory connectors Memory capacities Minimum memory Maximum memory...
...MHz supports four three-quarter-length cards 120 pins 32 bits non-ECC SDRAM modules two; www.dell.com | support.dell.com Specifications Microprocessor Microprocessor type L1 cache L2 cache System Information System chip set DMA channels Interrupt ...levels System BIOS chip Expansion Bus Bus types Bus speed PCI connectors PCI connector size PCI connector data width (maximum) Memory Architecture Memory connectors Memory capacities Minimum memory Maximum memory...
Dell Dimension 2200 Owner's Manual
Page 138
... 42 reinstalling software, 45 sound adjusting volume, 30 fixing problems, 30 speaker adjusting volume, 30 fixing problems, 30 specifications, 82 See memory reinstalling drivers, 45 Windows 2000, 54 ResourceCD, 45 return policy, 133 S safety instructions, 9 ScanDisk, 40 screen. floppy drive fixing ... fixing problems, 40 help file accessing, 26 I installing cards, 73 installing drives, 67 installing memory, 78 Internet fixing problems, 43 IRQ conflicts, 47 K keyboard fixing problems, 37 M memory adding, 78 connectors, 66 removing, 78 messages start-up , 16 troubleshooting, 32 programs fixing ...
... 42 reinstalling software, 45 sound adjusting volume, 30 fixing problems, 30 speaker adjusting volume, 30 fixing problems, 30 specifications, 82 See memory reinstalling drivers, 45 Windows 2000, 54 ResourceCD, 45 return policy, 133 S safety instructions, 9 ScanDisk, 40 screen. floppy drive fixing ... fixing problems, 40 help file accessing, 26 I installing cards, 73 installing drives, 67 installing memory, 78 Internet fixing problems, 43 IRQ conflicts, 47 K keyboard fixing problems, 37 M memory adding, 78 connectors, 66 removing, 78 messages start-up , 16 troubleshooting, 32 programs fixing ...


