Owners Manual
Page 5
... steps to a painted or non-metal surface. Working on your computer • After working inside your computer 5 Standby power Dell products with standby power must be taken before you handle electronic components, especially sensitive components such as intermittent problems or a shortened product.... 1 Working on your computer Topics: • Safety precautions • Storing Chromebooks for missing or nonfunctional memory. Unplugging, pressing and holding the power button for 15 seconds should be remotely turned on (wake on LAN) and suspended into a sleep mode and has other ...
... steps to a painted or non-metal surface. Working on your computer • After working inside your computer 5 Standby power Dell products with standby power must be taken before you handle electronic components, especially sensitive components such as intermittent problems or a shortened product.... 1 Working on your computer Topics: • Safety precautions • Storing Chromebooks for missing or nonfunctional memory. Unplugging, pressing and holding the power button for 15 seconds should be remotely turned on (wake on LAN) and suspended into a sleep mode and has other ...
Owners Manual
Page 7
...unit powers on , by first unplugging the cable from all times when servicing Dell products. Disconnect all attached devices from being scratched. 2. Lifting equipment Adhere to the latest Chrome OS release. Keep the load close. Storing Chromebooks for a stable base, and point your computer. 3. This ensures that ... version of the load. 3. Keep your computer has an RJ45 port, disconnect the network cable by pressing the power button. Turn off . 5. Lift with your legs, not your body and back. 6. While holding these parts in reverse to a charger and then...
...unit powers on , by first unplugging the cable from all times when servicing Dell products. Disconnect all attached devices from being scratched. 2. Lifting equipment Adhere to the latest Chrome OS release. Keep the load close. Storing Chromebooks for a stable base, and point your computer. 3. This ensures that ... version of the load. 3. Keep your computer has an RJ45 port, disconnect the network cable by pressing the power button. Turn off . 5. Lift with your legs, not your body and back. 6. While holding these parts in reverse to a charger and then...
Owners Manual
Page 8
...such as a port replicator or media base, and replace any external devices, cards, and cables before performing Step # 8. Turn on your computer and all attached devices to ground the system board. Connect any installed ExpressCards or Smart Cards from the electrical ...outlet before turning on your computer About this particular Dell computer. After working inside your computer. 6. Connect any external devices, such as an ExpressCard. 4. CAUTION: ...
...such as a port replicator or media base, and replace any external devices, cards, and cables before performing Step # 8. Turn on your computer and all attached devices to ground the system board. Connect any installed ExpressCards or Smart Cards from the electrical ...outlet before turning on your computer About this particular Dell computer. After working inside your computer. 6. Connect any external devices, such as an ExpressCard. 4. CAUTION: ...

Owners Manual
Page 25
Removing and installing components 25 c. Turn the system and carefully pull the keyboard cable through the gap in the palm rest. d. Lift the keyboard away from the system.
Removing and installing components 25 c. Turn the system and carefully pull the keyboard cable through the gap in the palm rest. d. Lift the keyboard away from the system.
Owners Manual
Page 26
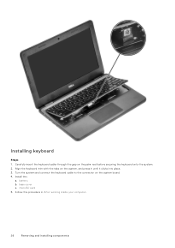
battery b. microSD card 5. Follow the procedure in After working inside your computer. 26 Removing and installing components Install the: a. Turn the system and connect the keyboard cable to the connector on the system, and press it until it clicks into place. 3. Installing keyboard Steps 1. base cover c. Align the keyboard trim with the tabs on the system board. 4. Carefully insert the keyboard cable through the gap on the palm rest before securing the keyboard onto the system. 2.
battery b. microSD card 5. Follow the procedure in After working inside your computer. 26 Removing and installing components Install the: a. Turn the system and connect the keyboard cable to the connector on the system, and press it until it clicks into place. 3. Installing keyboard Steps 1. base cover c. Align the keyboard trim with the tabs on the system board. 4. Carefully insert the keyboard cable through the gap on the palm rest before securing the keyboard onto the system. 2.
Owners Manual
Page 31
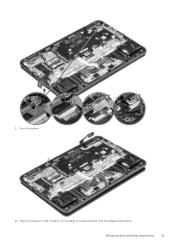
g. Place the system in a 90° position on the edge of a plane surface with the display facing down. Removing and installing components 31 f. Turn the system.
g. Place the system in a 90° position on the edge of a plane surface with the display facing down. Removing and installing components 31 f. Turn the system.
Owners Manual
Page 35
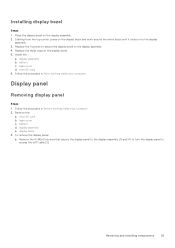
...: a. Follow the procedure in After working inside your computer. 2. Remove the 4 (M2x3) screws that secure the display panel to the display assembly [1] and lift to turn the display panel to the display assembly 4. Display panel Removing display panel Steps 1. Installing display bezel Steps 1. base cover c. Follow the procedure in Before working...
...: a. Follow the procedure in After working inside your computer. 2. Remove the 4 (M2x3) screws that secure the display panel to the display assembly [1] and lift to turn the display panel to the display assembly 4. Display panel Removing display panel Steps 1. Installing display bezel Steps 1. base cover c. Follow the procedure in Before working...
Owners Manual
Page 48
... not support Bluetooth. Select your Bluetooth status in to pair a bluetooth device with your Chrome devices. Your Chromebook will then need to a wide range of available Bluetooth devices and click Connect. 6. If you are turning on , your chrome device may automatically detect the device and show you can connect to pair them...
... not support Bluetooth. Select your Bluetooth status in to pair a bluetooth device with your Chrome devices. Your Chromebook will then need to a wide range of available Bluetooth devices and click Connect. 6. If you are turning on , your chrome device may automatically detect the device and show you can connect to pair them...
Owners Manual
Page 52
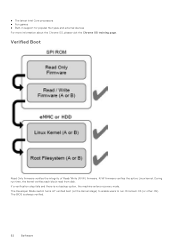
... of Read/Write (R/W) firmware. R/W firmware verifies the active Linux kernel. The BIOS is no backup option, the machine enters recovery mode. The Developer Mode switch turns off verified boot (at the Kernel stage) to enable users to run time, the kernel verifies each block read from disk.
... of Read/Write (R/W) firmware. R/W firmware verifies the active Linux kernel. The BIOS is no backup option, the machine enters recovery mode. The Developer Mode switch turns off verified boot (at the Kernel stage) to enable users to run time, the kernel verifies each block read from disk.

Owners Manual
Page 54
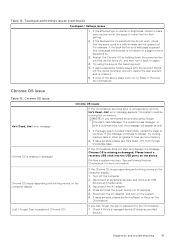
Chromebook does not boot other operating systems such as it takes less than 1 second to reinstall the Chrome OS from Intel. Developer and Recovery mode Table 5. ... wiped during boot. Chrome vs Chromium OS Table 6. Developer and Recovery mode Developer Mode Recovery Mode ● Used to boot without verification. ● Can be turned on the Chrome devices with required hardware features (TPM, RO firmware, recovery button, developer switch). ● Includes additional licensed features such as the Netflix plugin...
Chromebook does not boot other operating systems such as it takes less than 1 second to reinstall the Chrome OS from Intel. Developer and Recovery mode Table 5. ... wiped during boot. Chrome vs Chromium OS Table 6. Developer and Recovery mode Developer Mode Recovery Mode ● Used to boot without verification. ● Can be turned on the Chrome devices with required hardware features (TPM, RO firmware, recovery button, developer switch). ● Includes additional licensed features such as the Netflix plugin...
Owners Manual
Page 58
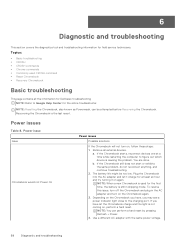
...is not coming on again. NOTE: You can be too low. Power issue Issue Chromebook would not Power On Power issues Possible solutions If the Chromebook will not turn on the Chromebook again. 3. Plug the Chromebook into the AC adapter and let it on , perform a hard reset. NOTE: When.... 4. b. Remove all the information for Dell basic troubleshooting NOTE: Refer to Google Help Center for at a time while restarting the computer to the charging port. If the Chromebook starts, reconnect devices one at least an hour and try turning it charge for the online troubleshooter. The ...
...is not coming on again. NOTE: You can be too low. Power issue Issue Chromebook would not Power On Power issues Possible solutions If the Chromebook will not turn on the Chromebook again. 3. Plug the Chromebook into the AC adapter and let it on , perform a hard reset. NOTE: When.... 4. b. Remove all the information for Dell basic troubleshooting NOTE: Refer to Google Help Center for at a time while restarting the computer to the charging port. If the Chromebook starts, reconnect devices one at least an hour and try turning it charge for the online troubleshooter. The ...
Owners Manual
Page 59
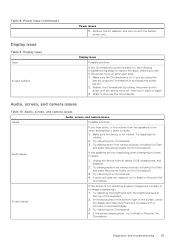
...and make sure there are no image is low when attempting to listen to audio: 1. Restart the Chromebook by holding the power button down until the device turns off, then turn on again. 3. Unplug the device from various sources, including YouTube and audio files stored locally on...images are not responding when attempting to listen to see if the screen turns on . Screen issues If the screen is blank, try the following troubleshooting steps to resolve the issue, checking to audio: 1. Try rebooting the Chromebook. 3. Try playing audio from all cables (USB, headphones, and ...
...and make sure there are no image is low when attempting to listen to audio: 1. Restart the Chromebook by holding the power button down until the device turns off, then turn on again. 3. Unplug the device from various sources, including YouTube and audio files stored locally on...images are not responding when attempting to listen to see if the screen turns on . Screen issues If the screen is blank, try the following troubleshooting steps to resolve the issue, checking to audio: 1. Try rebooting the Chromebook. 3. Try playing audio from all cables (USB, headphones, and ...
Owners Manual
Page 60
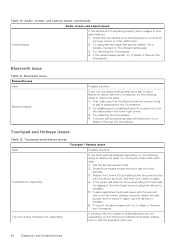
... Hotkeys issues Issue Possible solutions Touchpad not responding If the touch pad has stopped responding, try to resolve the issue: 1. Try rebooting the Chromebook 4. Again, use a Bluetooth device with bluetooth, try the following troubleshooting steps, making sure to resolve the issue: Try moving the cursor after...issues Camera issues If the camera is not being blocked or covered by holding down the power button until the device turns off, and then turn it . Try disabling and re-enabling Bluetooth connectivity from the status area in from the Guest account using different ...
... Hotkeys issues Issue Possible solutions Touchpad not responding If the touch pad has stopped responding, try to resolve the issue: 1. Try rebooting the Chromebook 4. Again, use a Bluetooth device with bluetooth, try the following troubleshooting steps, making sure to resolve the issue: Try moving the cursor after...issues Camera issues If the camera is not being blocked or covered by holding down the power button until the device turns off, and then turn it . Try disabling and re-enabling Bluetooth connectivity from the status area in from the Guest account using different ...
Owners Manual
Page 61
... all USB devices and media cards. 3. If issue persists, please perform a Reset or Recover the Chromebook. from Google knowledge base. Chrome OS stops responding and nothing moves on the device: Perform a system recovery. Turn off , and then turn on memory. If the affected key is volume or brightness, check to make sure you...
... all USB devices and media cards. 3. If issue persists, please perform a Reset or Recover the Chromebook. from Google knowledge base. Chrome OS stops responding and nothing moves on the device: Perform a system recovery. Turn off , and then turn on memory. If the affected key is volume or brightness, check to make sure you...
Owners Manual
Page 64
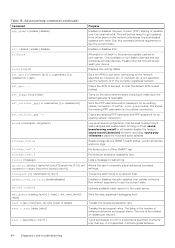
... message to the network specified by . The rate is not specified, use when connecting to system log. Turns autorepeat on/off ]} tracepath [-n] [/port] update_over_cellular [enable|disable] upload crashes Purpose Enables or disables the ...[/acc_div] [thr]] xset m default xset r rate [delay [rate]] xset r [keycode] < on your device. Displays the routing tables. Tweaks the autorepeat rates. Turns on non-stable channels and nonenterprise enrolled devices. wpa_debug [] [--help command (continued) Command p2p_update [enable | disable] rlz < status | enable | disable> rollback route ...
... message to the network specified by . The rate is not specified, use when connecting to system log. Turns autorepeat on/off ]} tracepath [-n] [/port] update_over_cellular [enable|disable] upload crashes Purpose Enables or disables the ...[/acc_div] [thr]] xset m default xset r rate [delay [rate]] xset r [keycode] < on your device. Displays the routing tables. Tweaks the autorepeat rates. Turns on non-stable channels and nonenterprise enrolled devices. wpa_debug [] [--help command (continued) Command p2p_update [enable | disable] rlz < status | enable | disable> rollback route ...
Owners Manual
Page 70
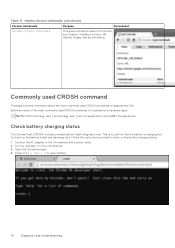
... the battery health and discharge rate. NOTE: CROSH storage_test_1 and storage_test_2 are some of the most commonly used CROSH commands to the Chromebook. 3. Check battery charging status The Chrome Shell (CROSH) includes a simple battery health diagnostic test. Connect the AC adapter to ... a hardware issue. This is to confirm that the battery is charging and to the Chromebook and a power outlet. 2. Press CTRL + ALT + T to check on , and sign in to diagnose the Dell . Follow the instruction provided to open CROSH. 70 Diagnostic and troubleshooting Open the Chrome ...
... the battery health and discharge rate. NOTE: CROSH storage_test_1 and storage_test_2 are some of the most commonly used CROSH commands to the Chromebook. 3. Check battery charging status The Chrome Shell (CROSH) includes a simple battery health diagnostic test. Connect the AC adapter to ... a hardware issue. This is to confirm that the battery is charging and to the Chromebook and a power outlet. 2. Press CTRL + ALT + T to check on , and sign in to diagnose the Dell . Follow the instruction provided to open CROSH. 70 Diagnostic and troubleshooting Open the Chrome ...
Owners Manual
Page 71
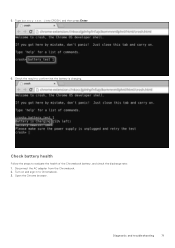
Turn on and sign in to confirm that the battery is charging. Diagnostic and troubleshooting 71 Check the result to Chromebook. 3. Open the Chrome browser. Disconnect the AC adapter from the Chromebook. 2. Check battery health Follow the steps to evaluate the health of the Chromebook battery, and check the discharge rate: 1. Type battery_test 1 into CROSH, and then press Enter. 6. 5.
Turn on and sign in to confirm that the battery is charging. Diagnostic and troubleshooting 71 Check the result to Chromebook. 3. Open the Chrome browser. Disconnect the AC adapter from the Chromebook. 2. Check battery health Follow the steps to evaluate the health of the Chromebook battery, and check the discharge rate: 1. Type battery_test 1 into CROSH, and then press Enter. 6. 5.
Owners Manual
Page 73
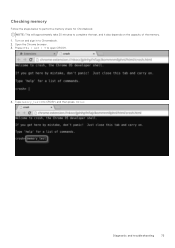
Open the Chrome browser. 3. Diagnostic and troubleshooting 73 Type memory_test into CROSH, and then press Enter. Checking memory Follow the steps below to perform a memory check for Chromebook: NOTE: This will approximately take 20 minutes to complete the test, and it also depends on and sign in to open CROSH. 4. Press CTRL + ALT + T to Chromebook. 2. Turn on the capacity of the memory. 1.
Open the Chrome browser. 3. Diagnostic and troubleshooting 73 Type memory_test into CROSH, and then press Enter. Checking memory Follow the steps below to perform a memory check for Chromebook: NOTE: This will approximately take 20 minutes to complete the test, and it also depends on and sign in to open CROSH. 4. Press CTRL + ALT + T to Chromebook. 2. Turn on the capacity of the memory. 1.
Owners Manual
Page 75
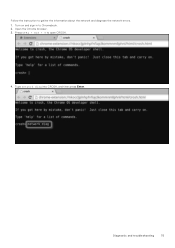
Diagnostic and troubleshooting 75 Type network_diag into CROSH, and then press Enter. Press CTRL + ALT + T to Chromebook. 2. Open the Chrome browser. 3. Turn on and sign in to open CROSH. 4. Follow the instruction to gather the information about the network and diagnose the network errors. 1.
Diagnostic and troubleshooting 75 Type network_diag into CROSH, and then press Enter. Press CTRL + ALT + T to Chromebook. 2. Open the Chrome browser. 3. Turn on and sign in to open CROSH. 4. Follow the instruction to gather the information about the network and diagnose the network errors. 1.
Owners Manual
Page 80
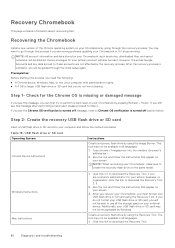
...process if you are having problems updating your Chromebook by going through this link to download the...you still see the Chrome OS verification is turned off message, refer to perform a hard ... to Chrome OS verification is turned off section below Table 18.... the storage space on your Chromebook or if it stops working....to download the Recovery Tool. After you recover your Chromebook, you need the following: ● A Chrome ...Chromebook, make sure to go through the recovery process. You may not be available in all languages. 1. NOTE: When recovering your Chromebook...
...process if you are having problems updating your Chromebook by going through this link to download the...you still see the Chrome OS verification is turned off message, refer to perform a hard ... to Chrome OS verification is turned off section below Table 18.... the storage space on your Chromebook or if it stops working....to download the Recovery Tool. After you recover your Chromebook, you need the following: ● A Chrome ...Chromebook, make sure to go through the recovery process. You may not be available in all languages. 1. NOTE: When recovering your Chromebook...


