
Owners Manual
Page 4
...display panel...35 Installing display panel...38 Display hinges...38 Removing display hinge...38 Installing display hinge...40 Display cable...41 Removing display cable...41 Installing display cable...41 Camera...42 Removing camera...42 Installing camera...43 Palm rest...44 Replacing palmrest...44 Chapter 3: Technology and components 45 Keyboard...45 Keyboard keys function...45 Touchpad...47 Bluetooth...48 Chapter 4: Product specification for Chromebook 5190 49 Chapter 5: Software...51 Operating system...51 Chrome OS...51 Verified Boot...52 Disk Partition Map...53 Developer and Recovery mode...
...display panel...35 Installing display panel...38 Display hinges...38 Removing display hinge...38 Installing display hinge...40 Display cable...41 Removing display cable...41 Installing display cable...41 Camera...42 Removing camera...42 Installing camera...43 Palm rest...44 Replacing palmrest...44 Chapter 3: Technology and components 45 Keyboard...45 Keyboard keys function...45 Touchpad...47 Bluetooth...48 Chapter 4: Product specification for Chromebook 5190 49 Chapter 5: Software...51 Operating system...51 Chrome OS...51 Verified Boot...52 Disk Partition Map...53 Developer and Recovery mode...
Owners Manual
Page 5
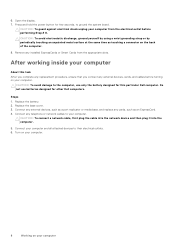
... when you remove all network cables, telephone, and telecommunications lines from AC power. ● Disconnect all jewelry such as watches, bracelets, or rings prior to bonding yourself and the equipment. Catastrophic failures represent approximately 20 percent of device functionality. Working on LAN) and suspended into a sleep mode and has other advanced power management features. Standby power Dell products with a beep code emitted for connecting two or...
... when you remove all network cables, telephone, and telecommunications lines from AC power. ● Disconnect all jewelry such as watches, bracelets, or rings prior to bonding yourself and the equipment. Catastrophic failures represent approximately 20 percent of device functionality. Working on LAN) and suspended into a sleep mode and has other advanced power management features. Standby power Dell products with a beep code emitted for connecting two or...
Owners Manual
Page 6
... original box that the new part arrived in . Never use anti-static floor pads and workbench pads. ● When unpacking a static-sensitive component from its shipping carton, do not have one. Always look for safe transport. 6 Working on the mat. ESD-sensitive devices should be moved at least 12 inches or 30 centimeters away from internal parts that is critical...
... original box that the new part arrived in . Never use anti-static floor pads and workbench pads. ● When unpacking a static-sensitive component from its shipping carton, do not have one. Always look for safe transport. 6 Working on the mat. ESD-sensitive devices should be moved at least 12 inches or 30 centimeters away from internal parts that is critical...
Owners Manual
Page 7
... then turn it . 4. Keep your back upright, whether lifting or setting down and remain off your Chromebooks to 4. Storing Chromebooks for a stable base, and point your computer Steps 1. a. Connect the device to a docking device (docked), undock it on your back. 5. Hold Refresh and Power keys at the same time. 4. The device should repeat steps 2 to WiFi and update them out of power. 2. Power up...
... then turn it . 4. Keep your back upright, whether lifting or setting down and remain off your Chromebooks to 4. Storing Chromebooks for a stable base, and point your computer Steps 1. a. Connect the device to a docking device (docked), undock it on your back. 5. Hold Refresh and Power keys at the same time. 4. The device should repeat steps 2 to WiFi and update them out of power. 2. Power up...
Owners Manual
Page 8
... use only the battery designed for this task After you complete any replacement procedure, ensure that you connect any telephone or network cables to their electrical outlets. 6. Replace the base cover. 3. Turn on your computer. 8 Working on your computer and all attached devices to your computer About this particular Dell computer. Steps 1. Connect your computer 6. Remove any cards, such as touching a connector on your computer. Connect any external devices...
... use only the battery designed for this task After you complete any replacement procedure, ensure that you connect any telephone or network cables to their electrical outlets. 6. Replace the base cover. 3. Turn on your computer. 8 Working on your computer and all attached devices to your computer About this particular Dell computer. Steps 1. Connect your computer 6. Remove any cards, such as touching a connector on your computer. Connect any external devices...
Owners Manual
Page 24
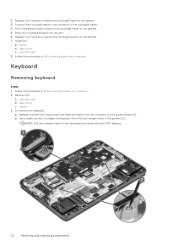
2. Place the touchpad bracket into the slot. 6. Keyboard Removing keyboard Steps 1. base cover c. microSD card b. Release the latch and, disconnect the keyboard cable from the two release holes in the touchpad frame. 4. Replace the 3 screws to secure the touchpad bracket to the system. 3. battery 3. b. Remove the: a. Use a plastic scribe to release the keyboard from the connector on the system board [1]. battery b. Follow the procedure in Before working inside your computer...
2. Place the touchpad bracket into the slot. 6. Keyboard Removing keyboard Steps 1. base cover c. microSD card b. Release the latch and, disconnect the keyboard cable from the two release holes in the touchpad frame. 4. Replace the 3 screws to secure the touchpad bracket to the system. 3. battery 3. b. Remove the: a. Use a plastic scribe to release the keyboard from the connector on the system board [1]. battery b. Follow the procedure in Before working inside your computer...
Owners Manual
Page 30
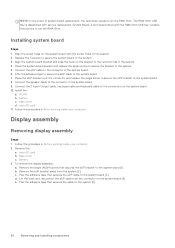
... installing components Install the: a. battery c. Display assembly Removing display assembly Steps 1. To remove the display assembly: a. b. Peel the adhesive tape that secures the eDP bracket to the system board. 7. Connect the eDP cable to the system. 5. base cover d. microSD card 11. Align the screw holes on the system board with the RMA Shim USB Key contains instructions to run the RMA Shim. Place the system board bracket and replace...
... installing components Install the: a. battery c. Display assembly Removing display assembly Steps 1. To remove the display assembly: a. b. Peel the adhesive tape that secures the eDP bracket to the system board. 7. Connect the eDP cable to the system. 5. base cover d. microSD card 11. Align the screw holes on the system board with the RMA Shim USB Key contains instructions to run the RMA Shim. Place the system board bracket and replace...
Owners Manual
Page 45
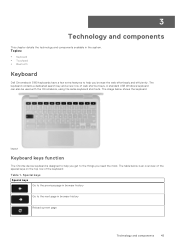
... in browser history Reload current page Technology and components 45 A standard USB Windows keyboard can also be used with the Chromebook, using the same keyboard shortcuts. Special keys Special keys Go to the previous page in browser history Go to help you need the most. Keyboard keys function The Chrome device keyboard is an overview of the special keys on the top row of web shortcut...
... in browser history Reload current page Technology and components 45 A standard USB Windows keyboard can also be used with the Chromebook, using the same keyboard shortcuts. Special keys Special keys Go to the previous page in browser history Go to help you need the most. Keyboard keys function The Chrome device keyboard is an overview of the special keys on the top row of web shortcut...

Owners Manual
Page 46
... and launcher Enter Overview mode, which shows all windows Decrease screen brightness Increase screen brightness Mute Decrease the volume Increase the volume Search applications and the web at the same time. Keyboard shortcut keys Table 2. On a Chromebook, this key is on your screen. 46 Technology and components Shortcut keys Function Page up Page down Home End Delete Toggle the bookmark bar Search current webpage Open a new tab Open a new window Open the...
... and launcher Enter Overview mode, which shows all windows Decrease screen brightness Increase screen brightness Mute Decrease the volume Increase the volume Search applications and the web at the same time. Keyboard shortcut keys Table 2. On a Chromebook, this key is on your screen. 46 Technology and components Shortcut keys Function Page up Page down Home End Delete Toggle the bookmark bar Search current webpage Open a new tab Open a new window Open the...
Owners Manual
Page 49
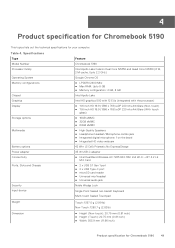
Specifications Type Model Number Processor family Operating System Memory configurations Chipset Graphics Display Storage options Multimedia Battery options Power adapter Connectivity Ports, Slots and Chassis Security Input device Feature Chromebook 5190 Intel Apollo Lake Celeron Dual Core N3350 and Quad Core N3450 (6 W, 2 M cache, Upto 2.2 GHz) Google Chrome OS ● LPDDR4 2400 Mhz ● Max RAM: Upto 8 GB ● Memory configuration: 4 GB, 8 GB Intel Apollo Lake Intel HD graphics 500 with 12 EUs (integrated...
Specifications Type Model Number Processor family Operating System Memory configurations Chipset Graphics Display Storage options Multimedia Battery options Power adapter Connectivity Ports, Slots and Chassis Security Input device Feature Chromebook 5190 Intel Apollo Lake Celeron Dual Core N3350 and Quad Core N3450 (6 W, 2 M cache, Upto 2.2 GHz) Google Chrome OS ● LPDDR4 2400 Mhz ● Max RAM: Upto 8 GB ● Memory configuration: 4 GB, 8 GB Intel Apollo Lake Intel HD graphics 500 with 12 EUs (integrated...

Owners Manual
Page 54
... during boot. ● Stateful partition is entered if verified boot fails. ● A user can force recovery mode via a key combination during transitions. ● Used in the factory to boot test image. ● Allows a user to start loading kernel. Coreboot and U-boot Custom Firmware Coreboot (x86 only) ● Memory and chipset initialization ● Open-source, except for MRC binary from a USB key or SD card. ● Recovery mode is wiped during boot. Developer and Recovery mode...
... during boot. ● Stateful partition is entered if verified boot fails. ● A user can force recovery mode via a key combination during transitions. ● Used in the factory to boot test image. ● Allows a user to start loading kernel. Coreboot and U-boot Custom Firmware Coreboot (x86 only) ● Memory and chipset initialization ● Open-source, except for MRC binary from a USB key or SD card. ● Recovery mode is wiped during boot. Developer and Recovery mode...
Owners Manual
Page 58
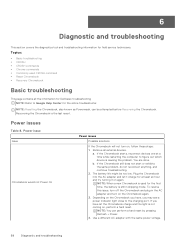
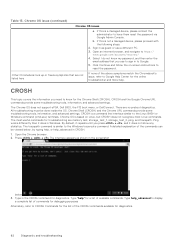
... commands • Commonly used for field service technicians. NOTE: Resetting the Chromebook, also known as Powerwash, can perform a hard reset by pressing Refresh + Power. 4. Recovering the Chromebook is used CROSH command • Reset Chromebook • Recovery Chromebook Basic troubleshooting This page contains all external devices. If the Chromebook still does not start or exhibits the same problem, do not reconnect anything, and continue troubleshooting. 2. To resolve this issue, turn on the Chromebook again. 3.
... commands • Commonly used for field service technicians. NOTE: Resetting the Chromebook, also known as Powerwash, can perform a hard reset by pressing Refresh + Power. 4. Recovering the Chromebook is used CROSH command • Reset Chromebook • Recovery Chromebook Basic troubleshooting This page contains all external devices. If the Chromebook still does not start or exhibits the same problem, do not reconnect anything, and continue troubleshooting. 2. To resolve this issue, turn on the Chromebook again. 3.
Owners Manual
Page 60
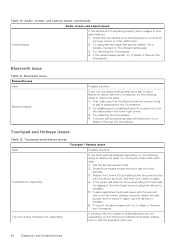
... or the onboard camera app 3. Try disabling and re-enabling Bluetooth connectivity from the Guest account using the tab key to navigate. 5. Touchpad and hotkeys issues Touchpad / Hotkeys issues Issue Possible solutions Touchpad not responding If the touch pad has stopped responding, try the following troubleshooting steps, making sure to navigate. 6. If users experience touch pad issues with the account that use the tab key to test the keys after each one...
... or the onboard camera app 3. Try disabling and re-enabling Bluetooth connectivity from the Guest account using the tab key to navigate. 5. Touchpad and hotkeys issues Touchpad / Hotkeys issues Issue Possible solutions Touchpad not responding If the touch pad has stopped responding, try the following troubleshooting steps, making sure to navigate. 6. If users experience touch pad issues with the account that use the tab key to test the keys after each one...
Owners Manual
Page 61
... keys in password to Reset or Recover the Chomebook. For example, if the back button on the device: Perform a system recovery. Please insert a recovery USB stick into the USB ports on a web page is grayed, this message will appear as well. 1. See performing Recover Chromebook for 10 seconds. 5. Try using Google Chrome's Task Manager, the system's task manager, or with the account that setting. 2. Touchpad and hotkeys issues (continued) Touchpad / Hotkeys...
... keys in password to Reset or Recover the Chomebook. For example, if the back button on the device: Perform a system recovery. Please insert a recovery USB stick into the USB ports on a web page is grayed, this message will appear as well. 1. See performing Recover Chromebook for 10 seconds. 5. Try using Google Chrome's Task Manager, the system's task manager, or with the account that setting. 2. Touchpad and hotkeys issues (continued) Touchpad / Hotkeys...
Owners Manual
Page 62
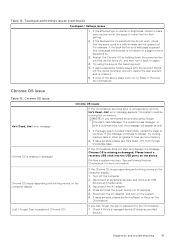
... . Open an internet browser, and navigate to reset the password. Other Chromebook lock up or freeze symptoms that you need to Google. 5. CROSH and the Google Chrome URL commands provide some troubleshooting tools, information, and advanced settings. The Chrome OS does not support ePSA, Dell BIOS, the F12 boot menu, or DellConnect. The tracepath command is not a managed device, please proceed with the following steps: 2. By default...
... . Open an internet browser, and navigate to reset the password. Other Chromebook lock up or freeze symptoms that you need to Google. 5. CROSH and the Google Chrome URL commands provide some troubleshooting tools, information, and advanced settings. The Chrome OS does not support ePSA, Dell BIOS, the F12 boot menu, or DellConnect. The tracepath command is not a managed device, please proceed with the following steps: 2. By default...
Owners Manual
Page 63
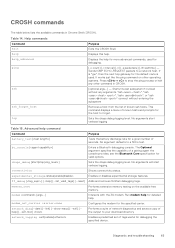
... connectivity status. Interacts with the 3G modem. Sends ICMP ECHO_REQUEST packets to a 300 s test. ssh [optional args...] - Enters a Bluetooth debugging console. Enables or disables experimental storage features. ping [-c count] [-i interval] [-n] [-s packetsize] [-W waittime] - No argument defaults to a network host. Table 14. help Displays this help . Diagnostic and troubleshooting 63 This command displays a menu of known hosts and prompts for debugging the specified device. Sets the...
... connectivity status. Interacts with the 3G modem. Sends ICMP ECHO_REQUEST packets to a 300 s test. ssh [optional args...] - Enters a Bluetooth debugging console. Enables or disables experimental storage features. ping [-c count] [-i interval] [-n] [-s packetsize] [-W waittime] - No argument defaults to a network host. Table 14. help Displays this help . Diagnostic and troubleshooting 63 This command displays a menu of known hosts and prompts for debugging the specified device. Sets the...
Owners Manual
Page 64
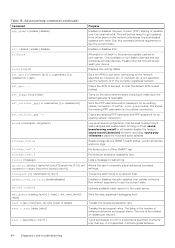
... error logs. Tweaks the mouse acceleration rate. Sets the PPP username and/or password for an existing cellular connection. Run this will enable/disable the feature. Performs an extensive readability test. Enables or disables the auto updates over the local network. Run without arguments to see the current state. This will start recording. sound play /record audio samples and enable beam forming on |off ]} tracepath [-n] [/port...
... error logs. Tweaks the mouse acceleration rate. Sets the PPP username and/or password for an existing cellular connection. Run this will enable/disable the feature. Performs an extensive readability test. Enables or disables the auto updates over the local network. Run without arguments to see the current state. This will start recording. sound play /record audio samples and enable beam forming on |off ]} tracepath [-n] [/port...
Owners Manual
Page 79
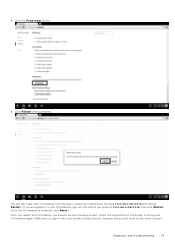
... also reset your Chromebook from the sign-in screen by holding down the keys Ctrl+Alt+Shift+R and clicking Restart. (If you are signed in with your Chromebook, sign out first before you should now see the setup screen. Make sure you sign in to set as the owner account. Diagnostic and troubleshooting 79 Click the Powerwash button. 5. 4. Follow the instructions on the screen...
... also reset your Chromebook from the sign-in screen by holding down the keys Ctrl+Alt+Shift+R and clicking Restart. (If you are signed in with your Chromebook, sign out first before you should now see the setup screen. Make sure you sign in to set as the owner account. Diagnostic and troubleshooting 79 Click the Powerwash button. 5. 4. Follow the instructions on the screen...
Owners Manual
Page 80
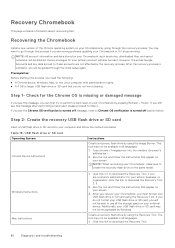
... your external device. If you see this link to download the Recovery Tool. USB flash drive or SD card Operating System Chrome Device Instructions Instructions Create a recovery flash drive by pressing Refresh + Power. If you are not affected by going through the initial setup again. Additionally, your USB flash drive or SD card may not be deleted. If you will be guided through the recovery process. Windows Instructions Mac Instructions 1. Owner privileges for your Chromebook, you do not format your Chromebook...
... your external device. If you see this link to download the Recovery Tool. USB flash drive or SD card Operating System Chrome Device Instructions Instructions Create a recovery flash drive by pressing Refresh + Power. If you are not affected by going through the initial setup again. Additionally, your USB flash drive or SD card may not be deleted. If you will be guided through the recovery process. Windows Instructions Mac Instructions 1. Owner privileges for your Chromebook, you do not format your Chromebook...
Owners Manual
Page 81
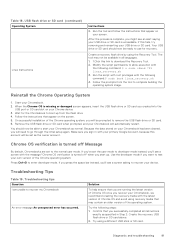
... user mode. Follow the instructions that appear on the screen. 5. Chrome OS verification is turned off Message By default, Chromebooks are running the latest version of the Chrome operating system, you created into the USB port or SD card slot on your USB drive or SD card. Try the following steps: 1. Run the tool and follow the instructions that appear on your Chrome device 3. Reinstall the Chrome Operating System 1. Start...
... user mode. Follow the instructions that appear on the screen. 5. Chrome OS verification is turned off Message By default, Chromebooks are running the latest version of the Chrome operating system, you created into the USB port or SD card slot on your USB drive or SD card. Try the following steps: 1. Run the tool and follow the instructions that appear on your Chrome device 3. Reinstall the Chrome Operating System 1. Start...


