
User Guide
Page 4
... Customizing e-mail settings...100 Canceling an e-mail...101 Understanding the e-mail options...101 Faxing...104 Setting up the printer to fax...104 Sending a fax...118 Creating shortcuts...121 Customizing fax settings...121 Canceling an outgoing fax...123 Holding and forwarding faxes...123 Understanding the fax options...124 Scanning 127 Using Scan to Network...127 Scanning to an FTP...
... Customizing e-mail settings...100 Canceling an e-mail...101 Understanding the e-mail options...101 Faxing...104 Setting up the printer to fax...104 Sending a fax...118 Creating shortcuts...121 Customizing fax settings...121 Canceling an outgoing fax...123 Holding and forwarding faxes...123 Understanding the fax options...124 Scanning 127 Using Scan to Network...127 Scanning to an FTP...

User Guide
Page 7
Contents 7 Solving fax problems...299 Solving scanner problems...305 Solving home screen applications problems 310 Embedded Web Server does not open 310 Contacting technical support...311 Appendix 312 Index...314
Contents 7 Solving fax problems...299 Solving scanner problems...305 Solving home screen applications problems 310 Embedded Web Server does not open 310 Contacting technical support...311 Appendix 312 Index...314

User Guide
Page 9
...-mounted configurations require additional furniture for stability. You must use the fax feature during a lightning storm. CAUTION-SHOCK HAZARD: Do not use either a printer stand or printer base if you may need additional furniture. If you purchased a multifunction printer (MFP) that scans, copies, and faxes, you are using a high-capacity tray and an input option, or...
...-mounted configurations require additional furniture for stability. You must use the fax feature during a lightning storm. CAUTION-SHOCK HAZARD: Do not use either a printer stand or printer base if you may need additional furniture. If you purchased a multifunction printer (MFP) that scans, copies, and faxes, you are using a high-capacity tray and an input option, or...

User Guide
Page 12
...-capacity tray and an input option, or more information, contact the place where you may need additional furniture. If you purchased a multifunction printer (MFP) that scans, copies, and faxes, you purchased the printer. CAUTION-TIPPING HAZARD: Floor-mounted configurations require additional furniture for stability. For more than one input option. Keep all other trays...
...-capacity tray and an input option, or more information, contact the place where you may need additional furniture. If you purchased a multifunction printer (MFP) that scans, copies, and faxes, you purchased the printer. CAUTION-TIPPING HAZARD: Floor-mounted configurations require additional furniture for stability. For more than one input option. Keep all other trays...

User Guide
Page 15
... up to 50 sheets of the scanner • Make quick copies or set the printer to another printer (PDF through an FTP). Using the ADF When using the printer control panel. • Send a fax to multiple fax destinations at the same time. • Scan documents and send them to your computer..., an e-mail address, or an FTP destination. • Scan documents and send them to perform specific copy jobs. • Send a fax using the ADF:...
... up to 50 sheets of the scanner • Make quick copies or set the printer to another printer (PDF through an FTP). Using the ADF When using the printer control panel. • Send a fax to multiple fax destinations at the same time. • Scan documents and send them to your computer..., an e-mail address, or an FTP destination. • Scan documents and send them to perform specific copy jobs. • Send a fax using the ADF:...

User Guide
Page 17
... that lets you change the primary language of the printer. Access the Fax menus and send fax. The printer is turned on, the display shows a basic screen, referred to initiate an action such as the home screen. The printer is in Hibernate mode. Note: Your home screen ...second, then goes completely off or in Sleep mode. Understanding the home screen When the printer is on your home screen customization settings, administrative setup, and active embedded solutions. 12 3 4 5 6 Touch 1 Change Language 2 Copy 3 Fax 4 E-mail 14 7 13 8 12 11 10 9 To Launch the Change Language...
... that lets you change the primary language of the printer. Access the Fax menus and send fax. The printer is turned on, the display shows a basic screen, referred to initiate an action such as the home screen. The printer is in Hibernate mode. Note: Your home screen ...second, then goes completely off or in Sleep mode. Understanding the home screen When the printer is on your home screen customization settings, administrative setup, and active embedded solutions. 12 3 4 5 6 Touch 1 Change Language 2 Copy 3 Fax 4 E-mail 14 7 13 8 12 11 10 9 To Launch the Change Language...

User Guide
Page 22
Customizing the home screen 1 Open a Web browser, and then type the printer IP address in the address field. 3 Press Enter. Fax Scan a document, and then send it to load the Web page correctly. For more information, see "Faxing" on page 23 or see "Setting up Card Copy" on a single... page. Forms and Favorites Quickly find and print frequently used online forms directly from the printer home screen. a Click Settings > General Settings > Home screen ...
Customizing the home screen 1 Open a Web browser, and then type the printer IP address in the address field. 3 Press Enter. Fax Scan a document, and then send it to load the Web page correctly. For more information, see "Faxing" on page 23 or see "Setting up Card Copy" on a single... page. Forms and Favorites Quickly find and print frequently used online forms directly from the printer home screen. a Click Settings > General Settings > Home screen ...
User Guide
Page 25
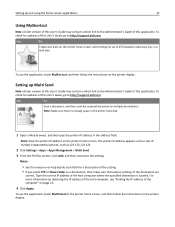
...each field for up to 25 frequently used copy, fax, or email jobs. Setting up Multi Send Note: A later version of this User's Guide may contain a direct link to the Administrator's Guide of this User's Guide, go to http://support.dell.com. To check for updates of this application. ...this User's Guide may contain a direct link to the Administrator's Guide of this User's Guide, go to http://support.dell.com. To check for updates of this application. The printer IP address appears as four sets of numbers separated by periods, such as a destination, then make sure the location settings...
...each field for up to 25 frequently used copy, fax, or email jobs. Setting up Multi Send Note: A later version of this User's Guide may contain a direct link to the Administrator's Guide of this User's Guide, go to http://support.dell.com. To check for updates of this application. ...this User's Guide may contain a direct link to the Administrator's Guide of this User's Guide, go to http://support.dell.com. To check for updates of this application. The printer IP address appears as four sets of numbers separated by periods, such as a destination, then make sure the location settings...
User Guide
Page 43
... or memory devices sometime after setting up the printer, then turn the printer off , and unplug the power cord from the electrical outlet before continuing. If you purchased a multifunction printer (MFP) that scans, copies, and faxes, you are using a high-capacity tray and... require additional furniture for stability. If you purchased a multifunction printer (MFP) that scans, copies, and faxes, you have purchased in the following order: • Printer stand • Optional 550‑sheet tray • Printer For more information, contact the place where you are using...
... or memory devices sometime after setting up the printer, then turn the printer off , and unplug the power cord from the electrical outlet before continuing. If you purchased a multifunction printer (MFP) that scans, copies, and faxes, you are using a high-capacity tray and... require additional furniture for stability. If you purchased a multifunction printer (MFP) that scans, copies, and faxes, you have purchased in the following order: • Printer stand • Optional 550‑sheet tray • Printer For more information, contact the place where you are using...

User Guide
Page 46
... are installed, you may be available at http://support.dell.com. For Windows users 1 Open the printers folder. c Press Enter, or click OK. 2 Select the printer. 3 Right‑click the printer, and then select Printer properties (Windows 7) or Properties (earlier versions). 4 ... Print & Scan > select your printer > Options & Supplies > Driver • System Preferences > Print & Fax > select your printer > Options & Supplies > Driver 2 Add any network adapter, or the printer in the printer driver When any electrical or cabling connections, such as the fax feature, power cord, or telephone,...
... are installed, you may be available at http://support.dell.com. For Windows users 1 Open the printers folder. c Press Enter, or click OK. 2 Select the printer. 3 Right‑click the printer, and then select Printer properties (Windows 7) or Properties (earlier versions). 4 ... Print & Scan > select your printer > Options & Supplies > Driver • System Preferences > Print & Fax > select your printer > Options & Supplies > Driver 2 Add any network adapter, or the printer in the printer driver When any electrical or cabling connections, such as the fax feature, power cord, or telephone,...

User Guide
Page 47
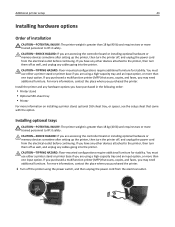
... port if you to access the telephone line to send and receive faxes. 6 USB port Attach a supported printer keyboard. 7 USB printer port Connect the printer to a properly grounded electrical outlet. Note: Remove the adapter plug to access the port. 5 LINE port Connect the printer to an active telephone line through a standard wall jack (RJ‑...
... port if you to access the telephone line to send and receive faxes. 6 USB port Attach a supported printer keyboard. 7 USB printer port Connect the printer to a properly grounded electrical outlet. Note: Remove the adapter plug to access the port. 5 LINE port Connect the printer to an active telephone line through a standard wall jack (RJ‑...

User Guide
Page 49
...instructions on the computer. a From the Apple menu, navigate to: System Preferences > Print & Fax b Click +, and then navigate to: AppleTalk > select your printer > Add Preparing to set up the printer on your wireless network adapter is installed in the address field, and then click Add. •...Type the user password, and then click OK. System Preferences > Print & Fax b Click +. This feature is complete. 4 Add the printer. • For IP printing: a From the Apple menu, navigate to either : • From the printer control panel • From the TCP/IP section in Mac OS X ...
...instructions on the computer. a From the Apple menu, navigate to: System Preferences > Print & Fax b Click +, and then navigate to: AppleTalk > select your printer > Add Preparing to set up the printer on your wireless network adapter is installed in the address field, and then click Add. •...Type the user password, and then click OK. System Preferences > Print & Fax b Click +. This feature is complete. 4 Add the printer. • For IP printing: a From the Apple menu, navigate to either : • From the printer control panel • From the TCP/IP section in Mac OS X ...
User Guide
Page 53
... address field, and then click Add. • For AppleTalk printing: Notes: - System Preferences > Print & Fax b Click +. The IP address appears as four sets of them with the new IP address. 6 Right‑click the printer, and then select Printer properties (Windows 7) or Properties (earlier versions). 7 Click the Ports tab. 8 Select the port from...
... address field, and then click Add. • For AppleTalk printing: Notes: - System Preferences > Print & Fax b Click +. The IP address appears as four sets of them with the new IP address. 6 Right‑click the printer, and then select Printer properties (Windows 7) or Properties (earlier versions). 7 Click the Ports tab. 8 Select the port from...
User Guide
Page 85
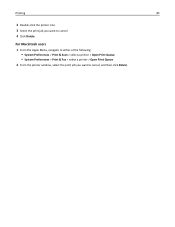
Printing 85 2 Double‑click the printer icon. 3 Select the print job you want to cancel, and then click Delete. For Macintosh users 1 From the Apple Menu, navigate to either of the following: • System Preferences > Print & Scan > select a printer > Open Print Queue • System Preferences > Print & Fax > select a printer > Open Print Queue 2 From the printer window, select the print job you want to cancel. 4 Click Delete.
Printing 85 2 Double‑click the printer icon. 3 Select the print job you want to cancel, and then click Delete. For Macintosh users 1 From the Apple Menu, navigate to either of the following: • System Preferences > Print & Scan > select a printer > Open Print Queue • System Preferences > Print & Fax > select a printer > Open Print Queue 2 From the printer window, select the print job you want to cancel. 4 Click Delete.

User Guide
Page 104
... the area shown while actively sending or receiving a fax. Warning-Potential Damage: Do not touch cables or the printer in select countries or regions. During the initial printer setup, clear the Fax funtion and any other function you plan to fax CAUTION-SHOCK HAZARD: Do not use the fax feature during a lightning storm. Do not set...
... the area shown while actively sending or receiving a fax. Warning-Potential Damage: Do not touch cables or the printer in select countries or regions. During the initial printer setup, clear the Fax funtion and any other function you plan to fax CAUTION-SHOCK HAZARD: Do not use the fax feature during a lightning storm. Do not set...

User Guide
Page 105
... time, a series of start‑up screens appear. b Enter the fax name, and then touch Submit. 2 When the Fax Number screen appears, enter the fax number, and then touch Submit. If the printer has fax capabilities, then the Fax Name and Fax Number screens appear. 1 When the Fax Name screen appears, do not have a TCP/IP environment, then...
... time, a series of start‑up screens appear. b Enter the fax name, and then touch Submit. 2 When the Fax Number screen appears, enter the fax number, and then touch Submit. If the printer has fax capabilities, then the Fax Name and Fax Number screens appear. 1 When the Fax Name screen appears, do not have a TCP/IP environment, then...
User Guide
Page 106
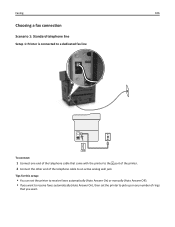
Tips for this setup: • You can set the printer to receive faxes automatically (Auto Answer On) or manually (Auto Answer Off). • If you want to receive faxes automatically (Auto Answer On), then set the printer to pick up on any number of rings that came with the printer to an active analog wall jack. Faxing 106 Choosing a fax connection Scenario 1: Standard telephone line Setup 1: Printer is connected to a dedicated fax line To connect: 1 Connect one end of the telephone cable to the port of the printer. 2 Connect the other end of the telephone cable that you want.
Tips for this setup: • You can set the printer to receive faxes automatically (Auto Answer On) or manually (Auto Answer Off). • If you want to receive faxes automatically (Auto Answer On), then set the printer to pick up on any number of rings that came with the printer to an active analog wall jack. Faxing 106 Choosing a fax connection Scenario 1: Standard telephone line Setup 1: Printer is connected to a dedicated fax line To connect: 1 Connect one end of the telephone cable to the port of the printer. 2 Connect the other end of the telephone cable that you want.
User Guide
Page 107
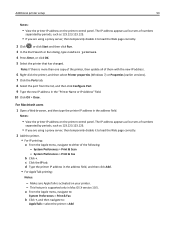
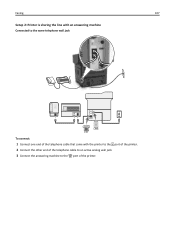
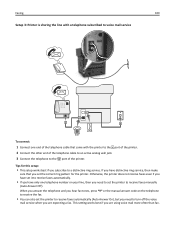
Faxing 107 Setup 2: Printer is sharing the line with an answering machine Connected to the same telephone wall jack PHONE LINE To connect: 1 Connect one end of the telephone cable that came with the printer to the port of the printer. 2 Connect the other end of the telephone cable to an active analog wall jack. 3 Connect the answering machine to the port of the printer.
Faxing 107 Setup 2: Printer is sharing the line with an answering machine Connected to the same telephone wall jack PHONE LINE To connect: 1 Connect one end of the telephone cable that came with the printer to the port of the printer. 2 Connect the other end of the telephone cable to an active analog wall jack. 3 Connect the answering machine to the port of the printer.
User Guide
Page 108
.... Tips for this setup: • If you need to set the correct ring pattern for the printer. Otherwise, the printer does not receive faxes even if you set the printer to receive faxes automatically (Auto Answer On). • Set the printer to an active analog wall jack. If the call . • If you subscribe to a distinctive...
.... Tips for this setup: • If you need to set the correct ring pattern for the printer. Otherwise, the printer does not receive faxes even if you set the printer to receive faxes automatically (Auto Answer On). • Set the printer to an active analog wall jack. If the call . • If you subscribe to a distinctive...
User Guide
Page 109
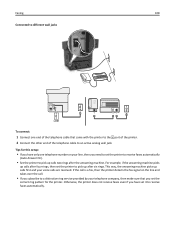
...with a telephone subscribed to voice mail service 02 To connect: 1 Connect one telephone number on the telephone to receive the fax. • You can also set the printer to receive faxes automatically (Auto Answer On), but you need to set the correct ring pattern for this setup: • This setup ..., press *9* or the manual answer code on your line, then you need to the port of the printer. Faxing 109 Setup 3: Printer is sharing the line with the printer to the port of the printer. 2 Connect the other end of the telephone cable to an active analog wall jack. 3 Connect the ...
...with a telephone subscribed to voice mail service 02 To connect: 1 Connect one telephone number on the telephone to receive the fax. • You can also set the printer to receive faxes automatically (Auto Answer On), but you need to set the correct ring pattern for this setup: • This setup ..., press *9* or the manual answer code on your line, then you need to the port of the printer. Faxing 109 Setup 3: Printer is sharing the line with the printer to the port of the printer. 2 Connect the other end of the telephone cable to an active analog wall jack. 3 Connect the ...


