
User Guide
Page 2
Contents 2 Contents Safety information 8 Learning about the printer 10 Finding information about the printer...10 Selecting a location for the printer...11 Printer configurations...12 Using the Embedded Web Server...14 Understanding the basic functions of the scanner 15 Using the ADF and scanner glass...15 ... home screen applications 21 Finding the IP address of the computer 21 Finding the IP address of the printer...21 Accessing the Embedded Web Server...22 Customizing the home screen...22 Understanding the different applications 22 Activating the home screen applications 23 Finding ...
Contents 2 Contents Safety information 8 Learning about the printer 10 Finding information about the printer...10 Selecting a location for the printer...11 Printer configurations...12 Using the Embedded Web Server...14 Understanding the basic functions of the scanner 15 Using the ADF and scanner glass...15 ... home screen applications 21 Finding the IP address of the computer 21 Finding the IP address of the printer...21 Accessing the Embedded Web Server...22 Customizing the home screen...22 Understanding the different applications 22 Activating the home screen applications 23 Finding ...
User Guide
Page 3
... to set up the printer on a wireless network 49 Connecting the printer using the Wireless Setup Wizard 50 Connecting the printer to a wireless network using Wi‑Fi Protected Setup 51 Connecting the printer to a wireless network using the Embedded Web Server 52 Changing port settings ...after installing a new network Internal Solutions Port 52 Setting up serial printing...54 Verifying printer setup...55 Printing a menu settings page ...55 Printing...
... to set up the printer on a wireless network 49 Connecting the printer using the Wireless Setup Wizard 50 Connecting the printer to a wireless network using Wi‑Fi Protected Setup 51 Connecting the printer to a wireless network using the Embedded Web Server 52 Changing port settings ...after installing a new network Internal Solutions Port 52 Setting up serial printing...54 Verifying printer setup...55 Printing a menu settings page ...55 Printing...

User Guide
Page 5
...Dell products...210 Securing the printer 211 Statement of Volatility...211 Erasing volatile memory...211 Erasing non‑volatile memory...212 Erasing printer hard disk memory...212 Configuring printer hard disk encryption 213 Finding printer security information...214 Maintaining the printer 215 Cleaning the printer parts...215 Cleaning the printer...and supplies 217 Checking the status of parts and supplies on the printer control panel 217 Checking the status of parts and supplies from the Embedded Web Server 217 Estimated number of remaining pages 217 Ordering supplies...217 Ordering ...
...Dell products...210 Securing the printer 211 Statement of Volatility...211 Erasing volatile memory...211 Erasing non‑volatile memory...212 Erasing printer hard disk memory...212 Configuring printer hard disk encryption 213 Finding printer security information...214 Maintaining the printer 215 Cleaning the printer parts...215 Cleaning the printer...and supplies 217 Checking the status of parts and supplies on the printer control panel 217 Checking the status of parts and supplies from the Embedded Web Server 217 Estimated number of remaining pages 217 Ordering supplies...217 Ordering ...
User Guide
Page 6
... the staple cartridge ...223 Moving the printer...225 Before moving the printer ...225 Moving the printer to another location...226 Shipping the printer ...226 Managing the printer 227 Managing printer messages...227 Accessing Status Monitor Center...227... Checking the virtual display...227 Setting up e‑mail alerts...228 Viewing reports...228 Configuring supply notifications from the Embedded Web Server...
... the staple cartridge ...223 Moving the printer...225 Before moving the printer ...225 Moving the printer to another location...226 Shipping the printer ...226 Managing the printer 227 Managing printer messages...227 Accessing Status Monitor Center...227... Checking the virtual display...227 Setting up e‑mail alerts...228 Viewing reports...228 Configuring supply notifications from the Embedded Web Server...

User Guide
Page 7
Contents 7 Solving fax problems...299 Solving scanner problems...305 Solving home screen applications problems 310 Embedded Web Server does not open 310 Contacting technical support...311 Appendix 312 Index...314
Contents 7 Solving fax problems...299 Solving scanner problems...305 Solving home screen applications problems 310 Embedded Web Server does not open 310 Contacting technical support...311 Appendix 312 Index...314
User Guide
Page 14
...Optional stapler Using the Embedded Web Server Note: This feature is installed on a network, then you are using a proxy server, then temporarily disable it to load the Web page correctly. 2 Open a Web browser, and then type the printer IP address in the Network/Ports...the Embedded Web Server to print servers. An IP address appears as four sets of the printer supplies. • Configure supply notifications. • Configure printer settings. • Configure network settings. • View reports. To access the Embedded Web Server for your printer: 1 Obtain the printer IP address: ...
...Optional stapler Using the Embedded Web Server Note: This feature is installed on a network, then you are using a proxy server, then temporarily disable it to load the Web page correctly. 2 Open a Web browser, and then type the printer IP address in the Network/Ports...the Embedded Web Server to print servers. An IP address appears as four sets of the printer supplies. • Configure supply notifications. • Configure printer settings. • Configure network settings. • View reports. To access the Embedded Web Server for your printer: 1 Obtain the printer IP address: ...
User Guide
Page 18
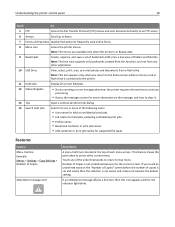
... held or confidential print jobs • Job names for held jobs. 12 Status/Supplies • Show a warning or error message whenever the printer requires intervention to continue processing. • Access the messages screen for more information on the "Number of Copies" screen before the number of ...to return to that menu. This feature shows the path taken to an FTP server. 6 Arrows Scroll up or down. 7 Forms and Favorites Quickly find and print frequently used online forms. 8 Menu icon Access the printer menus. If an attendance message affects a function, then this function, and ...
... held or confidential print jobs • Job names for held jobs. 12 Status/Supplies • Show a warning or error message whenever the printer requires intervention to continue processing. • Access the messages screen for more information on the "Number of Copies" screen before the number of ...to return to that menu. This feature shows the path taken to an FTP server. 6 Arrows Scroll up or down. 7 Forms and Favorites Quickly find and print frequently used online forms. 8 Menu icon Access the printer menus. If an attendance message affects a function, then this function, and ...
User Guide
Page 19
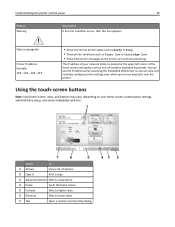
...the home screen. 5 Increase Select a higher value. 6 Decrease Select a lower value. 7 Tips Open a context-sensitive Help dialog. 43 2 Understanding the printer control panel 19 Feature Warning Description If an error condition occurs, then this icon appears. You can use the IP address when accessing the Embedded... Web Server so you can continue processing. Using the touch-screen buttons Note: Your home screen, icons, and buttons may vary, depending on your network printer is located at the upper left corner of numbers separated...
...the home screen. 5 Increase Select a higher value. 6 Decrease Select a lower value. 7 Tips Open a context-sensitive Help dialog. 43 2 Understanding the printer control panel 19 Feature Warning Description If an error condition occurs, then this icon appears. You can use the IP address when accessing the Embedded... Web Server so you can continue processing. Using the touch-screen buttons Note: Your home screen, icons, and buttons may vary, depending on your network printer is located at the upper left corner of numbers separated...
User Guide
Page 21
Some applications are connected to a print server. Finding the IP address of the printer home screen. • From the TCP/IP section in the Network/Ports menu. For Macintosh users Note: This is applicable only in select printer models. You can find the printer IP address: • From the top left corner... IP address is connected to a network or to the network (Ethernet or wireless). The IP address appears as four sets of the printer Note: Make sure your printer is required when setting up and using the home screen applications Note: Your home screen may vary, depending on your...
Some applications are connected to a print server. Finding the IP address of the printer home screen. • From the TCP/IP section in the Network/Ports menu. For Macintosh users Note: This is applicable only in select printer models. You can find the printer IP address: • From the top left corner... IP address is connected to a network or to the network (Ethernet or wireless). The IP address appears as four sets of the printer Note: Make sure your printer is required when setting up and using the home screen applications Note: Your home screen may vary, depending on your...

User Guide
Page 22
...IP section. Setting up and using a proxy server, then temporarily disable it to specify which icons appear on the home screen. Note: If you are not physically near the printer. 1 Obtain the printer IP address: • From the printer control panel home screen • From the ...to a fax number. Forms and Favorites Quickly find and print frequently used online forms directly from the printer home screen. Accessing the Embedded Web Server The Embedded Web Server is the printer Web page that came with the application. a Click Settings > General Settings > Home screen customization. ...
...IP section. Setting up and using a proxy server, then temporarily disable it to specify which icons appear on the home screen. Note: If you are not physically near the printer. 1 Obtain the printer IP address: • From the printer control panel home screen • From the ...to a fax number. Forms and Favorites Quickly find and print frequently used online forms directly from the printer home screen. Accessing the Embedded Web Server The Embedded Web Server is the printer Web page that came with the application. a Click Settings > General Settings > Home screen customization. ...

User Guide
Page 23
...User's Guide may contain a direct link to http://support.dell.com. For more information, see the documentation that came with preinstalled home screen applications. For more information, see "Accessing the Embedded Web Server" on the printer home screen. Before you can use sharing, security, and... firewall settings to allow the printer at http://support.dell.com. Setting up and using the home screen applications 23 Use...
...User's Guide may contain a direct link to http://support.dell.com. For more information, see the documentation that came with preinstalled home screen applications. For more information, see "Accessing the Embedded Web Server" on the printer home screen. Before you can use sharing, security, and... firewall settings to allow the printer at http://support.dell.com. Setting up and using the home screen applications 23 Use...

User Guide
Page 49
... > Print & Fax b Click +. All the necessary applications are configuring access for the printer. d From the Easy Install screen, click Install. Additional printer setup 49 For Macintosh users 1 Allow the network DHCP server to assign an IP address to the printer. 2 Obtain the printer IP address either of the following: - a Insert the Software and Documentation CD...
... > Print & Fax b Click +. All the necessary applications are configuring access for the printer. d From the Easy Install screen, click Install. Additional printer setup 49 For Macintosh users 1 Allow the network DHCP server to assign an IP address to the printer. 2 Obtain the printer IP address either of the following: - a Insert the Software and Documentation CD...
User Guide
Page 50
...be set for the same type on the router and on the printer, or the printer will also require the automatic setting. To find the SSID or the security information for your network, then see the Embedded Web Server associated with the access point, or consult your network uses more ...information, see the instruction sheet that came with the wireless network adapter. • An Ethernet cable is disconnected from the printer. • Active NIC is either infrastructure ...
...be set for the same type on the router and on the printer, or the printer will also require the automatic setting. To find the SSID or the security information for your network, then see the Embedded Web Server associated with the access point, or consult your network uses more ...information, see the instruction sheet that came with the wireless network adapter. • An Ethernet cable is disconnected from the printer. • Active NIC is either infrastructure ...
User Guide
Page 51
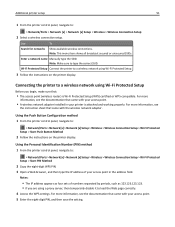
... documentation that : • The access point (wireless router) is attached and working properly. Using the Push Button Configuration method 1 From the printer control panel, navigate to a wireless network using a proxy server, then temporarily disable it to type the correct SSID. Notes: • The IP address appears as four sets of your access...
... documentation that : • The access point (wireless router) is attached and working properly. Using the Push Button Configuration method 1 From the printer control panel, navigate to a wireless network using a proxy server, then temporarily disable it to type the correct SSID. Notes: • The IP address appears as four sets of your access...

User Guide
Page 52
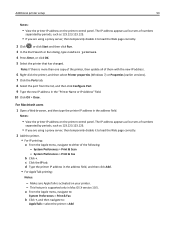
... to operate wirelessly. For Windows users 1 Open a Web browser, and then type the printer IP address in the address field. Additional printer setup 52 Connecting the printer to a wireless network using a proxy server, then temporarily disable it back on. • Only one network connection is active at ...as 123.123.123.123. • If you are using the Embedded Web Server Before you begin, make any changes to the computer configurations. • If the computers are adding a wireless ISP to a printer previously configured for at a time. Then in the Network Card [x] section, see...
... to operate wirelessly. For Windows users 1 Open a Web browser, and then type the printer IP address in the address field. Additional printer setup 52 Connecting the printer to a wireless network using a proxy server, then temporarily disable it back on. • Only one network connection is active at ...as 123.123.123.123. • If you are using the Embedded Web Server Before you begin, make any changes to the computer configurations. • If the computers are adding a wireless ISP to a printer previously configured for at a time. Then in the Network Card [x] section, see...
User Guide
Page 53
... users 1 Open a Web browser, and then type the printer IP address in the address field, and then click Add. • For AppleTalk printing: Notes: - The IP address appears as 123.123.123.123. • If you are using a proxy server, then temporarily disable it to load the Web page correctly.... 2 Click , or click Start and then click Run. 3 In the Start Search or Run dialog, type control printers. 4 Press Enter, or click OK. 5 Select the printer that has changed. a From the Apple menu,...
... users 1 Open a Web browser, and then type the printer IP address in the address field, and then click Add. • For AppleTalk printing: Notes: - The IP address appears as 123.123.123.123. • If you are using a proxy server, then temporarily disable it to load the Web page correctly.... 2 Click , or click Start and then click Run. 3 In the Start Search or Run dialog, type control printers. 4 Press Enter, or click OK. 5 Select the printer that has changed. a From the Apple menu,...

User Guide
Page 67
...paper size and type settings for the trays you are using the printer control panel. Notes: • View the printer IP address on page 56. Note: You can also change the paper size and type settings using a proxy server, then temporarily disable it flips forward. Creating a custom name ...for a paper type Using the Embedded Web Server 1 Open a Web browser, and then type the printer IP address in do not automatically link. For more information, see ...
...paper size and type settings for the trays you are using the printer control panel. Notes: • View the printer IP address on page 56. Note: You can also change the paper size and type settings using a proxy server, then temporarily disable it flips forward. Creating a custom name ...for a paper type Using the Embedded Web Server 1 Open a Web browser, and then type the printer IP address in do not automatically link. For more information, see ...
User Guide
Page 68
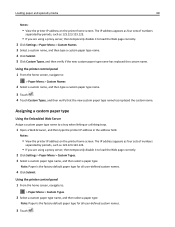
...home screen, navigate to a tray when linking or unlinking trays. 1 Open a Web browser, and then type the printer IP address in the address field. Assigning a custom paper type Using the Embedded Web Server Assign a custom paper type name to : > Paper Menu > Custom Names 2 Select a custom name, and ... and then select a paper type Note: Paper is the factory default paper type for all user‑defined custom names. 4 Click Submit. Using the printer control panel 1 From the home screen, navigate to load the Web page correctly. 2 Click Settings > Paper Menu > Custom Types. 3 Select a custom...
...home screen, navigate to a tray when linking or unlinking trays. 1 Open a Web browser, and then type the printer IP address in the address field. Assigning a custom paper type Using the Embedded Web Server Assign a custom paper type name to : > Paper Menu > Custom Names 2 Select a custom name, and ... and then select a paper type Note: Paper is the factory default paper type for all user‑defined custom names. 4 Click Submit. Using the printer control panel 1 From the home screen, navigate to load the Web page correctly. 2 Click Settings > Paper Menu > Custom Types. 3 Select a custom...
User Guide
Page 69
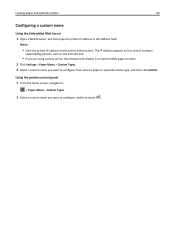
... Submit. The IP address appears as four sets of numbers separated by periods, such as 123.123.123.123. • If you are using a proxy server, then temporarily disable it to load the Web page correctly. 2 Click Settings > Paper Menu > Custom Types. 3 Select a custom name you want to configure, and then... touch . Loading paper and specialty media 69 Configuring a custom name Using the Embedded Web Server 1 Open a Web browser, and then type the printer IP address in the address field.
... Submit. The IP address appears as four sets of numbers separated by periods, such as 123.123.123.123. • If you are using a proxy server, then temporarily disable it to load the Web page correctly. 2 Click Settings > Paper Menu > Custom Types. 3 Select a custom name you want to configure, and then... touch . Loading paper and specialty media 69 Configuring a custom name Using the Embedded Web Server 1 Open a Web browser, and then type the printer IP address in the address field.
User Guide
Page 80
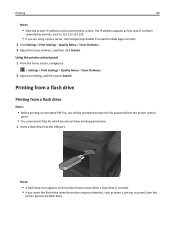
... panel. • You cannot print files for which you insert the flash drive when the printer requires attention, such as 123.123.123.123. • If you are using a proxy server, then temporarily disable it to : > Settings > Print Settings > Quality Menu > Toner Darkness 2 Adjust the setting..., and then touch Submit. Printing 80 Notes: • View the printer IP address on the printer home screen when a flash drive is inserted. &#...
... panel. • You cannot print files for which you insert the flash drive when the printer requires attention, such as 123.123.123.123. • If you are using a proxy server, then temporarily disable it to : > Settings > Print Settings > Quality Menu > Toner Darkness 2 Adjust the setting..., and then touch Submit. Printing 80 Notes: • View the printer IP address on the printer home screen when a flash drive is inserted. &#...


