User Guide
Page 6
... output bin. Leave paper in bin. [45y.xx 241 [x]-page jam, remove all pages from the finisher's accumulator. Leave paper in bin. [45y.xx 246 Troubleshooting 249 Understanding the printer messages...249 Solving printer problems...264 Solving print problems...270 Solving copy problems...295
... output bin. Leave paper in bin. [45y.xx 241 [x]-page jam, remove all pages from the finisher's accumulator. Leave paper in bin. [45y.xx 246 Troubleshooting 249 Understanding the printer messages...249 Solving printer problems...264 Solving print problems...270 Solving copy problems...295

User Guide
Page 10
... information. From the list of operation for Printer and Software Documentation under the Pubs folder. Click to an Ethernet network • Troubleshooting printer connection problems Help using the printer software The latest supplemental information, updates, and technical support: • Documentation • Driver...• The printer software is automatically installed with the printer. For updates, visit our Web site at http://support.dell.com. Learning about the printer 10 Learning about the printer Finding information about the printer What are available on the Software ...
... information. From the list of operation for Printer and Software Documentation under the Pubs folder. Click to an Ethernet network • Troubleshooting printer connection problems Help using the printer software The latest supplemental information, updates, and technical support: • Documentation • Driver...• The printer software is automatically installed with the printer. For updates, visit our Web site at http://support.dell.com. Learning about the printer 10 Learning about the printer Finding information about the printer What are available on the Software ...
User Guide
Page 249
... you purchased the printer. 2 Change the toner cartridge or imaging unit so that both are both MICR (Magnetic Imaging Content Recording) or non-MICR supplies. Troubleshooting 249 Troubleshooting • "Understanding the printer messages" on page 249 • "Solving printer problems" on page 264 • "Solving print problems" on page 270 • "Solving...
... you purchased the printer. 2 Change the toner cartridge or imaging unit so that both are both MICR (Magnetic Imaging Content Recording) or non-MICR supplies. Troubleshooting 249 Troubleshooting • "Understanding the printer messages" on page 249 • "Solving printer problems" on page 264 • "Solving print problems" on page 270 • "Solving...
User Guide
Page 250
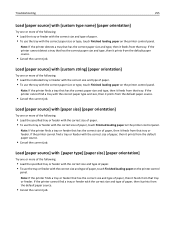
... then touch Finished changing paper. • Touch Reset active bin to reset the active tray for a linked set of trays. • Cancel the print job. Troubleshooting 250 Change [paper source] to [custom type name] load [orientation] Try one or more of the following : • Load the correct size and type of...
... then touch Finished changing paper. • Touch Reset active bin to reset the active tray for a linked set of trays. • Cancel the print job. Troubleshooting 250 Change [paper source] to [custom type name] load [orientation] Try one or more of the following : • Load the correct size and type of...
User Guide
Page 251
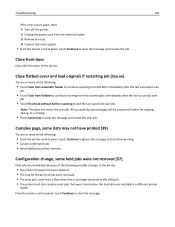
... printed [39] Try one or more of the printer. Close front door Close the front door of the following possible changes in a different printer model. Troubleshooting 251 If the error occurs again, then: 1 Turn off the printer. 2 Unplug the power cord from the electrical outlet. 3 Remove the tray. 4 Contact technical support...
... printed [39] Try one or more of the printer. Close front door Close the front door of the following possible changes in a different printer model. Troubleshooting 251 If the error occurs again, then: 1 Turn off the printer. 2 Unplug the power cord from the electrical outlet. 3 Remove the tray. 4 Contact technical support...
User Guide
Page 252
Troubleshooting 252 Defective flash detected [51] Try one or more of the following: • Touch Continue to clear the message and continue printing. • Delete fonts, ...
Troubleshooting 252 Defective flash detected [51] Try one or more of the following: • Touch Continue to clear the message and continue printing. • Delete fonts, ...

User Guide
Page 253
... your system support person. Imaging unit low [84.xy] You may need to clear the message and continue printing. Fax Station Number not set up. Troubleshooting 253 Fax server 'To Format' not set up . Try either of the User's Guide. For more of the following : • From the printer control panel...
... your system support person. Imaging unit low [84.xy] You may need to clear the message and continue printing. Fax Station Number not set up. Troubleshooting 253 Fax server 'To Format' not set up . Try either of the User's Guide. For more of the following : • From the printer control panel...
User Guide
Page 254
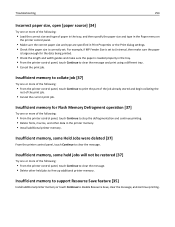
... paper size is large enough for Flash Memory Defragment operation [37] Try one or more of the print job. • Cancel the current print job. Troubleshooting 254 Incorrect paper size, open [paper source] [34] Try one or more of the following : • From the printer control panel, touch Continue to clear...
... paper size is large enough for Flash Memory Defragment operation [37] Try one or more of the print job. • Cancel the current print job. Troubleshooting 254 Incorrect paper size, open [paper source] [34] Try one or more of the following : • From the printer control panel, touch Continue to clear...
User Guide
Page 255
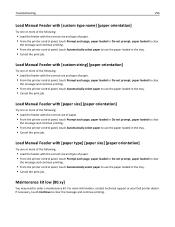
... paper. • To use the tray or feeder with the correct size and type of paper, touch Finished loading paper on the printer control panel. Troubleshooting 255 Load [paper source] with [custom type name] [paper orientation] Try one or more of the following: • Load the tray or feeder with the...
... paper. • To use the tray or feeder with the correct size and type of paper, touch Finished loading paper on the printer control panel. Troubleshooting 255 Load [paper source] with [custom type name] [paper orientation] Try one or more of the following: • Load the tray or feeder with the...
User Guide
Page 256
...necessary, touch Continue to use the paper loaded in the tray. • Cancel the print job. For more information, contact technical support or your Dell printer dealer. Load Manual Feeder with [paper size] [paper orientation] Try one or more of the following: • Load the feeder with the ... • From the printer control panel, touch Automatically select paper to use the paper loaded in the tray. • Cancel the print job. Troubleshooting 256 Load Manual Feeder with [custom type name] [paper orientation] Try one or more of the following: • Load the feeder with the correct...
...necessary, touch Continue to use the paper loaded in the tray. • Cancel the print job. For more information, contact technical support or your Dell printer dealer. Load Manual Feeder with [paper size] [paper orientation] Try one or more of the following: • Load the feeder with the ... • From the printer control panel, touch Automatically select paper to use the paper loaded in the tray. • Cancel the print job. Troubleshooting 256 Load Manual Feeder with [custom type name] [paper orientation] Try one or more of the following: • Load the feeder with the correct...
User Guide
Page 257
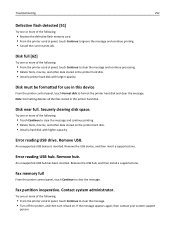
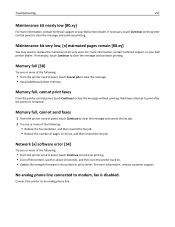
... the printer is disabled. Memory full [38] Try one or more information, contact technical support or your Dell printer dealer. Held faxes attempt to replace the maintenance kit very soon. Troubleshooting 257 Maintenance kit nearly low [80.xy] For more of the following: • From the printer control...No analog phone line connected to clear the message and cancel the fax job. 2 Try one or more information, contact technical support or your Dell printer dealer. For more of the following: • Reduce the fax resolution, and then resend the fax job. • Reduce the number ...
... the printer is disabled. Memory full [38] Try one or more information, contact technical support or your Dell printer dealer. Held faxes attempt to replace the maintenance kit very soon. Troubleshooting 257 Maintenance kit nearly low [80.xy] For more of the following: • From the printer control...No analog phone line connected to clear the message and cancel the fax job. 2 Try one or more information, contact technical support or your Dell printer dealer. For more of the following: • Reduce the fax resolution, and then resend the fax job. • Reduce the number ...
User Guide
Page 258
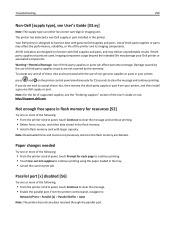
...macros not previously stored in flash memory for each page to continue printing. • Touch Use current supplies to function with genuine Dell supplies and parts. All life indicators are designed to continue printing using the paper loaded in the printer. Not enough free space in.... Note: For the list of supported supplies, see User's Guide [33.xy] Note: The supply type can affect warranty coverage. Troubleshooting 258 Non‑Dell [supply type], see the "Ordering supplies" section of third-party supplies or parts can either be a toner cartridge or imaging unit....
...macros not previously stored in flash memory for each page to continue printing. • Touch Use current supplies to function with genuine Dell supplies and parts. All life indicators are designed to continue printing using the paper loaded in the printer. Not enough free space in.... Note: For the list of supported supplies, see User's Guide [33.xy] Note: The supply type can affect warranty coverage. Troubleshooting 258 Non‑Dell [supply type], see the "Ordering supplies" section of third-party supplies or parts can either be a toner cartridge or imaging unit....
User Guide
Page 259
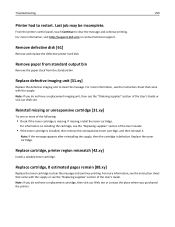
... may be incomplete. For information on installing the cartridge, see the "Replacing supplies" section of the following: • Check if the toner cartridge is defective. Troubleshooting 259 Printer had to clear the message and continue printing. Remove defective disk [61] Remove and replace the defective printer hard disk. Reinstall missing or...
... may be incomplete. For information on installing the cartridge, see the "Replacing supplies" section of the following: • Check if the toner cartridge is defective. Troubleshooting 259 Printer had to clear the message and continue printing. Remove defective disk [61] Remove and replace the defective printer hard disk. Reinstall missing or...
User Guide
Page 260
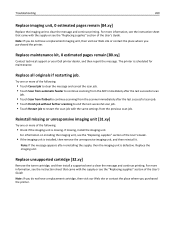
Troubleshooting 260 Replace imaging unit, 0 estimated pages remain [84.xy] Replace the imaging unit to restart the scan job with the supply or see the instruction ... our Web site or contact the place where you purchased the printer. Replace maintenance kit, 0 estimated pages remain [80.xy] Contact technical support or your Dell printer dealer, and then report the message. For more of the User's Guide. Replace all originals if restarting job. The printer is defective. Replace the...
Troubleshooting 260 Replace imaging unit, 0 estimated pages remain [84.xy] Replace the imaging unit to restart the scan job with the supply or see the instruction ... our Web site or contact the place where you purchased the printer. Replace maintenance kit, 0 estimated pages remain [80.xy] Contact technical support or your Dell printer dealer, and then report the message. For more of the User's Guide. Replace all originals if restarting job. The printer is defective. Replace the...
User Guide
Page 261
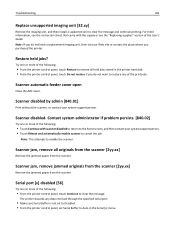
... any of the following : • From the printer control panel, touch Continue to enable the scanner. Scanner automatic feeder cover open Close the ADF cover. Troubleshooting 261 Replace unsupported imaging unit [32.xy] Remove the imaging unit, and then install a supported one to Auto in the printer hard disk. • From...
... any of the following : • From the printer control panel, touch Continue to enable the scanner. Scanner automatic feeder cover open Close the ADF cover. Troubleshooting 261 Replace unsupported imaging unit [32.xy] Remove the imaging unit, and then install a supported one to Auto in the printer hard disk. • From...
User Guide
Page 262
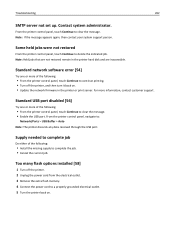
.... Standard USB port disabled [56] Try one or more information, contact customer support. Note: If the message appears again, then contact your system support person. Troubleshooting 262 SMTP server not set up. Contact system administrator.
.... Standard USB port disabled [56] Try one or more information, contact customer support. Note: If the message appears again, then contact your system support person. Troubleshooting 262 SMTP server not set up. Contact system administrator.
User Guide
Page 263
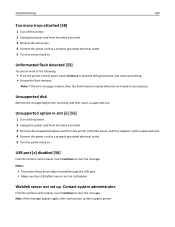
... electrical outlet. 5 Turn the printer back on . Note: If the message appears again, then contact your system support person. Unformatted flash detected [53] Try one . Troubleshooting 263 Too many trays attached [58] 1 Turn off the printer. 2 Unplug the power cord from the electrical outlet. 3 Remove the unsupported option card from the...
... electrical outlet. 5 Turn the printer back on . Note: If the message appears again, then contact your system support person. Unformatted flash detected [53] Try one . Troubleshooting 263 Too many trays attached [58] 1 Turn off the printer. 2 Unplug the power cord from the electrical outlet. 3 Remove the unsupported option card from the...
User Guide
Page 264
... is in Sleep mode or Hibernate mode? Press the Sleep button to step 6. Step 5 Go to wake the printer from Sleep mode or Hibernate mode. Troubleshooting 264 Solving printer problems • "Basic printer problems" on page 264 • "Option problems" on page 266 • "Paper feed problems" on page 269 Basic...
... is in Sleep mode or Hibernate mode? Press the Sleep button to step 6. Step 5 Go to wake the printer from Sleep mode or Hibernate mode. Troubleshooting 264 Solving printer problems • "Basic printer problems" on page 264 • "Option problems" on page 266 • "Paper feed problems" on page 269 Basic...

User Guide
Page 265
... device. Step 12 Turn off the printer, remove all packing material removed? Check if you have selected the correct port settings in the printer driver. Troubleshooting 265 Action Yes No Step 7 Connect the printer Check if the printer is plugged into any packing material.
... device. Step 12 Turn off the printer, remove all packing material removed? Check if you have selected the correct port settings in the printer driver. Troubleshooting 265 Action Yes No Step 7 Connect the printer Check if the printer is plugged into any packing material.
User Guide
Page 266
... option to step 2. Reinstall the internal option. Turn off the printer, then wait for about 10 seconds, and then turn on the printer control panel. Troubleshooting 266 Printer display is blank Action Step 1 Press the Sleep button on the printer. The problem is solved.
... option to step 2. Reinstall the internal option. Turn off the printer, then wait for about 10 seconds, and then turn on the printer control panel. Troubleshooting 266 Printer display is blank Action Step 1 Press the Sleep button on the printer. The problem is solved.

