User Guide
Page 45
... optional trays, slide the latch on the computer screen. If the installation dialog does not appear after a minute, then launch the CD manually: a Click , or click Start and then click Run. Setting up the printer software Installing the printer software Note: If you may ... any hardware options are installed, you installed the printer software on the computer screen. For Windows users 1 Close all open software programs. 2 Insert the Software and Documentation CD. For Macintosh users 1 Close all open applications. 2 Insert the Software and Documentation CD. For more information, see...
... optional trays, slide the latch on the computer screen. If the installation dialog does not appear after a minute, then launch the CD manually: a Click , or click Start and then click Run. Setting up the printer software Installing the printer software Note: If you may ... any hardware options are installed, you installed the printer software on the computer screen. For Windows users 1 Close all open software programs. 2 Insert the Software and Documentation CD. For Macintosh users 1 Close all open applications. 2 Insert the Software and Documentation CD. For more information, see...

User Guide
Page 46
Updating available options in the printer driver When any hardware options are installed, you may be available at http://support.dell.com. For Windows users 1 Open the printers folder. c Press Enter, or click OK. 2 Select the printer. 3 Right‑click the printer, and then select Printer properties (...them available for use the fax feature during a lightning storm. a Click , or click Start and then click Run. Make sure to manually add the options in the area shown while actively printing or scanning. b In the Start Search or Run dialog, type control printers. For ...
Updating available options in the printer driver When any hardware options are installed, you may be available at http://support.dell.com. For Windows users 1 Open the printers folder. c Press Enter, or click OK. 2 Select the printer. 3 Right‑click the printer, and then select Printer properties (...them available for use the fax feature during a lightning storm. a Click , or click Start and then click Run. Make sure to manually add the options in the area shown while actively printing or scanning. b In the Start Search or Run dialog, type control printers. For ...
User Guide
Page 48
...screen. Note: If the configured printer does not appear in the list, then click Modify Search. 6 Follow the instructions on an Ethernet network For Windows users 1 Insert the Software and Documentation CD. b In the Start Search or Run dialog, type D:\setup.exe, where D is a name assigned to the... Identifier (SSID) is the letter of security used on a network. If the installation dialog does not appear after a minute, then launch the CD manually: a Click , or click Start and then click Run. You will need an Ethernet cable to connect the printer to the network and an available ...
...screen. Note: If the configured printer does not appear in the list, then click Modify Search. 6 Follow the instructions on an Ethernet network For Windows users 1 Insert the Software and Documentation CD. b In the Start Search or Run dialog, type D:\setup.exe, where D is a name assigned to the... Identifier (SSID) is the letter of security used on a network. If the installation dialog does not appear after a minute, then launch the CD manually: a Click , or click Start and then click Run. You will need an Ethernet cable to connect the printer to the network and an available ...
User Guide
Page 56
...paper settings The Universal paper size is Plain Paper. • The Paper Type setting must be set manually in the Paper Size menu. • The factory default Paper Type setting is a user‑defined setting that lets you print on paper sizes that are not preset in each tray separately... 550‑sheet tray (Tray 1) and the multipurpose feeder. • The Paper Size setting for Tray 1 and the multipurpose feeder must be set manually for all other trays closed until needed. 1 Pull out the tray completely. For more information, see "Avoiding jams" on page 230 and "Storing paper...
...paper settings The Universal paper size is Plain Paper. • The Paper Type setting must be set manually in the Paper Size menu. • The factory default Paper Type setting is a user‑defined setting that lets you print on paper sizes that are not preset in each tray separately... 550‑sheet tray (Tray 1) and the multipurpose feeder. • The Paper Size setting for Tray 1 and the multipurpose feeder must be set manually for all other trays closed until needed. 1 Pull out the tray completely. For more information, see "Avoiding jams" on page 230 and "Storing paper...
User Guide
Page 118
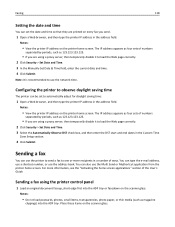
... a fax to one or more information, see the "Activating the home screen applications" section of ways. For more recipients in a number of the User's Guide. Place these items on the scanner glass. Note: It is recommended to use the Multi Send or MyShortcut application from the printer home screen... you are using a proxy server, then temporarily disable it to load the Web page correctly. 2 Click Security > Set Date and Time. 3 In the Manually Set Date & Time field, enter the current date and time. 4 Click Submit. Faxing 118 Setting the date and time You can set to automatically adjust...
... a fax to one or more information, see the "Activating the home screen applications" section of ways. For more recipients in a number of the User's Guide. Place these items on the scanner glass. Note: It is recommended to use the Multi Send or MyShortcut application from the printer home screen... you are using a proxy server, then temporarily disable it to load the Web page correctly. 2 Click Security > Set Date and Time. 3 In the Manually Set Date & Time field, enter the current date and time. 4 Click Submit. Faxing 118 Setting the date and time You can set to automatically adjust...
User Guide
Page 158
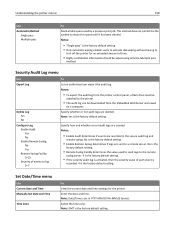
... the secure audit log and remote syslog. No is the factory default setting. Note: GMT is the factory default setting. • Only automatic wiping enables users to activate disk wiping without having to the printer. • The audit log can be wiped using only the Multiple pass method. Set Date/Time... menu Use Current Date and Time Manually Set Date and Time Time Zone To View the current date and time settings for an extended amount of each event is recorded. 4 is the...
... the secure audit log and remote syslog. No is the factory default setting. Note: GMT is the factory default setting. • Only automatic wiping enables users to activate disk wiping without having to the printer. • The audit log can be wiped using only the Multiple pass method. Set Date/Time... menu Use Current Date and Time Manually Set Date and Time Time Zone To View the current date and time settings for an extended amount of each event is recorded. 4 is the...
User Guide
Page 191
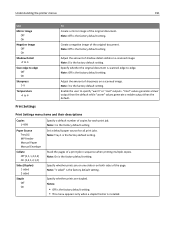
...Note: "1 sided" is the factory default setting. Create a negative image of a print job in sequence when printing multiple copies. Enable the user to 4 To Create a mirror image of the page. Set a default paper source for each print job. Note: Tray 1 is the ...default setting. Note: Off is installed. Print Settings Print Settings menu items and their descriptions Copies 1-999 Paper Source Tray [x] MP Feeder Manual Paper Manual Envelope Collate Off (1,1,1,2,2,2) On (1,2,1,2,1,2) Sides (Duplex) 1 sided 2 sided Staple Off On Specify a default number of shadow detail visible on ...
...Note: "1 sided" is the factory default setting. Create a negative image of a print job in sequence when printing multiple copies. Enable the user to 4 To Create a mirror image of the page. Set a default paper source for each print job. Note: Tray 1 is the ...default setting. Note: Off is installed. Print Settings Print Settings menu items and their descriptions Copies 1-999 Paper Source Tray [x] MP Feeder Manual Paper Manual Envelope Collate Off (1,1,1,2,2,2) On (1,2,1,2,1,2) Sides (Duplex) 1 sided 2 sided Staple Off On Specify a default number of shadow detail visible on ...
User Guide
Page 318
...] with [paper type] [paper size] [paper orientation] 255 Load Manual Feeder with [custom string] [paper orientation] 256 Load Manual Feeder with [custom type name] [paper orientation] 256 Load Manual Feeder with [paper size] [paper orientation] 256 Load manual feeder with [paper type] [paper size] [paper orientation] 256 loading... Reports menu 148 network setup page printing 55 No analog phone line connected to modem, fax is disabled. 257 Non‑Dell [supply type], see User's Guide [33.xy] 258 non‑volatile memory 211 erasing 212 Not enough free space in flash memory for resources [...
...] with [paper type] [paper size] [paper orientation] 255 Load Manual Feeder with [custom string] [paper orientation] 256 Load Manual Feeder with [custom type name] [paper orientation] 256 Load Manual Feeder with [paper size] [paper orientation] 256 Load manual feeder with [paper type] [paper size] [paper orientation] 256 loading... Reports menu 148 network setup page printing 55 No analog phone line connected to modem, fax is disabled. 257 Non‑Dell [supply type], see User's Guide [33.xy] 258 non‑volatile memory 211 erasing 212 Not enough free space in flash memory for resources [...


