User Guide
Page 2
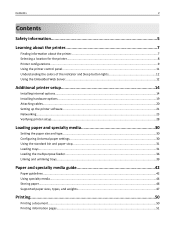
... the printer...8 Printer configurations...9 Using the printer control panel...11 Understanding the colors of the indicator and Sleep button lights 12 Using the Embedded Web Server...12 Additional printer setup 14 Installing internal options...14 Installing hardware options...19 Attaching cables...20 Setting up the printer software...21 Networking...23 Verifying printer setup...28 Loading paper and specialty media 30 Setting the paper size and type...30 Configuring Universal paper settings...30 Using the standard bin and paper stop 31 Loading trays...31 Loading the multipurpose feeder...36...
... the printer...8 Printer configurations...9 Using the printer control panel...11 Understanding the colors of the indicator and Sleep button lights 12 Using the Embedded Web Server...12 Additional printer setup 14 Installing internal options...14 Installing hardware options...19 Attaching cables...20 Setting up the printer software...21 Networking...23 Verifying printer setup...28 Loading paper and specialty media 30 Setting the paper size and type...30 Configuring Universal paper settings...30 Using the standard bin and paper stop 31 Loading trays...31 Loading the multipurpose feeder...36...
User Guide
Page 7
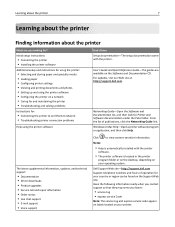
...Windows or Mac Help-Open a printer software program or application, and then click Help. ? For updates, visit our Web site at http://support.dell.com. Click to an Ethernet network • Troubleshooting printer connection problems Help using the printer software • Configuring the printer on your operating system. Initial setup instructions: • Connecting the printer • Installing the printer software Additional setup and instructions for using the printer: • Selecting and storing paper and specialty media • Loading paper • Configuring printer...
...Windows or Mac Help-Open a printer software program or application, and then click Help. ? For updates, visit our Web site at http://support.dell.com. Click to an Ethernet network • Troubleshooting printer connection problems Help using the printer software • Configuring the printer on your operating system. Initial setup instructions: • Connecting the printer • Installing the printer software Additional setup and instructions for using the printer: • Selecting and storing paper and specialty media • Loading paper • Configuring printer...
User Guide
Page 11
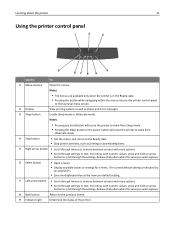
... Sleep mode. • Pressing the Sleep button or the power switch will cause the printer to wake from Hibernate mode. 4 Stop button • Exit the menus and return to move between screens and menu options. • Scroll through the settings. View printing options as well as printing or downloading fonts. 5 Right arrow button • Scroll through menus or to the Ready state. • Stop printer activities, such as status and error messages. 3 Sleep button Enable Sleep mode or Hibernate mode...
... Sleep mode. • Pressing the Sleep button or the power switch will cause the printer to wake from Hibernate mode. 4 Stop button • Exit the menus and return to move between screens and menu options. • Scroll through the settings. View printing options as well as printing or downloading fonts. 5 Right arrow button • Scroll through menus or to the Ready state. • Stop printer activities, such as status and error messages. 3 Sleep button Enable Sleep mode or Hibernate mode...
User Guide
Page 22
...://support.dell.com. For Windows users 1 Open the printers folder. Use the printer software to make them available for use. b In the Start Search or Run dialog, type control printers. Additional printer setup 22 c Press Enter, or click OK. 3 Click Install, and then follow the instructions on the computer screen. a Click , or click Start and then click Run. Updating available options in the printer driver to change the toner darkness, power saver, and paper size settings for individual print jobs...
...://support.dell.com. For Windows users 1 Open the printers folder. Use the printer software to make them available for use. b In the Start Search or Run dialog, type control printers. Additional printer setup 22 c Press Enter, or click OK. 3 Click Install, and then follow the instructions on the computer screen. a Click , or click Start and then click Run. Updating available options in the printer driver to change the toner darkness, power saver, and paper size settings for individual print jobs...
User Guide
Page 24
... AppleTalk printing: Notes: - For Macintosh users 1 Allow the network DHCP server to assign an IP address to do so. 5 Select the printer from the list, and then click Continue. c Click the IP tab. e Type the user password, and then click OK. System Preferences > Print & Scan - d From the Easy Install screen, click Install. Note: If the configured printer does not appear in the Network/Ports menu • By printing a network setup page or menu settings page, and...
... AppleTalk printing: Notes: - For Macintosh users 1 Allow the network DHCP server to assign an IP address to do so. 5 Select the printer from the list, and then click Continue. c Click the IP tab. e Type the user password, and then click OK. System Preferences > Print & Scan - d From the Easy Install screen, click Install. Note: If the configured printer does not appear in the Network/Ports menu • By printing a network setup page or menu settings page, and...
User Guide
Page 28
... factory default settings as 123.123.123.123. • If you are installed correctly. Additional printer setup 28 Connecting the printer to a wireless network using a proxy server, then temporarily disable it . Then wait for at least five seconds, and then turn the printer back on. 6 To verify if your wireless network adapter. 1 Open a Web browser, and then type the printer IP address in the Network Card [x] section, see the "Verifying printer setup" section of the User's Guide. Verifying printer setup Printing a menu settings page Print a menu settings page...
... factory default settings as 123.123.123.123. • If you are installed correctly. Additional printer setup 28 Connecting the printer to a wireless network using a proxy server, then temporarily disable it . Then wait for at least five seconds, and then turn the printer back on. 6 To verify if your wireless network adapter. 1 Open a Web browser, and then type the printer IP address in the Network Card [x] section, see the "Verifying printer setup" section of the User's Guide. Verifying printer setup Printing a menu settings page Print a menu settings page...
User Guide
Page 50
... Using the Embedded Web Server 1 Open a Web browser, and then type the printer IP address in the Print dialog: 1 With a document open, choose File > Print. b Click Properties, Preferences, Options, or Setup. For Macintosh users a Customize the settings in the Network/Ports menu. The IP address appears as four sets of paper and specialty media can affect how reliably documents print. If necessary, click the disclosure triangle to match the paper loaded. 2 Send the print job: For Windows users a With a document open , choose File > Page Setup...
... Using the Embedded Web Server 1 Open a Web browser, and then type the printer IP address in the Print dialog: 1 With a document open, choose File > Print. b Click Properties, Preferences, Options, or Setup. For Macintosh users a Customize the settings in the Network/Ports menu. The IP address appears as four sets of paper and specialty media can affect how reliably documents print. If necessary, click the disclosure triangle to match the paper loaded. 2 Send the print job: For Windows users a With a document open , choose File > Page Setup...
User Guide
Page 63
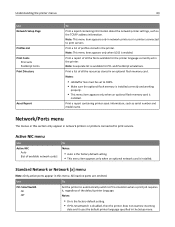
... printers connected to 100%. • Make sure the optional flash memory is installed correctly and working properly. • This menu item appears only when an optional flash memory card is enabled. Print a list of available network cards] To Notes: • Auto is the factory default setting. • This menu item appears only when an optional network card is installed. Notes: • On is the factory default setting. • If PCL SmartSwitch is available for the printer language currently set to print servers. Active NIC menu Use Active NIC Auto [list...
... printers connected to 100%. • Make sure the optional flash memory is installed correctly and working properly. • This menu item appears only when an optional flash memory card is enabled. Print a list of available network cards] To Notes: • Auto is the factory default setting. • This menu item appears only when an optional network card is installed. Notes: • On is the factory default setting. • If PCL SmartSwitch is available for the printer language currently set to print servers. Active NIC menu Use Active NIC Auto [list...
User Guide
Page 70
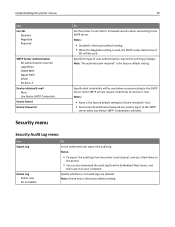
.... Understanding the printer menus 70 Use Use SSL Disabled Negotiate Required SMTP Server Authentication No authentication required Login/Plain CRAM‑MD5 Digest‑MD5 NTLM Kerberos 5 Device‑Initiated E‑mail None Use Device SMTP Credentials Device Userid Device Password To Set the printer to use SSL for increased security when connecting to the printer. • You can also download the audit log from the printer control panel, connect a flash drive to the...
.... Understanding the printer menus 70 Use Use SSL Disabled Negotiate Required SMTP Server Authentication No authentication required Login/Plain CRAM‑MD5 Digest‑MD5 NTLM Kerberos 5 Device‑Initiated E‑mail None Use Device SMTP Credentials Device Userid Device Password To Set the printer to use SSL for increased security when connecting to the printer. • You can also download the audit log from the printer control panel, connect a flash drive to the...
User Guide
Page 75
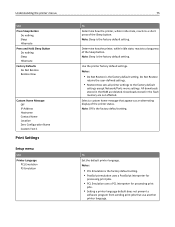
... settings except Network/Ports menu settings. Note: Off is the factory default setting. • PostScript emulation uses a PostScript interpreter for processing print jobs. • PCL Emulation uses a PCL interpreter for processing print jobs. • Setting a printer language default does not prevent a software program from sending print jobs that appears as an alternating display of the Sleep button. Do Not Restore retains the user‑defined settings. • Restore Now sets all printer settings to a short press of the printer status. Select a custom home message that use...
... settings except Network/Ports menu settings. Note: Off is the factory default setting. • PostScript emulation uses a PostScript interpreter for processing print jobs. • PCL Emulation uses a PCL interpreter for processing print jobs. • Setting a printer language default does not prevent a software program from sending print jobs that appears as an alternating display of the Sleep button. Do Not Restore retains the user‑defined settings. • Restore Now sets all printer settings to a short press of the printer status. Select a custom home message that use...
User Guide
Page 77
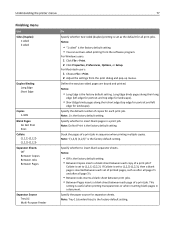
...blank pages in a print job. This setting is the factory default setting. For Windows users: 1 Click File > Print. 2 Click Properties, Preferences, Options, or Setup. Note: "(1,2,3) (1,2,3)" is useful when printing transparencies or when inserting blank pages in a document. Note: Do Not Print is the factory default setting. Specify the paper source for landscape). Note: Tray 1 (standard tray) is the factory default setting. Understanding the printer menus 77 Finishing menu Use Sides (Duplex) 1 sided 2 sided Duplex Binding Long Edge Short Edge Copies 1-999 Blank Pages Do Not Print...
...blank pages in a print job. This setting is the factory default setting. For Windows users: 1 Click File > Print. 2 Click Properties, Preferences, Options, or Setup. Note: "(1,2,3) (1,2,3)" is useful when printing transparencies or when inserting blank pages in a document. Note: Do Not Print is the factory default setting. Specify the paper source for landscape). Note: Tray 1 (standard tray) is the factory default setting. Understanding the printer menus 77 Finishing menu Use Sides (Duplex) 1 sided 2 sided Duplex Binding Long Edge Short Edge Copies 1-999 Blank Pages Do Not Print...
User Guide
Page 119
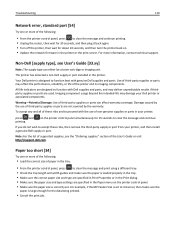
... use of non-genuine supplies or parts in the Paper menu on the printer control panel simultaneously for the data being printed. • Cancel the print job. Note: For the list of supported supplies, see User's Guide [33.xy] Note: The supply type can affect warranty coverage. Non‑Dell [supply type], see the "Ordering supplies" section of the User's Guide or visit http://support.dell.com. The printer has detected a non‑Dell supply or part installed in the printer or the print server. Troubleshooting 119 Network error, standard port...
... use of non-genuine supplies or parts in the Paper menu on the printer control panel simultaneously for the data being printed. • Cancel the print job. Note: For the list of supported supplies, see User's Guide [33.xy] Note: The supply type can affect warranty coverage. Non‑Dell [supply type], see the "Ordering supplies" section of the User's Guide or visit http://support.dell.com. The printer has detected a non‑Dell supply or part installed in the printer or the print server. Troubleshooting 119 Network error, standard port...

User Guide
Page 120
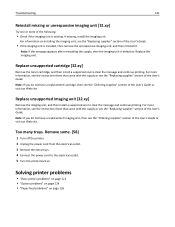
... port. • From the printer control panel, set USB Buffer to clear the message and continue printing. For more of the following: • From the printer control panel, press to clear the message and continue printing. If missing, install the toner cartridge. Press on installing the cartridge, see the "Ordering supplies" section of the User's Guide or visit our Web site. Rear USB port disabled [56] Try one or more information, visit http://support.dell.com or contact technical support. Replace imaging unit, 0 estimated pages...
... port. • From the printer control panel, set USB Buffer to clear the message and continue printing. For more of the following: • From the printer control panel, press to clear the message and continue printing. If missing, install the toner cartridge. Press on installing the cartridge, see the "Ordering supplies" section of the User's Guide or visit our Web site. Rear USB port disabled [56] Try one or more information, visit http://support.dell.com or contact technical support. Replace imaging unit, 0 estimated pages...
User Guide
Page 121
... the instruction sheet that came with the supply or see the "Replacing supplies" section of the User's Guide. • If the imaging unit is installed, then remove the unresponsive imaging unit, and then reinstall it. Remove some. [58] 1 Turn off the printer. 2 Unplug the power cord from the electrical outlet. 3 Remove the extra trays. 4 Connect the power cord to clear the message and continue printing. Solving printer problems • "Basic printer problems" on page 122 • "Option problems" on page 124 • "Paper feed problems...
... the instruction sheet that came with the supply or see the "Replacing supplies" section of the User's Guide. • If the imaging unit is installed, then remove the unresponsive imaging unit, and then reinstall it. Remove some. [58] 1 Turn off the printer. 2 Unplug the power cord from the electrical outlet. 3 Remove the extra trays. 4 Connect the power cord to clear the message and continue printing. Solving printer problems • "Basic printer problems" on page 122 • "Option problems" on page 124 • "Paper feed problems...
User Guide
Page 125
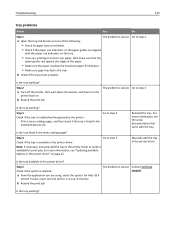
... print jobs. Step 3 Check if the tray is solved. Is the tray listed in the tray. Note: If necessary, manually add the tray in the printer driver to make sure the printer is set up in the printer driver" on . The problem is installed and recognized by the printer. Is the tray working ? Step 2 a Turn off the printer, then wait about 10 seconds, and then turn the printer back on page 22. For more information, see "Updating available options...
... print jobs. Step 3 Check if the tray is solved. Is the tray listed in the tray. Note: If necessary, manually add the tray in the printer driver to make sure the printer is set up in the printer driver" on . The problem is installed and recognized by the printer. Is the tray working ? Step 2 a Turn off the printer, then wait about 10 seconds, and then turn the printer back on page 22. For more information, see "Updating available options...
User Guide
Page 153
... types 41 attaching cables 20 available internal options 14 avoiding jams 46 avoiding paper jams 102 B Bin full. Load [orientation]. 114 Change [paper source] to find 88 envelopes loading, multipurpose feeder 36 tips on securing 88 confidential jobs modifying print settings 99 configuration information wireless network 25 configurations printer 9 Configure MP menu 57 configuring multiple printers 99 supply notifications, imaging unit 98 supply notifications, toner cartridge 98 configuring custom paper types 40 configuring supply notifications 98 connecting to a wireless network using...
... types 41 attaching cables 20 available internal options 14 avoiding jams 46 avoiding paper jams 102 B Bin full. Load [orientation]. 114 Change [paper source] to find 88 envelopes loading, multipurpose feeder 36 tips on securing 88 confidential jobs modifying print settings 99 configuration information wireless network 25 configurations printer 9 Configure MP menu 57 configuring multiple printers 99 supply notifications, imaging unit 98 supply notifications, toner cartridge 98 configuring custom paper types 40 configuring supply notifications 98 connecting to a wireless network using...
User Guide
Page 154
... jams, clearing behind front door 104 behind rear door 107 in duplex area 109 in standard bin 108 in Tray 1 111 in Tray 2 111 Multipurpose feeder 111 L labels, paper tips 45 letterhead loading, multipurpose feeder 36 tips on using 84 Hibernate Timeout setting 85 I imaging unit replacing 93 Imaging unit low [84.xy] 115 Imaging unit nearly low [84.xy] 115 Imaging unit very low, [x] estimated pages remain [84.xy] 115 Insert tray [x] 116 installing optional tray 19 installing an optional card 17 installing optional tray 19 installing printer on multiple printers 99 menu settings page printing...
... jams, clearing behind front door 104 behind rear door 107 in duplex area 109 in standard bin 108 in Tray 1 111 in Tray 2 111 Multipurpose feeder 111 L labels, paper tips 45 letterhead loading, multipurpose feeder 36 tips on using 84 Hibernate Timeout setting 85 I imaging unit replacing 93 Imaging unit low [84.xy] 115 Imaging unit nearly low [84.xy] 115 Imaging unit very low, [x] estimated pages remain [84.xy] 115 Insert tray [x] 116 installing optional tray 19 installing an optional card 17 installing optional tray 19 installing printer on multiple printers 99 menu settings page printing...
User Guide
Page 155
... 79 Wireless 67 XPS 80 menus list 53 moving the printer 8, 95, 96 multipurpose feeder loading 36 N Network [x] menu 63 Network Card menu 65 Network error, port [x] [54] 118 Network error, standard port [54] 119 Network Reports menu 64 network setup page printing 29 Non‑Dell [supply type], see User's Guide [33.xy] 119 non‑volatile memory 87 erasing 88 number of remaining pages estimate 90 O optional card installing 17 optional tray installing 19 loading 31 options memory card 15 memory cards 14 updating in Tray 2 111 Multipurpose feeder 111 Paper Loading menu 60 paper messages Jam...
... 79 Wireless 67 XPS 80 menus list 53 moving the printer 8, 95, 96 multipurpose feeder loading 36 N Network [x] menu 63 Network Card menu 65 Network error, port [x] [54] 118 Network error, standard port [54] 119 Network Reports menu 64 network setup page printing 29 Non‑Dell [supply type], see User's Guide [33.xy] 119 non‑volatile memory 87 erasing 88 number of remaining pages estimate 90 O optional card installing 17 optional tray installing 19 loading 31 options memory card 15 memory cards 14 updating in Tray 2 111 Multipurpose feeder 111 Paper Loading menu 60 paper messages Jam...
User Guide
Page 156
... 97 Memory full [38] 118 Memory low, no Resource Save [35] 118 Network error, port [x] [54] 118 Network error, standard port [54] 119 Non‑Dell [supply type], see User's Guide [33.xy] 119 Paper too short [34] 119 Parallel port disabled [56] 120 Printer restart. Load [orientation]. 114 Change [paper source] to find 7 printer is not detected 124 tray problems 125 printer problems, solving basic 122 Printer restart. Check last job. 120 printer security information on 88 printer software installing 21 printing font sample list 51...
... 97 Memory full [38] 118 Memory low, no Resource Save [35] 118 Network error, port [x] [54] 118 Network error, standard port [54] 119 Non‑Dell [supply type], see User's Guide [33.xy] 119 Paper too short [34] 119 Parallel port disabled [56] 120 Printer restart. Load [orientation]. 114 Change [paper source] to find 7 printer is not detected 124 tray problems 125 printer problems, solving basic 122 Printer restart. Check last job. 120 printer security information on 88 printer software installing 21 printing font sample list 51...
User Guide
Page 157
... selecting a location for the printer 8 selecting paper 43 Set Date and Time menu 71 setting paper size 30 paper type 30 TCP/IP address 65 Universal paper size 30 setting Hibernate Timeout 85 setting up the printer on an Ethernet network (Macintosh only) 23 on an Ethernet network (Windows only) 23 Setup menu 75 shipping the printer 96 Sleep mode adjusting 84 SMTP Setup menu 69 software Status Messenger 97 Status Monitor Center 97 Supplies Ordering Utility 90 standard bin, using 31 Standard Network menu 63 standard tray loading 31 Standard USB menu 68 statement...
... selecting a location for the printer 8 selecting paper 43 Set Date and Time menu 71 setting paper size 30 paper type 30 TCP/IP address 65 Universal paper size 30 setting Hibernate Timeout 85 setting up the printer on an Ethernet network (Macintosh only) 23 on an Ethernet network (Windows only) 23 Setup menu 75 shipping the printer 96 Sleep mode adjusting 84 SMTP Setup menu 69 software Status Messenger 97 Status Monitor Center 97 Supplies Ordering Utility 90 standard bin, using 31 Standard Network menu 63 standard tray loading 31 Standard USB menu 68 statement...


