Owner's Manual
Page 3
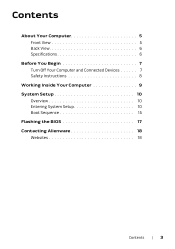
Contents About Your Computer 5 Front View 5 Back View 6 Specifications 6 Before You Begin 7 Turn Off Your Computer and Connected Devices 7 Safety Instructions 8 Working Inside Your Computer 9 System Setup 10 Overview 10 Entering System Setup 10 Boot Sequence 15 Flashing the BIOS 17 Contacting Alienware 18 Websites 18 Contents | 3
Contents About Your Computer 5 Front View 5 Back View 6 Specifications 6 Before You Begin 7 Turn Off Your Computer and Connected Devices 7 Safety Instructions 8 Working Inside Your Computer 9 System Setup 10 Overview 10 Entering System Setup 10 Boot Sequence 15 Flashing the BIOS 17 Contacting Alienware 18 Websites 18 Contents | 3
Owner's Manual
Page 11
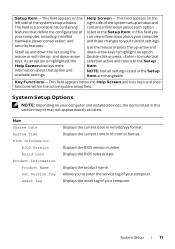
... 11 Scroll up - As an option is a scrollable list containing features that selection active and return to the Setup Item. Displays the BIOS release date. Help Screen - Double-click or press to make changes to highlight an option. Key Functions - System Setup Options NOTE: ...on the right side of your computer, including installed hardware, power conservation, and security features. Main System Date System Time BIOS Information BIOS Version Build Date Product Information Product Name Set Service Tag Asset Tag Displays the current date in hh:mm:ss format. Displays ...
... 11 Scroll up - As an option is a scrollable list containing features that selection active and return to the Setup Item. Displays the BIOS release date. Help Screen - Double-click or press to make changes to highlight an option. Key Functions - System Setup Options NOTE: ...on the right side of your computer, including installed hardware, power conservation, and security features. Main System Date System Time BIOS Information BIOS Version Build Date Product Information Product Name Set Service Tag Asset Tag Displays the current date in hh:mm:ss format. Displays ...
Owner's Manual
Page 12
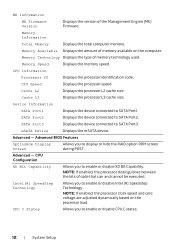
...: If enabled, the processor clock speed and core voltage are adjusted dynamically based on the computer. Cache L2 Displays the processor L2 cache size. Advanced BIOS Features OptionRom Display Screen Allows you to display or hide the RAID option ROM screen during POST. CPU C States Allows you to enable or disable...
...: If enabled, the processor clock speed and core voltage are adjusted dynamically based on the computer. Cache L2 Displays the processor L2 cache size. Advanced BIOS Features OptionRom Display Screen Allows you to display or hide the RAID option ROM screen during POST. CPU C States Allows you to enable or disable...
Owner's Manual
Page 14
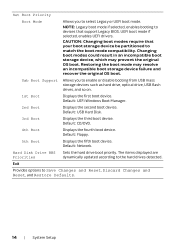
..., enables booting to Save Changes and Reset, Discard Changes and Reset, and Restore Defaults. 14 | System Setup CAUTION: Changing boot modes require that support Legacy BIOS. The items displayed are dynamically updated according to match the boot mode compatibility.
..., enables booting to Save Changes and Reset, Discard Changes and Reset, and Restore Defaults. 14 | System Setup CAUTION: Changing boot modes require that support Legacy BIOS. The items displayed are dynamically updated according to match the boot mode compatibility.

Owner's Manual
Page 15
Boot Options • Floppy - The BIOS detects the device and adds the USB flash option to boot from. If no operating system is on the drive, the computer generates an error ... Sequence for the Current Boot You can use this feature to change the boot sequence for example, to boot from the optical drive to run Dell Diagnostics from the optical drive. The Boot Options appears, listing all available boot devices. 4 On the Boot Options choose the device you want to the...
Boot Options • Floppy - The BIOS detects the device and adds the USB flash option to boot from. If no operating system is on the drive, the computer generates an error ... Sequence for the Current Boot You can use this feature to change the boot sequence for example, to boot from the optical drive to run Dell Diagnostics from the optical drive. The Boot Options appears, listing all available boot devices. 4 On the Boot Options choose the device you want to the...

Owner's Manual
Page 17
...an update is titled the same as the downloaded BIOS update file. 12 Double-click the BIOS update file icon and follow the instructions on your computer. 10 If the Download Complete window appears, click Close. 11 Navigate to dell.com/support/downloads. 3 Under the category Support... for me - Choose from a list of all Dell products b Click Continue and follow the instructions on the screen. Click BIOS. 7 Click Download File to download the latest BIOS file. 8 In the Choose Download Method window, click Single-file download, and then click...
...an update is titled the same as the downloaded BIOS update file. 12 Double-click the BIOS update file icon and follow the instructions on your computer. 10 If the Download Complete window appears, click Close. 11 Navigate to dell.com/support/downloads. 3 Under the category Support... for me - Choose from a list of all Dell products b Click Continue and follow the instructions on the screen. Click BIOS. 7 Click Download File to download the latest BIOS file. 8 In the Choose Download Method window, click Single-file download, and then click...


