

Owner's Manual
Page 4
... Procedure 29 Postrequisites 29 15 Removing the Power-Button Board 30 Prerequisites 30 Procedure 30 16 Replacing the Power-Button Board 31 Procedure 31 Postrequisites 31 17 Removing the Keyboard 32 Prerequisites 32 Procedure 33 18 Replacing the Keyboard 35 Procedure 35 Postrequisites 35 19 Removing the Macro Keyboard 36 Prerequisites 36 Procedure 36 4 | Contents
... Procedure 29 Postrequisites 29 15 Removing the Power-Button Board 30 Prerequisites 30 Procedure 30 16 Replacing the Power-Button Board 31 Procedure 31 Postrequisites 31 17 Removing the Keyboard 32 Prerequisites 32 Procedure 33 18 Replacing the Keyboard 35 Procedure 35 Postrequisites 35 19 Removing the Macro Keyboard 36 Prerequisites 36 Procedure 36 4 | Contents

Owner's Manual
Page 5
20 Replacing the Macro Keyboard 38 Procedure 38 Postrequisites 38 21 Removing the Memory Module(s 39 Prerequisites 39 Procedure 40 22 Replacing the Memory Module(s 41 Procedure 42 Postrequisites 42 23 Removing the Display Assembly 43 Prerequisites 43 Procedure 43 24 Replacing the Display Assembly 48 ...Procedure 48 Postrequisites 48 25 Removing the Palm Rest 49 Prerequisites 49 Procedure 50 26 Replacing the Palm Rest 53 Procedure 53 Postrequisites 53 27 Removing the ...
20 Replacing the Macro Keyboard 38 Procedure 38 Postrequisites 38 21 Removing the Memory Module(s 39 Prerequisites 39 Procedure 40 22 Replacing the Memory Module(s 41 Procedure 42 Postrequisites 42 23 Removing the Display Assembly 43 Prerequisites 43 Procedure 43 24 Replacing the Display Assembly 48 ...Procedure 48 Postrequisites 48 25 Removing the Palm Rest 49 Prerequisites 49 Procedure 50 26 Replacing the Palm Rest 53 Procedure 53 Postrequisites 53 27 Removing the ...

Owner's Manual
Page 31
Failure to the computer base. Procedure 1 Remove the screws that secure the keyboard to do so could result in scratching the display panel. 1 2 3 1 screws (5) 3 tabs (7) 2 keyboard Removing the Keyboard | 33 CAUTION: Be extremely careful when removing and handling the keyboard. CAUTION: The keycaps on the keyboard are fragile, easily dislodged, and time-consuming to replace. Be careful when removing and handling the keyboard.
Failure to the computer base. Procedure 1 Remove the screws that secure the keyboard to do so could result in scratching the display panel. 1 2 3 1 screws (5) 3 tabs (7) 2 keyboard Removing the Keyboard | 33 CAUTION: Be extremely careful when removing and handling the keyboard. CAUTION: The keycaps on the keyboard are fragile, easily dislodged, and time-consuming to replace. Be careful when removing and handling the keyboard.

Owner's Manual
Page 33
...at dell.com/ regulatory_compliance. Postrequisites 1 Replace the center control cover. See "Replacing the Battery Pack" on page 13. 4 Follow the instructions in "Before You Begin" on page 9. Replacing the Keyboard | 35 See "Replacing the Base Cover" on page 29. 2 Replace the base cover. 18 Replacing the Keyboard WARNING... in "After Working Inside Your Computer" on page 11. See "Replacing the Center Control Cover" on page 15. 3 Replace the battery pack. Procedure 1 Slide the keyboard cable and keyboard-backlight cable into their connectors on the system board, and press down...
...at dell.com/ regulatory_compliance. Postrequisites 1 Replace the center control cover. See "Replacing the Battery Pack" on page 13. 4 Follow the instructions in "Before You Begin" on page 9. Replacing the Keyboard | 35 See "Replacing the Base Cover" on page 29. 2 Replace the base cover. 18 Replacing the Keyboard WARNING... in "After Working Inside Your Computer" on page 11. See "Replacing the Center Control Cover" on page 15. 3 Replace the battery pack. Procedure 1 Slide the keyboard cable and keyboard-backlight cable into their connectors on the system board, and press down...
Owner's Manual
Page 34
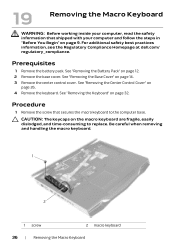
...dell.com/ regulatory_compliance. See "Removing the Battery Pack" on page 32. See "Removing the Base Cover" on page 26. 4 Remove the keyboard. Procedure 1 Remove the screw that shipped with your computer, read the safety information that secures the macro keyboard to replace.... Prerequisites 1 Remove the battery pack. Be careful when removing and handling the macro keyboard. 1 2 1 screw 2 macro keyboard 36 | Removing the Macro Keyboard 19 Removing the Macro Keyboard WARNING: Before working inside your computer...
...dell.com/ regulatory_compliance. See "Removing the Battery Pack" on page 32. See "Removing the Base Cover" on page 26. 4 Remove the keyboard. Procedure 1 Remove the screw that shipped with your computer, read the safety information that secures the macro keyboard to replace.... Prerequisites 1 Remove the battery pack. Be careful when removing and handling the macro keyboard. 1 2 1 screw 2 macro keyboard 36 | Removing the Macro Keyboard 19 Removing the Macro Keyboard WARNING: Before working inside your computer...

Owner's Manual
Page 36
... Inside Your Computer" on page 29. 3 Replace the base cover. Postrequisites 1 Replace the keyboard. See "Replacing the Center Control Cover" on page 11. 38 | Replacing the Macro Keyboard See "Replacing the Battery Pack" on page 13. 5 ...Follow the instructions in "Before You Begin" on page 35. 2 Replace the center control cover. For additional safety best practices information, see the Regulatory Compliance Homepage at dell...
... Inside Your Computer" on page 29. 3 Replace the base cover. Postrequisites 1 Replace the keyboard. See "Replacing the Center Control Cover" on page 11. 38 | Replacing the Macro Keyboard See "Replacing the Battery Pack" on page 13. 5 ...Follow the instructions in "Before You Begin" on page 35. 2 Replace the center control cover. For additional safety best practices information, see the Regulatory Compliance Homepage at dell...
Owner's Manual
Page 39
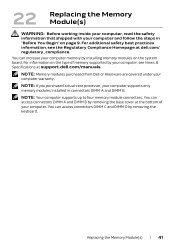
NOTE: Memory modules purchased from Dell or Alienware are covered under your computer. You can access connectors DIMM C and DIMM D by installing memory modules on the system board. You can increase your computer memory by removing the keyboard. NOTE: Your computer supports up to four ...memory module connectors. You can access connectors DIMM A and DIMM B by your computer, see the Regulatory Compliance Homepage at the bottom of memory supported by removing the base cover at dell.com/ regulatory_compliance. 22 Replacing the...
NOTE: Memory modules purchased from Dell or Alienware are covered under your computer. You can access connectors DIMM C and DIMM D by installing memory modules on the system board. You can increase your computer memory by removing the keyboard. NOTE: Your computer supports up to four ...memory module connectors. You can access connectors DIMM A and DIMM B by your computer, see the Regulatory Compliance Homepage at the bottom of memory supported by removing the base cover at dell.com/ regulatory_compliance. 22 Replacing the...

Owner's Manual
Page 40
...Replace the center control cover. Postrequisites 1 Replace the base cover. See "Replacing the Keyboard" on page 29. See "Replacing the Battery Pack" on page 13. 3 Follow the instructions in connectors DIMM C and DIMM D: a Replace the keyboard. See "Replacing the Center Control Cover" on page 35. See "Replacing... the Base Cover" on page 15. 2 Replace the battery pack. Procedure NOTE: If you need to Postrequisites. 4 If you...
...Replace the center control cover. Postrequisites 1 Replace the base cover. See "Replacing the Keyboard" on page 29. See "Replacing the Battery Pack" on page 13. 3 Follow the instructions in connectors DIMM C and DIMM D: a Replace the keyboard. See "Replacing the Center Control Cover" on page 35. See "Replacing... the Base Cover" on page 15. 2 Replace the battery pack. Procedure NOTE: If you need to Postrequisites. 4 If you...

Owner's Manual
Page 46
...safety best practices information, see the Regulatory Compliance Homepage at dell.com/regulatory_compliance. See "Replacing the Macro Keyboard" on page 29. 4 Replace the base cover. See "Replacing the Center Control Cover" on page 38. 2 Replace the keyboard. See "Replacing the Base Cover" on page 91. 8 Turn the ...4 Slide the Mini-Card antenna cables through the routing guides on page 11. 48 | Replacing the Display Assembly See "Replacing the Keyboard" on page 9. 24 Replacing the Display Assembly WARNING: Before working inside your computer, read the safety information that secure ...
...safety best practices information, see the Regulatory Compliance Homepage at dell.com/regulatory_compliance. See "Replacing the Macro Keyboard" on page 29. 4 Replace the base cover. See "Replacing the Center Control Cover" on page 38. 2 Replace the keyboard. See "Replacing the Base Cover" on page 91. 8 Turn the ...4 Slide the Mini-Card antenna cables through the routing guides on page 11. 48 | Replacing the Display Assembly See "Replacing the Keyboard" on page 9. 24 Replacing the Display Assembly WARNING: Before working inside your computer, read the safety information that secure ...

Owner's Manual
Page 51
... Drive(s)" on page 48. 2 Replace the macro keyboard. See "Replacing the Display Assembly" on page 25. 6 Replace the base cover. For additional safety best practices information, see the Regulatory Compliance Homepage at dell.com/regulatory_compliance. Postrequisites 1 Replace the dispaly assembly. Replacing the Palm Rest | 53 See "Replacing the Center Control Cover" on page 15. 7 Replace the battery pack. See...
... Drive(s)" on page 48. 2 Replace the macro keyboard. See "Replacing the Display Assembly" on page 25. 6 Replace the base cover. For additional safety best practices information, see the Regulatory Compliance Homepage at dell.com/regulatory_compliance. Postrequisites 1 Replace the dispaly assembly. Replacing the Palm Rest | 53 See "Replacing the Center Control Cover" on page 15. 7 Replace the battery pack. See...

Owner's Manual
Page 54
.... 2 Replace the screw that secures the status-light board to step 5 in Replacing the Palm Rest. 2 Replace the dispaly assembly. See "Replacing the Battery..." on page 48. 3 Replace the macro keyboard. See "Replacing the Display Assembly" on page 9. See "Replacing the Macro Keyboard" on page 15. 7 Replace the battery pack. Postrequisites 1...Replacing the Status-Light Board See "Replacing the Base Cover" on page 38. 4 Replace the keyboard. See "Replacing the Center Control Cover" on page 35. 5 Replace the center control cover. See "Replacing the Keyboard" on page 29. 6 Replace...
.... 2 Replace the screw that secures the status-light board to step 5 in Replacing the Palm Rest. 2 Replace the dispaly assembly. See "Replacing the Battery..." on page 48. 3 Replace the macro keyboard. See "Replacing the Display Assembly" on page 9. See "Replacing the Macro Keyboard" on page 15. 7 Replace the battery pack. Postrequisites 1...Replacing the Status-Light Board See "Replacing the Base Cover" on page 38. 4 Replace the keyboard. See "Replacing the Center Control Cover" on page 35. 5 Replace the center control cover. See "Replacing the Keyboard" on page 29. 6 Replace...

Owner's Manual
Page 57
... best practices information, see the Regulatory Compliance Homepage at dell.com/regulatory_compliance. See "Replacing the Macro Keyboard" on page 15. 7 Replace the battery pack. See "Replacing the Base Cover" on page 38. 4 Replace the keyboard. Procedure 1 Align the screw holes on the speakers... Inside Your Computer" on page 35. 5 Replace the center control cover. See "Replacing the Display Assembly" on page 29. 6 Replace the base cover. See "Replacing the Center Control Cover" on page 48. 3 Replace the macro keyboard. Replacing the Speakers | 59 Postrequisites 1 Follow the instructions...
... best practices information, see the Regulatory Compliance Homepage at dell.com/regulatory_compliance. See "Replacing the Macro Keyboard" on page 15. 7 Replace the battery pack. See "Replacing the Base Cover" on page 38. 4 Replace the keyboard. Procedure 1 Align the screw holes on the speakers... Inside Your Computer" on page 35. 5 Replace the center control cover. See "Replacing the Display Assembly" on page 29. 6 Replace the base cover. See "Replacing the Center Control Cover" on page 48. 3 Replace the macro keyboard. Replacing the Speakers | 59 Postrequisites 1 Follow the instructions...

Owner's Manual
Page 60
... control cover. See "Replacing the Keyboard" on page 29. 6 Replace the base cover. See "Replacing the Display Assembly" on page 9. 32 Replacing the I/O Board WARNING: Before working inside your computer and follow the steps in Replacing the Palm Rest. 2 Replace the dispaly assembly. For additional safety best practices information, see the Regulatory Compliance Homepage at dell.com/regulatory_compliance.
... control cover. See "Replacing the Keyboard" on page 29. 6 Replace the base cover. See "Replacing the Display Assembly" on page 9. 32 Replacing the I/O Board WARNING: Before working inside your computer and follow the steps in Replacing the Palm Rest. 2 Replace the dispaly assembly. For additional safety best practices information, see the Regulatory Compliance Homepage at dell.com/regulatory_compliance.

Owner's Manual
Page 64
... in "Before You Begin" on page 9. For additional safety best practices information, see the Regulatory Compliance Homepage at dell.com/regulatory_compliance. See "Replacing the Display Assembly" on page 38. 5 Replace the keyboard. See "Replacing the Keyboard" on page 29. 7 Replace the base cover. Procedure 1 Connect the interposer to the optical drive. 2 Align the screw holes on the...
... in "Before You Begin" on page 9. For additional safety best practices information, see the Regulatory Compliance Homepage at dell.com/regulatory_compliance. See "Replacing the Display Assembly" on page 38. 5 Replace the keyboard. See "Replacing the Keyboard" on page 29. 7 Replace the base cover. Procedure 1 Connect the interposer to the optical drive. 2 Align the screw holes on the...

Owner's Manual
Page 70
... on page 38. 4 Replace the keyboard. See "Replacing the Macro Keyboard" on page 11. 72 | Replacing the Video-Card Heat-Sink(s) See "Replacing the Center Control Cover" on page 35. 5 Replace the center control cover. ...Replacing the Keyboard" on page 29. 6 Replace the base cover. 38 Replacing the Video-Card Heat-Sink(s) WARNING: Before working inside your computer and follow the steps in "Before You Begin" on page 48. 3 Replace the macro keyboard. For additional safety best practices information, see the Regulatory Compliance Homepage at dell.com/regulatory_compliance. See "Replacing...
... on page 38. 4 Replace the keyboard. See "Replacing the Macro Keyboard" on page 11. 72 | Replacing the Video-Card Heat-Sink(s) See "Replacing the Center Control Cover" on page 35. 5 Replace the center control cover. ...Replacing the Keyboard" on page 29. 6 Replace the base cover. 38 Replacing the Video-Card Heat-Sink(s) WARNING: Before working inside your computer and follow the steps in "Before You Begin" on page 48. 3 Replace the macro keyboard. For additional safety best practices information, see the Regulatory Compliance Homepage at dell.com/regulatory_compliance. See "Replacing...

Owner's Manual
Page 73
... Computer" on page 38. 5 Replace the keyboard. See "Replacing the Keyboard" on page 29. 7 Replace the base cover. See "Replacing the Center Control Cover" on page 35. 6 Replace the center control cover. See "Replacing the Video-Card Heat-Sink(s)" on page 48. 4 Replace the macro keyboard. Procedure 1 Insert the video card connector at dell.com/regulatory_compliance. See "Replacing the Display Assembly" on...
... Computer" on page 38. 5 Replace the keyboard. See "Replacing the Keyboard" on page 29. 7 Replace the base cover. See "Replacing the Center Control Cover" on page 35. 6 Replace the center control cover. See "Replacing the Video-Card Heat-Sink(s)" on page 48. 4 Replace the macro keyboard. Procedure 1 Insert the video card connector at dell.com/regulatory_compliance. See "Replacing the Display Assembly" on...

Owner's Manual
Page 78
...with your computer, read the safety information that thermal conductivity is reinstalled. See "Replacing the Center Control Cover" on page 38. 4 Replace the keyboard. Postrequisites 1 Follow the instructions from step 2 to ensure that shipped with ...Replacing the Keyboard" on page 11. 80 | Replacing the Processor Heat-Sink CAUTION: Incorrect alignment of the processor heat-sink can be reused if the original processor heat-sink is achieved. For additional safety best practices information, see the Regulatory Compliance Homepage at dell.com/regulatory_compliance. 44 Replacing...
...with your computer, read the safety information that thermal conductivity is reinstalled. See "Replacing the Center Control Cover" on page 38. 4 Replace the keyboard. Postrequisites 1 Follow the instructions from step 2 to ensure that shipped with ...Replacing the Keyboard" on page 11. 80 | Replacing the Processor Heat-Sink CAUTION: Incorrect alignment of the processor heat-sink can be reused if the original processor heat-sink is achieved. For additional safety best practices information, see the Regulatory Compliance Homepage at dell.com/regulatory_compliance. 44 Replacing...

Owner's Manual
Page 81
... pad along with the pin-1 corner of the ZIF socket. See "Replacing the Center Control Cover" on page 38. 5 Replace the keyboard. Replacing the Processor Module | 83 If one or more corners of the processor... module with documentation to the system board. See "Replacing the Macro Keyboard" on page 29. 7 Replace the base cover. See "Replacing the Keyboard" on page 35. 6 Replace the center control cover. Procedure 1 Align the pin-1 corner of the module are aligned at dell...
... pad along with the pin-1 corner of the ZIF socket. See "Replacing the Center Control Cover" on page 38. 5 Replace the keyboard. Replacing the Processor Module | 83 If one or more corners of the processor... module with documentation to the system board. See "Replacing the Macro Keyboard" on page 29. 7 Replace the base cover. See "Replacing the Keyboard" on page 35. 6 Replace the center control cover. Procedure 1 Align the pin-1 corner of the module are aligned at dell...
Owner's Manual
Page 82
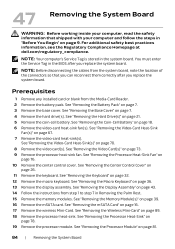
For additional safety best practices information, see the Regulatory Compliance Homepage at dell.com/regulatory_compliance. See "Removing the Processor Heat-Sink Fan" on page 81. 84 | Removing the System Board See "Removing the Processor Module" on page 76... location of the connectors so that shipped with your computer, read the safety information that you can reconnect them correctly after you replace the system board. See "Removing the Keyboard" on page 73. 9 Remove the processor heat-sink fan. 47 Removing the System Board WARNING: Before working inside your computer and...
For additional safety best practices information, see the Regulatory Compliance Homepage at dell.com/regulatory_compliance. See "Removing the Processor Heat-Sink Fan" on page 81. 84 | Removing the System Board See "Removing the Processor Module" on page 76... location of the connectors so that shipped with your computer, read the safety information that you can reconnect them correctly after you replace the system board. See "Removing the Keyboard" on page 73. 9 Remove the processor heat-sink fan. 47 Removing the System Board WARNING: Before working inside your computer and...
Owner's Manual
Page 85
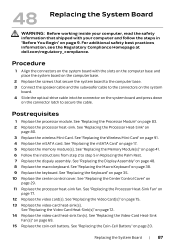
.... 9 Replace the keyboard. See "Replacing the Macro Keyboard" on page 91. 4 Replace the mSATA card. See "Replacing the Video-Card Heat-Sink Fan(s)" on page 83. 2 Replace the processor heat-sink. Replacing the System Board | 87 See "Replacing the Processor Module" on page 69. 15 Replace the coin-cell battery. See "Replacing the Processor... the safety information that shipped with the slots on the computer base and place the system board on the computer base. 2 Replace the screws that secure the system board to the computer base. 3 Connect the speaker cable and the subwoofer cable to secure ...
.... 9 Replace the keyboard. See "Replacing the Macro Keyboard" on page 91. 4 Replace the mSATA card. See "Replacing the Video-Card Heat-Sink Fan(s)" on page 83. 2 Replace the processor heat-sink. Replacing the System Board | 87 See "Replacing the Processor Module" on page 69. 15 Replace the coin-cell battery. See "Replacing the Processor... the safety information that shipped with the slots on the computer base and place the system board on the computer base. 2 Replace the screws that secure the system board to the computer base. 3 Connect the speaker cable and the subwoofer cable to secure ...


