Manual
Page 3
...YOUR LAPTOP 13 Front View Features 14 Left View Features 15 Right View Features 16 Display Features 17 Computer Base and Keyboard Features 18 Status Lights 19 Touch Controls 19 Power Button 20 Function Keys 21 Battery Pack 22 Power Management 23 CHAPTER 3: CONNECTING DEVICES ...25 Connecting External Displays 26 Connecting Printers 28 Connecting USB Devices 29 Connecting FireWire (IEEE 1394) Devices 29 CHAPTER 4: USING YOUR LAPTOP 31 Alienware...
...YOUR LAPTOP 13 Front View Features 14 Left View Features 15 Right View Features 16 Display Features 17 Computer Base and Keyboard Features 18 Status Lights 19 Touch Controls 19 Power Button 20 Function Keys 21 Battery Pack 22 Power Management 23 CHAPTER 3: CONNECTING DEVICES ...25 Connecting External Displays 26 Connecting Printers 28 Connecting USB Devices 29 Connecting FireWire (IEEE 1394) Devices 29 CHAPTER 4: USING YOUR LAPTOP 31 Alienware...

Manual
Page 18
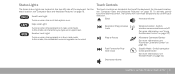
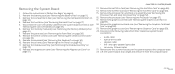
... pad buttons (2) - For more information, see "Touch Controls" on the keys. 6 3 Touch pad - Indicates if the Scroll Lock, Caps Lock, or Number Lock lights are turned on or off . 2 Keyboard - For more information, see "Power Button" on a mouse. 5 Touch controls (9) - Provides the functionality of a mouse to move the cursor, 5 drag or move...
... pad buttons (2) - For more information, see "Touch Controls" on the keys. 6 3 Touch pad - Indicates if the Scroll Lock, Caps Lock, or Number Lock lights are turned on or off . 2 Keyboard - For more information, see "Power Button" on a mouse. 5 Touch controls (9) - Provides the functionality of a mouse to move the cursor, 5 drag or move...
Manual
Page 19
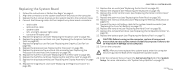
Eject Increase volume Caps Lock Light Turns on page 32) Fast Forward or Play next track Decrease volume Stealth Mode - Play or Pause Alienware Command Center (for more information, see "Alienware Command Center" on when the keyboard is in Caps Lock mode. Switch computer to confirm ...illuminate temporarily to low power state (for more information, see "Computer Base and Keyboard Features" on . Scroll Lock Light Turns on when the scroll lock option is in uppercase. Number Lock Light Rewind or Play previous track Wireless Control - Switch wireless communications on/off (for...
Eject Increase volume Caps Lock Light Turns on page 32) Fast Forward or Play next track Decrease volume Stealth Mode - Play or Pause Alienware Command Center (for more information, see "Alienware Command Center" on when the keyboard is in Caps Lock mode. Switch computer to confirm ...illuminate temporarily to low power state (for more information, see "Computer Base and Keyboard Features" on . Scroll Lock Light Turns on when the scroll lock option is in uppercase. Number Lock Light Rewind or Play previous track Wireless Control - Switch wireless communications on/off (for...
Manual
Page 57
If you require assistance, contact Alienware Technical Support (for correct seating and orientation. The computer may be depleted. Check the AC adapter: Check the AC adapter cable connections and ensure that the light is on page 45). • Computers using a dual-channel memory configuration require ... display. Test the electrical outlet: Ensure that memory modules be in pairs. Reseat the memory modules if applicable (see "CONTACTING ALIENWARE" on the keyboard or press the power button to resume normal operation. Check the battery: If you are using a program that you are using...
If you require assistance, contact Alienware Technical Support (for correct seating and orientation. The computer may be depleted. Check the AC adapter: Check the AC adapter cable connections and ensure that the light is on page 45). • Computers using a dual-channel memory configuration require ... display. Test the electrical outlet: Ensure that memory modules be in pairs. Reseat the memory modules if applicable (see "CONTACTING ALIENWARE" on the keyboard or press the power button to resume normal operation. Check the battery: If you are using a program that you are using...
Service Manual
Page 102
...Sink Assembly" on page 57). 17. Remove the graphics card heat sink (see "Removing the Memory Module(s)" on page 65). 19. and right-speaker light cable • consumer IR board cable 21. Remove the memory module(s) (see "Removing the Graphics Card Heat Sink" on page 21). 7. Remove ... 4. Remove the hard drive (see "Removing the Compartment Door" on page 17). 5. Remove the center control cover (see "Removing the Keyboard" on page 30). 9. Remove the keyboard (see "Removing the Center Control Cover" on page 34). 10. Remove the air vents (see "Removing the Half Mini-Card" on ...
...Sink Assembly" on page 57). 17. Remove the graphics card heat sink (see "Removing the Memory Module(s)" on page 65). 19. and right-speaker light cable • consumer IR board cable 21. Remove the memory module(s) (see "Removing the Graphics Card Heat Sink" on page 21). 7. Remove ... 4. Remove the hard drive (see "Removing the Compartment Door" on page 17). 5. Remove the center control cover (see "Removing the Keyboard" on page 30). 9. Remove the keyboard (see "Removing the Center Control Cover" on page 34). 10. Remove the air vents (see "Removing the Half Mini-Card" on ...
Service Manual
Page 104
Replacing the System Board 1. and right-speaker light cable • consumer IR board cable 5. Replace the processor fan and... 21. Replace the graphics card heat sink (see "Replacing the Coin-Cell Battery" on page 11). Replace the keyboard (see "Replacing the Graphics Card" on page 62). 8. Turn on page 35). 16. Follow the instructions in... the connectors on the system board with the slots on page 6. 2. Replace the graphics card (see "Replacing the Keyboard" on the computer. Replace the graphics card fan (see "Replacing the Processor" on page 49). 11. Replace the...
Replacing the System Board 1. and right-speaker light cable • consumer IR board cable 5. Replace the processor fan and... 21. Replace the graphics card heat sink (see "Replacing the Coin-Cell Battery" on page 11). Replace the keyboard (see "Replacing the Graphics Card" on page 62). 8. Turn on page 35). 16. Follow the instructions in... the connectors on the system board with the slots on page 6. 2. Replace the graphics card (see "Replacing the Keyboard" on the computer. Replace the graphics card fan (see "Replacing the Processor" on page 49). 11. Replace the...


