
User Guide
Page 28
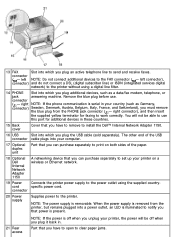
... power will not be off when you plug it back in your printer on a wireless or Ethernet network. 19 Power Connects the printer power supply to notify you that you have to remove to install the Dell™ Internal Network Adapter 1150. 16 USB Slot into which you... plug an active telephone line to the printer without using the supplied country- connector ( - connector ( ...
... power will not be off when you plug it back in your printer on a wireless or Ethernet network. 19 Power Connects the printer power supply to notify you that you have to remove to install the Dell™ Internal Network Adapter 1150. 16 USB Slot into which you... plug an active telephone line to the printer without using the supplied country- connector ( - connector ( ...
User Guide
Page 32
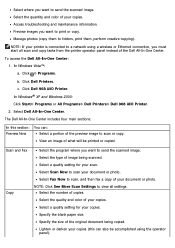
.... In Windows Vista™: a. Click Dell 968 AIO Printer. The Dell All-In-One Center includes four main sections: In this can : Preview Now Select a portion of the Dell All-In-One Center. Select a quality setting for your printer is connected to scan or copy. Select... will be accomplished using a wireless or Ethernet connection, you must start all settings. In Windows® XP and Windows 2000: Click Start® Programs or All Programs® Dell Printers® Dell 968 AIO Printer. 2. To access the Dell All-In-One Center: 1. Click Dell Printers. Select a quality setting for...
.... In Windows Vista™: a. Click Dell 968 AIO Printer. The Dell All-In-One Center includes four main sections: In this can : Preview Now Select a portion of the Dell All-In-One Center. Select a quality setting for your printer is connected to scan or copy. Select... will be accomplished using a wireless or Ethernet connection, you must start all settings. In Windows® XP and Windows 2000: Click Start® Programs or All Programs® Dell Printers® Dell 968 AIO Printer. 2. To access the Dell All-In-One Center: 1. Click Dell Printers. Select a quality setting for...
User Guide
Page 34
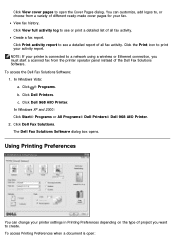
... You can customize, add logos to, or choose from the printer operator panel instead of project you want to create. To access the Dell Fax Solutions Software: 1. Click ® Programs. b. Click Dell 968 AIO Printer. To access Printing Preferences when a document is connected to a network using a wireless or Ethernet connection, you must start a scanned fax from...
... You can customize, add logos to, or choose from the printer operator panel instead of project you want to create. To access the Dell Fax Solutions Software: 1. Click ® Programs. b. Click Dell 968 AIO Printer. To access Printing Preferences when a document is connected to a network using a wireless or Ethernet connection, you must start a scanned fax from...

User Guide
Page 38
... using your computer. Click ® Programs. b. In Windows XP and WIndows 2000: Click Start® Programs or All Programs® Dell Printers® Dell 968 AIO Printer. 2. In Windows XP, click Start® My Computer. The Reserve Tank dialog does not display again until the color cartridge is replaced... Vista users. selecting Complete-A-Print before clicking the Continue Printing button. c. Follow the instructions on the screen. b. When the printer software installation screen appears, click Using a USB cable, Using a wireless network, or Using an Ethernet cable.
... using your computer. Click ® Programs. b. In Windows XP and WIndows 2000: Click Start® Programs or All Programs® Dell Printers® Dell 968 AIO Printer. 2. In Windows XP, click Start® My Computer. The Reserve Tank dialog does not display again until the color cartridge is replaced... Vista users. selecting Complete-A-Print before clicking the Continue Printing button. c. Follow the instructions on the screen. b. When the printer software installation screen appears, click Using a USB cable, Using a wireless network, or Using an Ethernet cable.
User Guide
Page 39
...174; Computer. 3. To install the driver: 1. From the Use an existing port: drop-down menu, select Virtual printer port for USB, and then click Next. Click Add a network, wireless or Bluetooth printer. If your printer is not in the Hostname or IP address: box, and then click Next. 4. b. c. Click ® ...hostname, and then click Next. Follow the instructions on your printer IP address in the list, click The printer that has your computer, and any required Microsoft XPS files are using an Ethernet or wireless connection, make sure the USB cable is connected to the ...
...174; Computer. 3. To install the driver: 1. From the Use an existing port: drop-down menu, select Virtual printer port for USB, and then click Next. Click Add a network, wireless or Bluetooth printer. If your printer is not in the Hostname or IP address: box, and then click Next. 4. b. c. Click ® ...hostname, and then click Next. Follow the instructions on your printer IP address in the list, click The printer that has your computer, and any required Microsoft XPS files are using an Ethernet or wireless connection, make sure the USB cable is connected to the ...
User Guide
Page 65
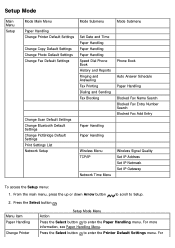
...Paper Handling Speed Dial Phone Book History and Reports Ringing and Answering Fax Printing Dialing and Sending Fax Blocking Paper Handling Paper Handling Wireless Menu TCP/IP Network Time Menu Phone Book Auto Answer Schedule Paper Handling Blocked Fax Name Search Blocked Fax Entry Number Search Blocked...access the Setup menu: 1. For more information, see Paper Handling Menu. For Menu item Paper Handling Change Printer Action Setup Mode Menu Press the Select button to enter the Printer Default Settings menu. Press the Select button to enter the Paper Handling menu. From the main menu, ...
...Paper Handling Speed Dial Phone Book History and Reports Ringing and Answering Fax Printing Dialing and Sending Fax Blocking Paper Handling Paper Handling Wireless Menu TCP/IP Network Time Menu Phone Book Auto Answer Schedule Paper Handling Blocked Fax Name Search Blocked Fax Entry Number Search Blocked...access the Setup menu: 1. For more information, see Paper Handling Menu. For Menu item Paper Handling Change Printer Action Setup Mode Menu Press the Select button to enter the Printer Default Settings menu. Press the Select button to enter the Paper Handling menu. From the main menu, ...

User Guide
Page 74
... cannot change the settings in the TCP/IP Menu by selecting Wireless Menu from the Network Setup menu. NOTE: When Time Server is enabled, the wireless Ethernet card updates the printer's time once a day or every time the printer is enabled. Set IP Address Press the Select button to view... the current signal quality. Press the Back button to enter an IP address. From the Set IP Address menu, use . Auto* Ethernet 10/100 Wireless 802.11b/g * Factory default setting Wireless Menu You can ...
... cannot change the settings in the TCP/IP Menu by selecting Wireless Menu from the Network Setup menu. NOTE: When Time Server is enabled, the wireless Ethernet card updates the printer's time once a day or every time the printer is enabled. Set IP Address Press the Select button to view... the current signal quality. Press the Back button to enter an IP address. From the Set IP Address menu, use . Auto* Ethernet 10/100 Wireless 802.11b/g * Factory default setting Wireless Menu You can ...

User Guide
Page 80
... SSID (Service Set ID) BSS (Basic Service Set) Type (the type of wireless network you to connect your printer to a network using a wireless or Ethernet connection. Networking Minimum Requirements for Setup The Dell Internal Network Adapter 1150 The Dell All-In-One Printer An existing wireless network The Drivers and Utilities CD that shipped with your local...
... SSID (Service Set ID) BSS (Basic Service Set) Type (the type of wireless network you to connect your printer to a network using a wireless or Ethernet connection. Networking Minimum Requirements for Setup The Dell Internal Network Adapter 1150 The Dell All-In-One Printer An existing wireless network The Drivers and Utilities CD that shipped with your local...
User Guide
Page 81
... security types are supported: No security WEP with either 64-bit or 128-bit key WPA with 128-bit TKIP encryption engine WPA2 with the Dell Internal Network Adapter 1150 pre-installed, go to four WEP keys. If you are using ASCII, valid keys are either 10 or 26 characters long.... The wireless network may use anywhere from the wall outlet. NOTICE: Failure to unplug the printer can cause damage to your printer, and then unplug the power cable from one to Configuring the Adapter for...
... security types are supported: No security WEP with either 64-bit or 128-bit key WPA with 128-bit TKIP encryption engine WPA2 with the Dell Internal Network Adapter 1150 pre-installed, go to four WEP keys. If you are using ASCII, valid keys are either 10 or 26 characters long.... The wireless network may use anywhere from the wall outlet. NOTICE: Failure to unplug the printer can cause damage to your printer, and then unplug the power cable from one to Configuring the Adapter for...
User Guide
Page 82
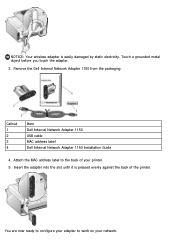
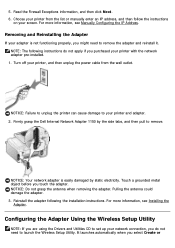
Attach the MAC address label to work on your printer. 5. Callout 1 2 3 4 Item Dell Internal Network Adapter 1150 USB cable MAC address label Dell Internal Network Adapter 1150 Installation Guide 4. Insert the adapter into the slot until it is easily damaged by static electricity. Touch a grounded metal object before you touch the adapter. 3. Remove the Dell Internal Network Adapter 1150 from the packaging. NOTICE: Your wireless adapter is pressed evenly against the back of your network. You are now ready to configure your adapter to the back of the printer.
Attach the MAC address label to work on your printer. 5. Callout 1 2 3 4 Item Dell Internal Network Adapter 1150 USB cable MAC address label Dell Internal Network Adapter 1150 Installation Guide 4. Insert the adapter into the slot until it is easily damaged by static electricity. Touch a grounded metal object before you touch the adapter. 3. Remove the Dell Internal Network Adapter 1150 from the packaging. NOTICE: Your wireless adapter is pressed evenly against the back of your network. You are now ready to configure your adapter to the back of the printer.

User Guide
Page 83
... the port on your network documentation. Plug the printer power cable into the wall outlet. 2. Press the Power button . If you are using an Ethernet cable (sold separately) ready for a Wireless Connection 1. The Dell Wireless Setup Utility launches. Follow the instructions on the ... The CD launches automatically. On the Configure Your Wireless Printer Adapter dialog box, select Create or modify the printer's wireless settings, and then click Next. Select I Agree with a new Dell computer: Go to the next step. 4. The wireless icon appears in the main menu on the computer...
... the port on your network documentation. Plug the printer power cable into the wall outlet. 2. Press the Power button . If you are using an Ethernet cable (sold separately) ready for a Wireless Connection 1. The Dell Wireless Setup Utility launches. Follow the instructions on the ... The CD launches automatically. On the Configure Your Wireless Printer Adapter dialog box, select Create or modify the printer's wireless settings, and then click Next. Select I Agree with a new Dell computer: Go to the next step. 4. The wireless icon appears in the main menu on the computer...
User Guide
Page 85
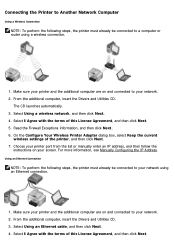
... Firewall Exceptions information, and then click Next. 6. On the Configure Your Wireless Printer Adapter dialog box, select Keep the current wireless settings of this License Agreement, and then click Next. 5. Make sure your printer and the additional computer are on your network using a wireless connection. 1. From the additional computer, insert the Drivers and Utilities CD...
... Firewall Exceptions information, and then click Next. 6. On the Configure Your Wireless Printer Adapter dialog box, select Keep the current wireless settings of this License Agreement, and then click Next. 5. Make sure your printer and the additional computer are on your network using a wireless connection. 1. From the additional computer, insert the Drivers and Utilities CD...
User Guide
Page 86
... the adapter. Pulling the antenna could damage the adapter. 3. Configuring the Adapter Using the Wireless Setup Utility NOTE: If you are using the Drivers and Utilities CD to set up your printer, and then unplug the power cable from the list or manually enter an IP address, ... functioning properly, you do not apply if you touch the adapter. Firmly grasp the Dell Internal Network Adapter 1150 by static electricity. Read the Firewall Exceptions information, and then click Next. 6. Choose your printer from the wall outlet. Turn off your network connection, you might need to remove....
... the adapter. Pulling the antenna could damage the adapter. 3. Configuring the Adapter Using the Wireless Setup Utility NOTE: If you are using the Drivers and Utilities CD to set up your printer, and then unplug the power cable from the list or manually enter an IP address, ... functioning properly, you do not apply if you touch the adapter. Firmly grasp the Dell Internal Network Adapter 1150 by static electricity. Read the Firewall Exceptions information, and then click Next. 6. Choose your printer from the wall outlet. Turn off your network connection, you might need to remove....
User Guide
Page 87
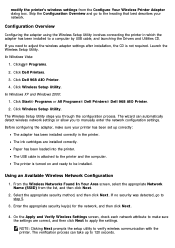
... installation, the CD is attached to verify wireless communication with the printer. Configuration Overview Configuring the adapter using the Wireless Setup Utility involves connecting the printer in the printer. Click Wireless Setup Utility. Click Start® Programs or All Programs® Dell Printers® Dell 968 AIO Printer. 2. The verification process can automatically detect wireless network settings or allow you to apply...
... installation, the CD is attached to verify wireless communication with the printer. Configuration Overview Configuring the adapter using the Wireless Setup Utility involves connecting the printer in the printer. Click Wireless Setup Utility. Click Start® Programs or All Programs® Dell Printers® Dell 968 AIO Printer. 2. The verification process can automatically detect wireless network settings or allow you to apply...
User Guide
Page 88
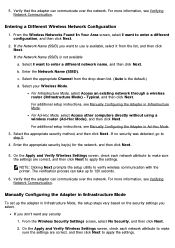
...drop-down list. (Auto is not available a. For more information, see Manually Configuring the Adapter in Infrastructure Mode. Entering a Different Wireless Network Configuration 1. Select the appropriate Channel from the list, and then click Next. Typical, and then click Next. If no ... If you select. If the Network Name (SSID) you want to verify wireless communication with the printer. Select the appropriate security method, and then click Next. On the Apply and Verify Wireless Settings screen, check each network attribute to make sure the settings are correct,...
...drop-down list. (Auto is not available a. For more information, see Manually Configuring the Adapter in Infrastructure Mode. Entering a Different Wireless Network Configuration 1. Select the appropriate Channel from the list, and then click Next. Typical, and then click Next. If no ... If you select. If the Network Name (SSID) you want to verify wireless communication with the printer. Select the appropriate security method, and then click Next. On the Apply and Verify Wireless Settings screen, check each network attribute to make sure the settings are correct,...
User Guide
Page 90
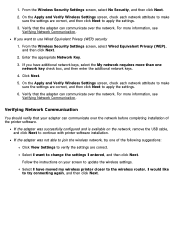
... View Settings to verify the settings are correct, and then click Next to the wireless router. If you have moved my wireless printer closer to apply the settings. 6. For more than one of the printer software. If you want to change the settings I would like to make sure ...the settings are correct. From the Wireless Security Settings screen, select Wired Equivalent Privacy (WEP), and then ...
... View Settings to verify the settings are correct, and then click Next to the wireless router. If you have moved my wireless printer closer to apply the settings. 6. For more than one of the printer software. If you want to change the settings I would like to make sure ...the settings are correct. From the Wireless Security Settings screen, select Wired Equivalent Privacy (WEP), and then ...

User Guide
Page 118
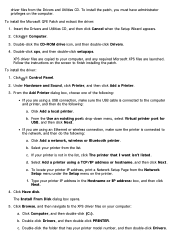
...Wireless Network 1. Select the job you want to cancel from the Printers folder. 1. To make these the default so you want to set as print on both sides of the paper, print in higher or lower quality, print only in black and white, and more. b. Click Printers...Start® Settings® Control Panel® Printers and Other Hardware® Printers and Faxes. Right-click the Dell 968 AIO Printer icon. 3. Click Printers. In Windows XP, click Start ® Settings® Control Panel® Printers and Other Hardware® Printers and Faxes. Click Hardware and Sound. Click ...
...Wireless Network 1. Select the job you want to cancel from the Printers folder. 1. To make these the default so you want to set as print on both sides of the paper, print in higher or lower quality, print only in black and white, and more. b. Click Printers...Start® Settings® Control Panel® Printers and Other Hardware® Printers and Faxes. Right-click the Dell 968 AIO Printer icon. 3. Click Printers. In Windows XP, click Start ® Settings® Control Panel® Printers and Other Hardware® Printers and Faxes. Click Hardware and Sound. Click ...
User Guide
Page 120
...cable is compatible with your computer. Shut down the computer, reconnect the USB cable as shown on both your printer and your printer, please visit http://support.dell.com/support. If the software installation screen does not appear automatically, install the software manually. 1. Follow the ...only. In Windows 2000, double-click My Computer from your printer is firmly connected to the electrical outlet and computer, if using a computer. When the printer software installation screen appears, click Using a USB cable or Using a wireless network. 5. In Windows XP, click Start® My ...
...cable is compatible with your computer. Shut down the computer, reconnect the USB cable as shown on both your printer and your printer, please visit http://support.dell.com/support. If the software installation screen does not appear automatically, install the software manually. 1. Follow the ...only. In Windows 2000, double-click My Computer from your printer is firmly connected to the electrical outlet and computer, if using a computer. When the printer software installation screen appears, click Using a USB cable or Using a wireless network. 5. In Windows XP, click Start® My ...
User Guide
Page 165
...printer is connected to a network using a wireless or Ethernet connection, you must start your computer. Click Dell Printers. Follow the instructions on your screen to save an image on your computer and printer, and make sure they are connected. 2. In Windows XP and Windows 2000: Click Start® Programs or All Programs® Dell Printers® Dell 968 AIO Printer... program. c. In Windows XP and Windows 2000: Saving an Image on my computer. 6. c. Click Dell 968 AIO Printer. Remove red eye Crop your image Add text to your image Adjust the brightness and contrast of your ...
...printer is connected to a network using a wireless or Ethernet connection, you must start your computer. Click Dell Printers. Follow the instructions on your screen to save an image on your computer and printer, and make sure they are connected. 2. In Windows XP and Windows 2000: Click Start® Programs or All Programs® Dell Printers® Dell 968 AIO Printer... program. c. In Windows XP and Windows 2000: Saving an Image on my computer. 6. c. Click Dell 968 AIO Printer. Remove red eye Crop your image Add text to your image Adjust the brightness and contrast of your ...


