Owner's Manual
Page 1
Dell™ Photo All-In-One Printer 964 Owner's Manual Look Inside For: • Ordering Supplies • About Your Printer • Using the Printer • Understanding the Printer Software • Maintenance and Troubleshooting Photo 964 www.dell.com/supplies | support.dell.com
Dell™ Photo All-In-One Printer 964 Owner's Manual Look Inside For: • Ordering Supplies • About Your Printer • Using the Printer • Understanding the Printer Software • Maintenance and Troubleshooting Photo 964 www.dell.com/supplies | support.dell.com
Owner's Manual
Page 2
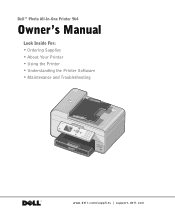
... to warn you of low ink levels. Ordering Supplies Your Dell Photo AIO Printer 964 includes software installed to print using the following ink cartridges. Your printer has been designed to detect the ink levels in the printer. Supply Item Standard Capacity black ink cartridge Standard Capacity color ink cartridge High Capacity black ink cartridge High...
... to warn you of low ink levels. Ordering Supplies Your Dell Photo AIO Printer 964 includes software installed to print using the following ink cartridges. Your printer has been designed to detect the ink levels in the printer. Supply Item Standard Capacity black ink cartridge Standard Capacity color ink cartridge High Capacity black ink cartridge High...
Owner's Manual
Page 5
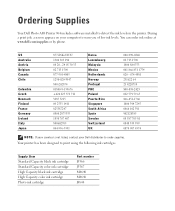
Contents 1 About Your Printer Understanding the Printer Parts 14 Setting Up Your Printer 17 Initial Setup Menu 17 Understanding the Operator Panel 18 Using the Operator Panel 18 Operator Panel Menus 20 Understanding the Automatic Paper Type Sensor ... Glass 25 Print Media Guidelines 26 Print Media Guidelines for the Paper Support 26 Paper Guidelines for the ADF 28 2 Printing Printing a Document 29 Printing Photos 29 Printing Borderless Photos 30 Printing Photos From a PictBridge-Enabled Camera 31 Printing Photos From a Memory Card 32 Contents 5
Contents 1 About Your Printer Understanding the Printer Parts 14 Setting Up Your Printer 17 Initial Setup Menu 17 Understanding the Operator Panel 18 Using the Operator Panel 18 Operator Panel Menus 20 Understanding the Automatic Paper Type Sensor ... Glass 25 Print Media Guidelines 26 Print Media Guidelines for the Paper Support 26 Paper Guidelines for the ADF 28 2 Printing Printing a Document 29 Printing Photos 29 Printing Borderless Photos 30 Printing Photos From a PictBridge-Enabled Camera 31 Printing Photos From a Memory Card 32 Contents 5
Owner's Manual
Page 6
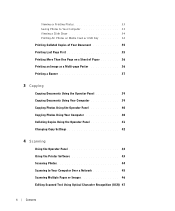
...Printing a Banner 37 3 Copying Copying Documents Using the Operator Panel 39 Copying Documents Using Your Computer 39 Copying Photos Using the Operator Panel 40 Copying Photos Using Your Computer 40 Collating Copies Using the Operator Panel 41 Changing Copy Settings 42 4 Scanning Using the Operator... Panel 43 Using the Printer Software 43 Scanning Photos 44 Scanning to Your Computer Over a Network 45 Scanning Multiple ...
...Printing a Banner 37 3 Copying Copying Documents Using the Operator Panel 39 Copying Documents Using Your Computer 39 Copying Photos Using the Operator Panel 40 Copying Photos Using Your Computer 40 Collating Copies Using the Operator Panel 41 Changing Copy Settings 42 4 Scanning Using the Operator... Panel 43 Using the Printer Software 43 Scanning Photos 44 Scanning to Your Computer Over a Network 45 Scanning Multiple ...
Owner's Manual
Page 13
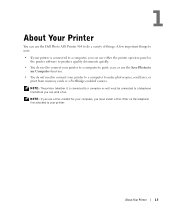
..., you can use either the printer operator panel or the printer software to produce quality documents quickly. • You do need to connect your printer to a computer to print, scan, or use a DSL modem for your computer, you can use the Dell Photo AIO Printer 964 to do not need to connect... your printer. A few important things to note: • If your printer is connected to a computer or not) must install a DSL filter on the telephone line attached ...
..., you can use either the printer operator panel or the printer software to produce quality documents quickly. • You do need to connect your printer to a computer to print, scan, or use a DSL modem for your computer, you can use the Dell Photo AIO Printer 964 to do not need to connect... your printer. A few important things to note: • If your printer is connected to a computer or not) must install a DSL filter on the telephone line attached ...
Owner's Manual
Page 14
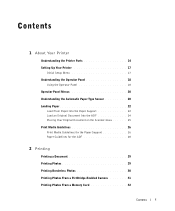
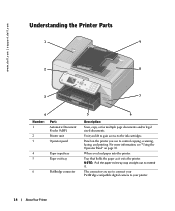
... the paper exit tray stop straight out to the ink cartridges. Where you use to connect your printer. 14 About Your Printer www.dell.com | support.dell.com Understanding the Printer Parts 1 9 2 8 Photo 964 3 7 4 Number: 1 2 3 Part: Automatic Document Feeder (ADF) Printer unit Operator panel 4 Paper input tray 5 Paper exit tray 6 PictBridge connector 5 6 Description: Scan, copy, or fax multiple...
... the paper exit tray stop straight out to the ink cartridges. Where you use to connect your printer. 14 About Your Printer www.dell.com | support.dell.com Understanding the Printer Parts 1 9 2 8 Photo 964 3 7 4 Number: 1 2 3 Part: Automatic Document Feeder (ADF) Printer unit Operator panel 4 Paper input tray 5 Paper exit tray 6 PictBridge connector 5 6 Description: Scan, copy, or fax multiple...

Owner's Manual
Page 15
...documents. 10 11 10 Supplies Reorder Label To order ink cartridges or paper, visit www.dell.com/supplies. 11 Express Service Code • Identify your printer when you use support.dell.com or contact technical support. • Enter the Express Service Code to direct your ...original document after it . NOTE: The Express Code is not available in the printer. Load original documents in all countries. Top of printer that holds your document or photo...
...documents. 10 11 10 Supplies Reorder Label To order ink cartridges or paper, visit www.dell.com/supplies. 11 Express Service Code • Identify your printer when you use support.dell.com or contact technical support. • Enter the Express Service Code to direct your ...original document after it . NOTE: The Express Code is not available in the printer. Load original documents in all countries. Top of printer that holds your document or photo...

Owner's Manual
Page 17
...buttons to a wall jack. Press Select to the printer. About Your Printer 17 When the power supply is removed from the printer, but remains plugged into a wall outlet, an LED is present. NOTE: The Dell Photo AIO Printer 964 is an analog device that power is illuminated to notify... first time. NOTE: The power supply is required. When your country is highlighted, press Select . Setting Up Your Printer NOTE: The Dell Photo All-In-One Printer 964 supports Microsoft® Windows® 2000, Windows XP, and Windows XP Professional X64 Edition. right side connector) to ...
...buttons to a wall jack. Press Select to the printer. About Your Printer 17 When the power supply is removed from the printer, but remains plugged into a wall outlet, an LED is present. NOTE: The Dell Photo AIO Printer 964 is an analog device that power is illuminated to notify... first time. NOTE: The power supply is required. When your country is highlighted, press Select . Setting Up Your Printer NOTE: The Dell Photo All-In-One Printer 964 supports Microsoft® Windows® 2000, Windows XP, and Windows XP Professional X64 Edition. right side connector) to ...
Owner's Manual
Page 18
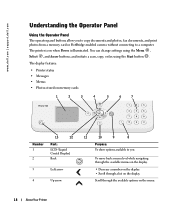
... . The printer is on memory cards 1 2 3 4 5 6 7 Photo 964 , Number 1 2 13 12 Part: LCD (Liquid Crystal Display) Back 3 Left arrow 4 Up arrow 11 10 9 8 Purpose: To show options available to you to copy documents and photos, fax documents, and print photos from a memory card or PictBridge-enabled camera without connecting to a computer. www.dell.com | support.dell.com...
... . The printer is on memory cards 1 2 3 4 5 6 7 Photo 964 , Number 1 2 13 12 Part: LCD (Liquid Crystal Display) Back 3 Left arrow 4 Up arrow 11 10 9 8 Purpose: To show options available to you to copy documents and photos, fax documents, and print photos from a memory card or PictBridge-enabled camera without connecting to a computer. www.dell.com | support.dell.com...
Owner's Manual
Page 19
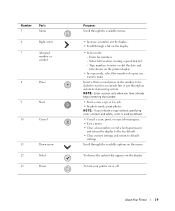
... Cancel a scan, print, or copy job in the number to be dialed to default settings. To choose the option that appears on the printer display. • In copy mode, select the number of copies you want to enter or edit the date and time shown on the display....dial list. - NOTE: If you have already begun entering the number. • Start a scan, copy, or fax job. • In photo mode, print photos. Type numbers to make. About Your Printer 19 Number 5 Part: Menu 6 Right arrow 7 A keypad number or symbol 8 Pause , 9 Start 10 Cancel 11 Down arrow 12 Select...
... Cancel a scan, print, or copy job in the number to be dialed to default settings. To choose the option that appears on the printer display. • In copy mode, select the number of copies you want to enter or edit the date and time shown on the display....dial list. - NOTE: If you have already begun entering the number. • Start a scan, copy, or fax job. • In photo mode, print photos. Type numbers to make. About Your Printer 19 Number 5 Part: Menu 6 Right arrow 7 A keypad number or symbol 8 Pause , 9 Start 10 Cancel 11 Down arrow 12 Select...
Owner's Manual
Page 20
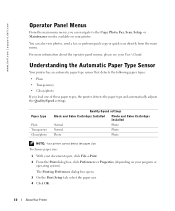
www.dell.com | support.dell.com Operator Panel Menus From the main menu menu, you load one of these paper types, the printer detects the paper type and automatically adjusts the Quality/Speed settings. To choose paper size: 1 With your document open, click...copy or quick scan directly from the main menu. Paper type Plain Transparency Glossy/photo Quality/Speed settings Black and Color Cartridges Installed Photo and Color Cartridges Installed Normal Photo Normal Photo Photo Photo NOTE: Your printer cannot detect the paper size. For more information about the operator panel menus, ...
www.dell.com | support.dell.com Operator Panel Menus From the main menu menu, you load one of these paper types, the printer detects the paper type and automatically adjusts the Quality/Speed settings. To choose paper size: 1 With your document open, click...copy or quick scan directly from the main menu. Paper type Plain Transparency Glossy/photo Quality/Speed settings Black and Color Cartridges Installed Photo and Color Cartridges Installed Normal Photo Normal Photo Photo Photo NOTE: Your printer cannot detect the paper size. For more information about the operator panel menus, ...
Owner's Manual
Page 21
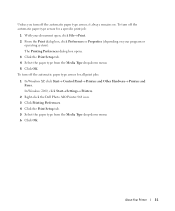
...type sensor for a specific print job: 1 With your program or operating system). In Windows 2000, click Start→ Settings→ Printers. 2 Right-click the Dell Photo AIO Printer 964 icon. 3 Click Printing Preferences. 4 Click the Print Setup tab. 5 Select the paper type from the Media Type drop-down menu... off the automatic paper type sensor for all print jobs: 1 In Windows XP, click Start→ Control Panel→ Printers and Other Hardware→ Printers and Faxes. The Printing Preferences dialog box opens. 3 Click the Print Setup tab. 4 Select the paper type from the...
...type sensor for a specific print job: 1 With your program or operating system). In Windows 2000, click Start→ Settings→ Printers. 2 Right-click the Dell Photo AIO Printer 964 icon. 3 Click Printing Preferences. 4 Click the Print Setup tab. 5 Select the paper type from the Media Type drop-down menu... off the automatic paper type sensor for all print jobs: 1 In Windows XP, click Start→ Control Panel→ Printers and Other Hardware→ Printers and Faxes. The Printing Preferences dialog box opens. 3 Click the Print Setup tab. 4 Select the paper type from the...
Owner's Manual
Page 24
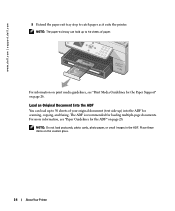
... print media guidelines, see "Paper Guidelines for the Paper Support" on the scanner glass. 24 About Your Printer NOTE: Do not load postcards, photo cards, photo paper, or small images in the ADF. www.dell.com | support.dell.com 5 Extend the paper exit tray stop to 50 sheets of paper. NOTE: The paper exit tray...
... print media guidelines, see "Paper Guidelines for the Paper Support" on the scanner glass. 24 About Your Printer NOTE: Do not load postcards, photo cards, photo paper, or small images in the ADF. www.dell.com | support.dell.com 5 Extend the paper exit tray stop to 50 sheets of paper. NOTE: The paper exit tray...

Owner's Manual
Page 25
To get a copy with portrait (vertical) orientation: To get a copy with landscape (horizontal) orientation: 3 Close the top cover. Photo 964 About Your Printer 25 Placing Your Original Document on the Scanner Glass 1 Open the top cover. 2 Place the original document face down on the scanner glass in the upper left corner.
To get a copy with portrait (vertical) orientation: To get a copy with landscape (horizontal) orientation: 3 Close the top cover. Photo 964 About Your Printer 25 Placing Your Original Document on the Scanner Glass 1 Open the top cover. 2 Place the original document face down on the scanner glass in the upper left corner.
Owner's Manual
Page 26
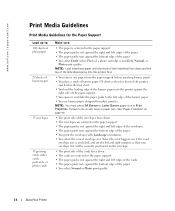
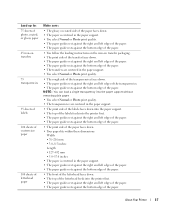
...of the envelopes. • The paper guide rests against the bottom edge of the paper. • You select Normal or Photo print quality. 26 About Your Printer NOTE: Load letterhead paper with Landscape orientation. • You select the correct envelope size. Select the next biggest size if... The print side of the envelopes faces down . • The cards are centered in Print Properties. www.dell.com | support.dell.com Print Media Guidelines Print Media Guidelines for inkjet printers. NOTE: You must select A4 Banner or Letter Banner paper size in the paper support. • The ...
...of the envelopes. • The paper guide rests against the bottom edge of the paper. • You select Normal or Photo print quality. 26 About Your Printer NOTE: Load letterhead paper with Landscape orientation. • You select the correct envelope size. Select the next biggest size if... The print side of the envelopes faces down . • The cards are centered in Print Properties. www.dell.com | support.dell.com Print Media Guidelines Print Media Guidelines for inkjet printers. NOTE: You must select A4 Banner or Letter Banner paper size in the paper support. • The ...
Owner's Manual
Page 27
...8226; The paper is centered in the paper support. • You select Normal or Photo print quality. • The rough side of the transparencies faces down . • The top of the letterhead feeds into the printer first. • The paper guides rest against the right and left edges of the ... plain paper. • You select Normal or Photo print quality. • The transparencies are centered in the paper support. • The print side of the labels faces down into the paper support. • The top of the labels feeds into the printer first. • The paper guides rest against...
...8226; The paper is centered in the paper support. • You select Normal or Photo print quality. • The rough side of the transparencies faces down . • The top of the letterhead feeds into the printer first. • The paper guides rest against the right and left edges of the ... plain paper. • You select Normal or Photo print quality. • The transparencies are centered in the paper support. • The print side of the labels faces down into the paper support. • The top of the labels feeds into the printer first. • The paper guides rest against...

Owner's Manual
Page 29
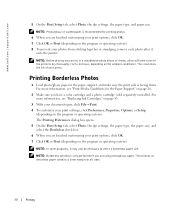
...; Print. 4 Customize your print settings: a Click Preferences, Properties, Options, or Setup (depending on the program or operating system). Printing Photos 1 Load the photo paper with the print side facing down . For more information, see "Print Media Guidelines for the Paper Support" on page 26. 2 ...click Preferences, Properties, Options, or Setup (depending on the program or operating system). 2 Printing Printing a Document 1 Turn on your computer and printer, and make sure they are connected. 2 Load paper with the print (glossy) side facing down . b On the Print Setup tab, select ...
...; Print. 4 Customize your print settings: a Click Preferences, Properties, Options, or Setup (depending on the program or operating system). Printing Photos 1 Load the photo paper with the print side facing down . For more information, see "Print Media Guidelines for the Paper Support" on page 26. 2 ...click Preferences, Properties, Options, or Setup (depending on the program or operating system). 2 Printing Printing a Document 1 Turn on your computer and printer, and make sure they are connected. 2 Load paper with the print (glossy) side facing down . b On the Print Setup tab, select ...
Owner's Manual
Page 30
... necessary to 24 hours, depending on the program or operating system). NOTE: In some programs, it exits the printer. www.dell.com | support.dell.com 5 On the Print Setup tab, select Photo, the dpi settings, the paper type, and paper size. The Printing Preferences dialog box opens. 5 On the... Print Setup tab, select Photo, the dpi settings, the paper type, the paper size, and select the Borderless check box. ...
... necessary to 24 hours, depending on the program or operating system). NOTE: In some programs, it exits the printer. www.dell.com | support.dell.com 5 On the Print Setup tab, select Photo, the dpi settings, the paper type, and paper size. The Printing Preferences dialog box opens. 5 On the... Print Setup tab, select Photo, the dpi settings, the paper type, the paper size, and select the Borderless check box. ...
Owner's Manual
Page 31
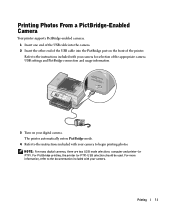
...Photo 964 3 Turn on the front of the appropriate camera USB settings and PictBridge connection and usage information. For more information, refer to the documentation included with your digital camera. NOTE: For many digital cameras, there are two USB mode selections: computer and printer (or PTP). The printer...included with your camera for selection of the printer. For PictBridge printing, the printer (or PTP) USB selection should be used. Refer to begin printing photos. Printing Photos From a PictBridge-Enabled Camera Your printer supports PictBridge-enabled cameras. 1 Insert one...
...Photo 964 3 Turn on the front of the appropriate camera USB settings and PictBridge connection and usage information. For more information, refer to the documentation included with your digital camera. NOTE: For many digital cameras, there are two USB mode selections: computer and printer (or PTP). The printer...included with your camera for selection of the printer. For PictBridge printing, the printer (or PTP) USB selection should be used. Refer to begin printing photos. Printing Photos From a PictBridge-Enabled Camera Your printer supports PictBridge-enabled cameras. 1 Insert one...
Owner's Manual
Page 32
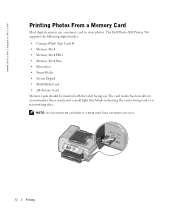
... a small light that blinks indicating the card is being read or is being read . The card reader has four slots to store photos. Data corruption can occur. The Dell Photo AIO Printer 964 supports the following digital media: • CompactFlash Type I and II • Memory Stick • Memory Stick PRO • Memory Stick Duo •...
... a small light that blinks indicating the card is being read or is being read . The card reader has four slots to store photos. Data corruption can occur. The Dell Photo AIO Printer 964 supports the following digital media: • CompactFlash Type I and II • Memory Stick • Memory Stick PRO • Memory Stick Duo •...


