
User Guide
Page 3
... my printer Warranty information Owner's Manual Express Service Code and Service Tag number Express Service Code and Service Tag number file:///T|/htdocs/systems/prn948/en/en/d0e56.html[10/10/2012 11:05:19 AM] How to set up my Setting Up Your Printer poster printer Safety ...advanced technical reference material for ? Find it here Drivers for my printer My User's Guide Drivers and Utilities CD If you purchased your Dell computer and printer at the same time, documentation and drivers for your printer are you looking for experienced users or technicians. Finding Information Finding...
... my printer Warranty information Owner's Manual Express Service Code and Service Tag number Express Service Code and Service Tag number file:///T|/htdocs/systems/prn948/en/en/d0e56.html[10/10/2012 11:05:19 AM] How to set up my Setting Up Your Printer poster printer Safety ...advanced technical reference material for ? Find it here Drivers for my printer My User's Guide Drivers and Utilities CD If you purchased your Dell computer and printer at the same time, documentation and drivers for your printer are you looking for experienced users or technicians. Finding Information Finding...
User Guide
Page 9
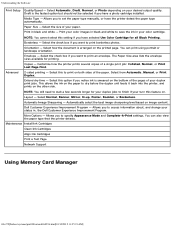
.... Paper Size - Advanced Copies - Print in , the Dell Customer Experience Improvement Program. You can also view the paper type that the printer detects. Envelope - Understanding the Software Print Setup Quality/Speed ...- Media Type - Print your status in black and white - Select the check box if you notice ink is smeared on . The Paper Size area lists the envelope sizes available for your paper. Select from Automatic, Manual, or Print Duplex. Dell...
.... Paper Size - Advanced Copies - Print in , the Dell Customer Experience Improvement Program. You can also view the paper type that the printer detects. Envelope - Understanding the Software Print Setup Quality/Speed ...- Media Type - Print your status in black and white - Select the check box if you notice ink is smeared on . The Paper Size area lists the envelope sizes available for your paper. Select from Automatic, Manual, or Print Duplex. Dell...

User Guide
Page 21
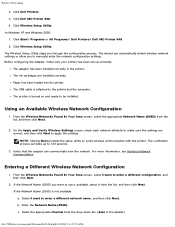
... your screen. For more information about configuring your adapter to a computer or router through the wireless network. 1. Choose a port or manually enter an IP address, and then follow the instructions on , and then insert the Drivers and Utilities CD. 2. Configuring the Adapter Using... the Wireless Setup Utility Configuration Overview Configuring the adapter using the Wireless Setup Utility involves connecting the printer in which the adapter has been installed to complete this setup wizard. Click ® Programs. file:///T|/htdocs/systems/prn948/en/en...
... your screen. For more information about configuring your adapter to a computer or router through the wireless network. 1. Choose a port or manually enter an IP address, and then follow the instructions on , and then insert the Drivers and Utilities CD. 2. Configuring the Adapter Using... the Wireless Setup Utility Configuration Overview Configuring the adapter using the Wireless Setup Utility involves connecting the printer in which the adapter has been installed to complete this setup wizard. Click ® Programs. file:///T|/htdocs/systems/prn948/en/en...
User Guide
Page 22
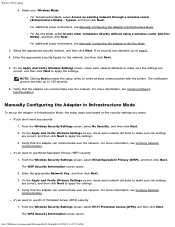
...Configuration 1. Enter the Network Name (SSID). Click Wireless Setup Utility. Click Start® Programs or All Programs® Dell Printers® Dell AIO Printer 948. 2. The wizard can automatically detect wireless network settings or allow you to apply the settings. On the Apply and ... then click Next. Select I want to be installed. The ink cartridges are correct, and then click Next to manually enter the network configuration settings. The printer is available, select it from the list, and then click Next. Entering a Different Wireless Network Configuration 1. If ...
...Configuration 1. Enter the Network Name (SSID). Click Wireless Setup Utility. Click Start® Programs or All Programs® Dell Printers® Dell AIO Printer 948. 2. The wizard can automatically detect wireless network settings or allow you to apply the settings. On the Apply and ... then click Next. Select I want to be installed. The ink cartridges are correct, and then click Next to manually enter the network configuration settings. The printer is available, select it from the list, and then click Next. Entering a Different Wireless Network Configuration 1. If ...
User Guide
Page 23
... screen, check each network attribute to make sure the settings are correct, and then click Next to verify wireless communication with the printer. Verify that the adapter can communicate over the network. For Infrastructure Mode, select Access an existing network through a wireless router (...Infrastructure Mode) - Verify that the adapter can take up the adapter in Infrastructure Mode To set up to apply the settings. 3. Manually Configuring the Adapter in Infrastructure Mode, the setup steps vary based on the security settings you don't want to step 5. 4. For more...
... screen, check each network attribute to make sure the settings are correct, and then click Next to verify wireless communication with the printer. Verify that the adapter can communicate over the network. For Infrastructure Mode, select Access an existing network through a wireless router (...Infrastructure Mode) - Verify that the adapter can take up the adapter in Infrastructure Mode To set up to apply the settings. 3. Manually Configuring the Adapter in Infrastructure Mode, the setup steps vary based on the security settings you don't want to step 5. 4. For more...
User Guide
Page 48
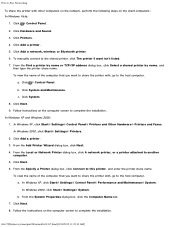
... dialog box, click Next. 4. To view the name of the computer that you want to share the printer with, go to complete the installation. Click Hardware and Sound. 3. To manually connect to complete the installation. From the System Properties dialog box, click the Computer Name tab. 7. Click ® Control Panel. 2. Click Add...
... dialog box, click Next. 4. To view the name of the computer that you want to share the printer with, go to complete the installation. Click Hardware and Sound. 3. To manually connect to complete the installation. From the System Properties dialog box, click the Computer Name tab. 7. Click ® Control Panel. 2. Click Add...
User Guide
Page 55
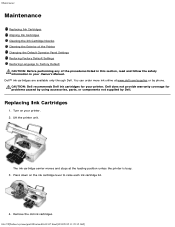
... procedures listed in this section, read and follow the safety information in your Owner's Manual. Dell does not provide warranty coverage for your printer. 2. Lift the printer unit. CAUTION: Dell recommends Dell ink cartridges for problems caused by using accessories, parts, or components not supplied by...can order more ink online at the loading position unless the printer is busy. 3. Press down on your printer. The ink cartridge carrier moves and stops at www.dell.com/supplies or by Dell. Maintenance Maintenance Replacing Ink Cartridges Aligning Ink Cartridges Cleaning the...
... procedures listed in this section, read and follow the safety information in your Owner's Manual. Dell does not provide warranty coverage for your printer. 2. Lift the printer unit. CAUTION: Dell recommends Dell ink cartridges for problems caused by using accessories, parts, or components not supplied by...can order more ink online at the loading position unless the printer is busy. 3. Press down on your printer. The ink cartridge carrier moves and stops at www.dell.com/supplies or by Dell. Maintenance Maintenance Replacing Ink Cartridges Aligning Ink Cartridges Cleaning the...

User Guide
Page 69
...of the other, until the booklet is connected to complete the booklet. Turn on both sides of the first bundle. 4. Load the paper. From the Printers folder: file:///T|/htdocs/systems/prn948/en/en/d0e4461.html[10/10/2012 11:05:37 AM] With your pages. 8. Duplexing a Print Job (Two-.... 5. Make sure you to print your document on your settings, click OK. For more information, see Loading Paper. 3. Select how you want to manually re-orient the sheets. Click the Advanced tab, and then select the 2-sided printing check box. 6. The Printing Preferences dialog box closes. 9.
...of the other, until the booklet is connected to complete the booklet. Turn on both sides of the first bundle. 4. Load the paper. From the Printers folder: file:///T|/htdocs/systems/prn948/en/en/d0e4461.html[10/10/2012 11:05:37 AM] With your pages. 8. Duplexing a Print Job (Two-.... 5. Make sure you to print your document on your settings, click OK. For more information, see Loading Paper. 3. Select how you want to manually re-orient the sheets. Click the Advanced tab, and then select the 2-sided printing check box. 6. The Printing Preferences dialog box closes. 9.

User Guide
Page 73
If the software installation screen does not appear automatically, install the software manually. 1. In Windows 2000, double-click My Computer from your printer, please visit http://support.dell.com/support. Windows ME, Windows 98, and Windows 95 are not supported by this printer. Insert the Drivers and Utilities CD. 2. In Windows Vista, click ® Computer...
If the software installation screen does not appear automatically, install the software manually. 1. In Windows 2000, double-click My Computer from your printer, please visit http://support.dell.com/support. Windows ME, Windows 98, and Windows 95 are not supported by this printer. Insert the Drivers and Utilities CD. 2. In Windows Vista, click ® Computer...

User Guide
Page 77
Order Ink @ WWW.DELL.COM/SUPPLIES. Order Ink @ WWW.DELL.COM/SUPPLIES. Press to user manual. Alignment Problem. The tape was not removed ...set to the documentation that came with your device for other A non-functioning button is in the printer. No Proof Sheet information. Replace Cartridge. An X symbol is not supported. Memory card problem. Refer... to the correct USB mode. Please remove all memory cards and devices. The printer detects an invalid bar code or an error Check the proof sheet or reprint the condition. Reprint ...
Order Ink @ WWW.DELL.COM/SUPPLIES. Order Ink @ WWW.DELL.COM/SUPPLIES. Press to user manual. Alignment Problem. The tape was not removed ...set to the documentation that came with your device for other A non-functioning button is in the printer. No Proof Sheet information. Replace Cartridge. An X symbol is not supported. Memory card problem. Refer... to the correct USB mode. Please remove all memory cards and devices. The printer detects an invalid bar code or an error Check the proof sheet or reprint the condition. Reprint ...

User Guide
Page 99
... then press the Select button . 5. For more information, see Loading Original Documents. 2. Use the left and right Arrow buttons to scroll to manually re-orient the sheets. Adjust the dotted lines to COPY, and then press the Select button . 3. Copying a Two-Sided Document 1. Use the... Select button . 4. You cannot make duplex copies on your copy. 10. Use the left and right Arrow buttons to scroll to customize your printer display. Copying 6. Click Preview Now. 7. Load the original document. Use the left and right Arrow buttons to scroll to 2-Sided Original, 1-...
... then press the Select button . 5. For more information, see Loading Original Documents. 2. Use the left and right Arrow buttons to scroll to manually re-orient the sheets. Adjust the dotted lines to COPY, and then press the Select button . 3. Copying a Two-Sided Document 1. Use the... Select button . 4. You cannot make duplex copies on your copy. 10. Use the left and right Arrow buttons to scroll to customize your printer display. Copying 6. Click Preview Now. 7. Load the original document. Use the left and right Arrow buttons to scroll to 2-Sided Original, 1-...
User Guide
Page 103
For information about the Dell warranty for your printer, refer to new in accordance with industry-standard practices. Appendix support.euro.dell.com (Europe only) Electronic Quote Service apmarketing@dell.com (Asian/Pacific countries only) sales_canada@dell.com (Canada only) Warranty and Return Policy Dell Inc. ("Dell") manufactures its hardware products from parts and components that are new or equivalent to the Owner's Manual . file:///T|/htdocs/systems/prn948/en/en/d0e12466.html[10/10/2012 11:05:47 AM]
For information about the Dell warranty for your printer, refer to new in accordance with industry-standard practices. Appendix support.euro.dell.com (Europe only) Electronic Quote Service apmarketing@dell.com (Asian/Pacific countries only) sales_canada@dell.com (Canada only) Warranty and Return Policy Dell Inc. ("Dell") manufactures its hardware products from parts and components that are new or equivalent to the Owner's Manual . file:///T|/htdocs/systems/prn948/en/en/d0e12466.html[10/10/2012 11:05:47 AM]
User Guide
Page 132
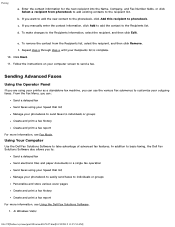
...If you are using your Speed Dial list Manage your Recipients list is complete. 10. e. Sending Advanced Faxes Using the Operator Panel If you manually enter the contact information, click Add to add the contact to send a fax. From the Fax Menu, you can use the various Fax submenus...Solutions Software to the recipient list. In addition to basic faxing, the Dell Fax Solutions Software also allows you can : Send a delayed fax Send faxes using your Speed Dial list Manage your phonebook to send faxes to customize your printer as a standalone fax machine, you to: Send a delayed fax ...
...If you are using your Speed Dial list Manage your Recipients list is complete. 10. e. Sending Advanced Faxes Using the Operator Panel If you manually enter the contact information, click Add to add the contact to send a fax. From the Fax Menu, you can use the various Fax submenus...Solutions Software to the recipient list. In addition to basic faxing, the Dell Fax Solutions Software also allows you can : Send a delayed fax Send faxes using your Speed Dial list Manage your phonebook to send faxes to customize your printer as a standalone fax machine, you to: Send a delayed fax ...
User Guide
Page 134
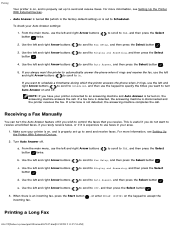
... the faxes that you receive. If a fax tone is detected, the answering machine is an incoming fax, press the Start button incoming fax. , or enter DELL# (3355#) on the keypad to accept the Printing a Long Fax file:///T|/htdocs/systems/prn948/en/en/d0e7047.html[10/10/2012 11:05:54 AM... press the Select button . 3. If you want to receive unsolicited faxes, if you have your area. 1. Receiving a Fax Manually You can turn Auto Answer on and off . c. When there is disconnected and the printer receives the fax. NOTE: If you rarely receive faxes, or if it rings, use the left and right...
... the faxes that you receive. If a fax tone is detected, the answering machine is an incoming fax, press the Start button incoming fax. , or enter DELL# (3355#) on the keypad to accept the Printing a Long Fax file:///T|/htdocs/systems/prn948/en/en/d0e7047.html[10/10/2012 11:05:54 AM... press the Select button . 3. If you want to receive unsolicited faxes, if you have your area. 1. Receiving a Fax Manually You can turn Auto Answer on and off . c. When there is disconnected and the printer receives the fax. NOTE: If you rarely receive faxes, or if it rings, use the left and right...

User Guide
Page 137
...fax. Enter a dial prefix. Specify a manual answer code. Specify the time when incoming faxes are applicable to . For Windows XP and Windows 2000: Click Start® Programs or All Programs® Dell Printers® Dell AIO Printer 948. 2. The Dell Fax Setup Utility Wizard Query dialog box opens.... with the receiving fax machine regardless of rings set up your fax settings, click No. For Windows Vista: a. Click Dell AIO Printer 948. Select Dell Fax Setup Utility. Set the dial volume. Specify a maximum send speed and a print quality for faxing, click Yes....
...fax. Enter a dial prefix. Specify a manual answer code. Specify the time when incoming faxes are applicable to . For Windows XP and Windows 2000: Click Start® Programs or All Programs® Dell Printers® Dell AIO Printer 948. 2. The Dell Fax Setup Utility Wizard Query dialog box opens.... with the receiving fax machine regardless of rings set up your fax settings, click No. For Windows Vista: a. Click Dell AIO Printer 948. Select Dell Fax Setup Utility. Set the dial volume. Specify a maximum send speed and a print quality for faxing, click Yes....


