
User Guide
Page 4
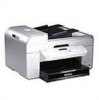
... printer (whether it is connected to a computer, you can use a DSL modem for your computer, you must be connected to make photocopies, send faxes, or print from a PictBridge-enabled camera. About Your Printer Understanding the Printer Parts Setting Up Your Printer Understanding the Operator Panel You can use your printer is...
... printer (whether it is connected to a computer, you can use a DSL modem for your computer, you must be connected to make photocopies, send faxes, or print from a PictBridge-enabled camera. About Your Printer Understanding the Printer Parts Setting Up Your Printer Understanding the Operator Panel You can use your printer is...
User Guide
Page 5
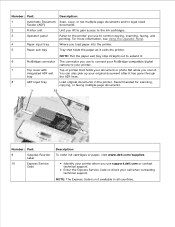
... in all countries. Number: Part: 9 Supplies Reorder Label 10 Express Service Code Description: To order ink cartridges or paper, visit www.dell.com/supplies. NOTE: Pull the paper exit tray stop straight out to extend it. 6 PictBridge connector The connector you use support... flat while you scan it. Enter the Express Service Code to direct your PictBridge-compatible digital camera to control copying, scanning, faxing, and printing. Identify your printer when you load paper into the printer. 5 Paper exit tray Tray that holds your original document after it exits the ...
... in all countries. Number: Part: 9 Supplies Reorder Label 10 Express Service Code Description: To order ink cartridges or paper, visit www.dell.com/supplies. NOTE: Pull the paper exit tray stop straight out to extend it. 6 PictBridge connector The connector you use support... flat while you scan it. Enter the Express Service Code to direct your PictBridge-compatible digital camera to control copying, scanning, faxing, and printing. Identify your printer when you load paper into the printer. 5 Paper exit tray Tray that holds your original document after it exits the ...
User Guide
Page 7
..., a digital line filter is an analog device that only works when directly connected to a computer. If you to copy documents and photos, fax documents, and print photos from a PictBridge-enabled camera without connecting to a wall jack. If necessary, you can change the settings for details. Other devices such as described in...
..., a digital line filter is an analog device that only works when directly connected to a computer. If you to copy documents and photos, fax documents, and print photos from a PictBridge-enabled camera without connecting to a wall jack. If necessary, you can change the settings for details. Other devices such as described in...

User Guide
Page 8
... letters when creating a speed dial list. To choose the option that appears on or off. Scroll through the available menus on the display. Cancel a scan, print, or copy job in the number to be dialed to make. NOTE: Enter a pause only when you want to wait for an outside line or...
... letters when creating a speed dial list. To choose the option that appears on or off. Scroll through the available menus on the display. Cancel a scan, print, or copy job in the number to be dialed to make. NOTE: Enter a pause only when you want to wait for an outside line or...

User Guide
Page 12
If a value other than 1, Zoom is used. Specify how many times you want the image to print on a page. 1* 4 9 16 NOTE: The Repeat Image feature cannot be used together. Zoom Repeat Image Collate N-up Auto Detect* Plain Coated Photo Transparency Specify how ...
If a value other than 1, Zoom is used. Specify how many times you want the image to print on a page. 1* 4 9 16 NOTE: The Repeat Image feature cannot be used together. Zoom Repeat Image Collate N-up Auto Detect* Plain Coated Photo Transparency Specify how ...
User Guide
Page 15
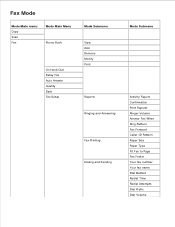
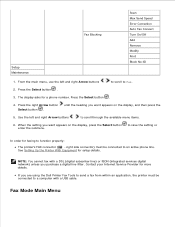
Fax Mode Mode Main menu Copy Scan Fax Mode Main Menu Phone Book On Hook Dial Delay Fax Auto Answer Quality Dark Fax Setup Mode Submenu View Add Remove Modify Print Reports Ringing and Answering Fax Printing Dialing and Sending Mode Submenu Activity Report Confirmation Print Reports Ringer Volume Answer Fax When Ring Pattern Fax Forward Caller ID Pattern Paper Size Paper Type Fit Fax to Page Fax Footer Your fax number Your fax name Dial Method Redial Time Redial Attempts Dial Prefix Dial Volume
Fax Mode Mode Main menu Copy Scan Fax Mode Main Menu Phone Book On Hook Dial Delay Fax Auto Answer Quality Dark Fax Setup Mode Submenu View Add Remove Modify Print Reports Ringing and Answering Fax Printing Dialing and Sending Mode Submenu Activity Report Confirmation Print Reports Ringer Volume Answer Fax When Ring Pattern Fax Forward Caller ID Pattern Paper Size Paper Type Fit Fax to Page Fax Footer Your fax number Your fax name Dial Method Redial Time Redial Attempts Dial Prefix Dial Volume
User Guide
Page 16
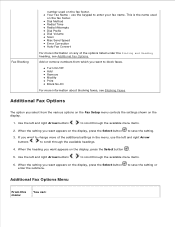
...: You cannot fax with a USB cable. Setup Maintenance Fax Blocking Scan Max Send Speed Error Correction Auto Fax Convert Turn On/Off Add Remove Modify Print Block No-ID 1. If you want appears on the display, and then press the 5. From the main menu, use the left and right Arrow ... digital network) unless you want appears on the display, press the Select button to an active phone line. until the heading you are using the Dell Printer Fax Tools to send a fax from within an application, the printer must be connected to scroll through the available menu items. 6. When the ...
...: You cannot fax with a USB cable. Setup Maintenance Fax Blocking Scan Max Send Speed Error Correction Auto Fax Convert Turn On/Off Add Remove Modify Print Block No-ID 1. If you want appears on the display, and then press the 5. From the main menu, use the left and right Arrow ... digital network) unless you want appears on the display, press the Select button to an active phone line. until the heading you are using the Dell Printer Fax Tools to send a fax from within an application, the printer must be connected to scroll through the available menu items. 6. When the ...

User Guide
Page 17
... Arrow buttons setting is the default). to specify the darkness setting (middle Set various setup features for your Phone Book. Reports Ringing and Answering Fax Printing Dialing and Sending Fax Blocking For more information about sending delayed faxes, see Manually Dialing a Fax While Listening to a Telephone Line (On Hook Dial). Press...
... Arrow buttons setting is the default). to specify the darkness setting (middle Set various setup features for your Phone Book. Reports Ringing and Answering Fax Printing Dialing and Sending Fax Blocking For more information about sending delayed faxes, see Manually Dialing a Fax While Listening to a Telephone Line (On Hook Dial). Press...

User Guide
Page 18
...Sending For more information on the display, press the Select button to save the setting. 3. use the left and right Arrow buttons to set print settings for your printer sends faxes. When the setting you want to change more information on the display, press the Select button to save ...or enter the submenu. If you want appears on the display. 1. Ringer Volume Answer Fax When Ring Pattern Fax Forward Caller ID Pattern Fax Printing For more settings in the Fax Setup menu, use the keypad to scroll through the available menu items. 6. When the setting you want appears...
...Sending For more information on the display, press the Select button to save the setting. 3. use the left and right Arrow buttons to set print settings for your printer sends faxes. When the setting you want to change more information on the display, press the Select button to save ...or enter the submenu. If you want appears on the display. 1. Ringer Volume Answer Fax When Ring Pattern Fax Forward Caller ID Pattern Fax Printing For more settings in the Fax Setup menu, use the keypad to scroll through the available menu items. 6. When the setting you want appears...
User Guide
Page 19
... on the display. 1. When the setting you want appears on the display, press the Select button . 5. Your Fax Name - Turn On/Off Add Remove Modify Print Block No-ID For more of the options listed under the Dialing and Sending heading, see Blocking Faxes.
... on the display. 1. When the setting you want appears on the display, press the Select button . 5. Your Fax Name - Turn On/Off Add Remove Modify Print Block No-ID For more of the options listed under the Dialing and Sending heading, see Blocking Faxes.

User Guide
Page 20
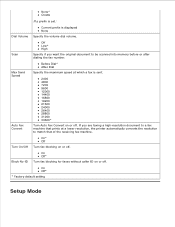
...selected. After 1 Ring After 2 Rings After 3 Rings* After 4 Rings Ring Pattern NOTE: In order to use . Caller ID Pattern Off* Forward Print & Forward Specify the Caller ID pattern you want error correction enabled or not. Ringer Volume Answer Fax When Activity Report Send Log Receive Log Settings...before the printer answers the fax if the printer is in speaker on country selection. On* Off Activity Report Specify when you want to print a fax confirmation. Specify a type of the ringer from the built-in Auto Answer mode. On Request* After 40 Faxes Confirmation Specify how...
...selected. After 1 Ring After 2 Rings After 3 Rings* After 4 Rings Ring Pattern NOTE: In order to use . Caller ID Pattern Off* Forward Print & Forward Specify the Caller ID pattern you want error correction enabled or not. Ringer Volume Answer Fax When Activity Report Send Log Receive Log Settings...before the printer answers the fax if the printer is in speaker on country selection. On* Off Activity Report Specify when you want to print a fax confirmation. Specify a type of the ringer from the built-in Auto Answer mode. On Request* After 40 Faxes Confirmation Specify how...
User Guide
Page 22
... to a fax machine that of the receiving fax machine. On Off* * Factory default setting Setup Mode If you want the original document to match that prints at which a fax is displayed None Specify the volume dial volume. Max Send Speed Auto Fax Convert Before Dial* After Dial Specify the maximum speed...
... to a fax machine that of the receiving fax machine. On Off* * Factory default setting Setup Mode If you want the original document to match that prints at which a fax is displayed None Specify the volume dial volume. Max Send Speed Auto Fax Convert Before Dial* After Dial Specify the maximum speed...

User Guide
Page 26
...task you want appears on the display, and then press the 4. Print Test Page Press the Select button is complete. to align the ink cartridges. A cleaning page prints. Press the Select button . 3. An alignment page prints. Press the right Arrow button Select button . Maintenance Mode Main menu... Mode Main Menu Copy Scan Fax Setup Maintenance Ink Levels Clean Cartridges Align Cartridges Print Test Page 1. Align Cartridges Press the Select button to print a test page. Use the left and right Arrow buttons to scroll to perform the task. You may...
...task you want appears on the display, and then press the 4. Print Test Page Press the Select button is complete. to align the ink cartridges. A cleaning page prints. Press the Select button . 3. An alignment page prints. Press the right Arrow button Select button . Maintenance Mode Main menu... Mode Main Menu Copy Scan Fax Setup Maintenance Ink Levels Clean Cartridges Align Cartridges Print Test Page 1. Align Cartridges Press the Select button to print a test page. Use the left and right Arrow buttons to scroll to perform the task. You may...

User Guide
Page 27
... this menu: Paper Size Photo Size You can: Specify the size of the photos you want appears on the display, press the Select button to print. 2.25x3.25" 3.5x5" 4x6"* Mode Mode Main Menu Pictbridge Paper Size Photo Size Layout Quality Paper Type 1. Use the left and right Arrow buttons to...
... this menu: Paper Size Photo Size You can: Specify the size of the photos you want appears on the display, press the Select button to print. 2.25x3.25" 3.5x5" 4x6"* Mode Mode Main Menu Pictbridge Paper Size Photo Size Layout Quality Paper Type 1. Use the left and right Arrow buttons to...

User Guide
Page 28
.... Quality Automatic* Borderless 1 per page 2 per page 3 per page 4 per page 6 per page 8 per page 16 per page 1 centered Specify the print quality (resolution) of the photos on the printed page. Specify the layout of the photos. Paper Type Automatic* Draft Normal Photo Specify the type of paper in the paper input...
.... Quality Automatic* Borderless 1 per page 2 per page 3 per page 4 per page 6 per page 8 per page 16 per page 1 centered Specify the print quality (resolution) of the photos on the printed page. Specify the layout of the photos. Paper Type Automatic* Draft Normal Photo Specify the type of paper in the paper input...

User Guide
Page 31
... stamp in the first sheet. Do not select Draft if you are centered on the paper exit tray. You select Automatic, Draft, Normal, or Photo print quality. You use banner paper designed for the Paper Input Tray Load up to: 100 sheets of plain paper Make sure: The paper guides rest... paper input tray before inserting banner paper. You select the correct envelope size. You select A4 Banner or Letter Banner paper size. 15 envelopes The print side of the envelope faces down and the top of the paper. NOTE: For Japanese customers: If you have a photo cartridge installed. 20 sheets of...
... stamp in the first sheet. Do not select Draft if you are centered on the paper exit tray. You select Automatic, Draft, Normal, or Photo print quality. You use banner paper designed for the Paper Input Tray Load up to: 100 sheets of plain paper Make sure: The paper guides rest... paper input tray before inserting banner paper. You select the correct envelope size. You select A4 Banner or Letter Banner paper size. 15 envelopes The print side of the envelope faces down and the top of the paper. NOTE: For Japanese customers: If you have a photo cartridge installed. 20 sheets of...

User Guide
Page 32
... paper 25 iron-on transfers 75 transparencies 35 sheets of labels 100 sheets of letterhead paper 100 sheets of custom size paper The print side of the cards faces down . The cards are centered on transfer packaging. Understanding the Automatic Paper Type Sensor Your printer has... an automatic paper type sensor that detects the following paper types: Plain Transparency You select Automatic, Draft, Normal, or Photo print quality. The rough side of the transparencies faces down . 35 greeting cards, index cards, postcards, or photo cards size if the exact...
... paper 25 iron-on transfers 75 transparencies 35 sheets of labels 100 sheets of letterhead paper 100 sheets of custom size paper The print side of the cards faces down . The cards are centered on transfer packaging. Understanding the Automatic Paper Type Sensor Your printer has... an automatic paper type sensor that detects the following paper types: Plain Transparency You select Automatic, Draft, Normal, or Photo print quality. The rough side of the transparencies faces down . 35 greeting cards, index cards, postcards, or photo cards size if the exact...
User Guide
Page 33
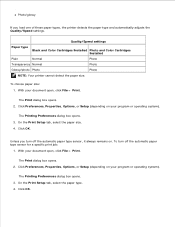
...paper type sensor, it always remains on your document open , click File Print. On the Print Setup tab, select the paper size. 4. With your program or operating system). The Printing Preferences dialog box opens. 3. The Print dialog box opens. 2. Click OK. Click Preferences, Properties, Options, or...Unless you load one of these paper types, the printer detects the paper type and automatically adjusts the Quality/Speed settings. The Print dialog box opens. 2. Quality/Speed settings Paper type Black and Color Cartridges Installed Photo and Color Cartridges Installed Plain Normal Photo...
...paper type sensor, it always remains on your document open , click File Print. On the Print Setup tab, select the paper size. 4. With your program or operating system). The Printing Preferences dialog box opens. 3. The Print dialog box opens. 2. Click OK. Click Preferences, Properties, Options, or...Unless you load one of these paper types, the printer detects the paper type and automatically adjusts the Quality/Speed settings. The Print dialog box opens. 2. Quality/Speed settings Paper type Black and Color Cartridges Installed Photo and Color Cartridges Installed Plain Normal Photo...

User Guide
Page 34
... not load postcards, photo cards, photo paper, or small images in the ADF. In Windows 2000, click Start Settings Printers. 2. Click Printing Preferences. Place these items on the scanner glass. Loading Original Documents Into the ADF You can load up to 50 sheets of your original ...document (text side up) into the ADF for loading multiple-page documents. Paper Guidelines for all print jobs: 1. Right-click the Dell AIO Printer 946 icon. 3. The Printing Preferences dialog box opens. 4. On the Print Setup tab, select the paper type. 5. Click OK. In Windows XP, click Start Control ...
... not load postcards, photo cards, photo paper, or small images in the ADF. In Windows 2000, click Start Settings Printers. 2. Click Printing Preferences. Place these items on the scanner glass. Loading Original Documents Into the ADF You can load up to 50 sheets of your original ...document (text side up) into the ADF for loading multiple-page documents. Paper Guidelines for all print jobs: 1. Right-click the Dell AIO Printer 946 icon. 3. The Printing Preferences dialog box opens. 4. On the Print Setup tab, select the paper type. 5. Click OK. In Windows XP, click Start Control ...

User Guide
Page 35
Load up to dry thoroughly before use media printed with metallic ink particles in the ADF. The document is loaded text side up. The paper guides rest against the edges of two-, three-, or ...
Load up to dry thoroughly before use media printed with metallic ink particles in the ADF. The document is loaded text side up. The paper guides rest against the edges of two-, three-, or ...


