Owner's Manual
Page 6
... Scanned Image or Document 32 Enlarging or Reducing Images or Documents 33 Faxing 33 Sending a Fax 34 Installing Microsoft Fax in Windows XP 34 Configuring Microsoft Fax 35 Changing the Fax Configuration 36 3 Understanding the Software Understanding the Printer Software 38 Using the Dell Printer Solution Center 38 Using the Dell All-In-One Center 39 Using Print Properties 40 Using Dell Picture Studio v2.0 41 4 Ink Cartridge Maintenance Replacing Ink Cartridges 44 Aligning Ink Cartridges 47 Cleaning the Ink Cartridge Nozzles 48 5 Troubleshooting Troubleshooting 52 Setup Problems...
... Scanned Image or Document 32 Enlarging or Reducing Images or Documents 33 Faxing 33 Sending a Fax 34 Installing Microsoft Fax in Windows XP 34 Configuring Microsoft Fax 35 Changing the Fax Configuration 36 3 Understanding the Software Understanding the Printer Software 38 Using the Dell Printer Solution Center 38 Using the Dell All-In-One Center 39 Using Print Properties 40 Using Dell Picture Studio v2.0 41 4 Ink Cartridge Maintenance Replacing Ink Cartridges 44 Aligning Ink Cartridges 47 Cleaning the Ink Cartridge Nozzles 48 5 Troubleshooting Troubleshooting 52 Setup Problems...
Owner's Manual
Page 13
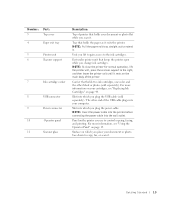
... printer before connecting the power cable into which you plug the USB cable (sold separately). Unit you change ink cartridges. Carrier that holds two ink cartridges, one color and the other end of the USB cable plugs into which you place your document or photo face down to the ink cartridges. For more information, see "Replacing Ink Cartridges" on which you use to extend it. Getting Started 13 Number: 3 Part: Top cover 4 Paper exit tray 5 Printer unit 6 Scanner support 7 Ink cartridge carrier 8 USB connector 9 Power connector 10 Operator panel 11 Scanner...
... printer before connecting the power cable into which you plug the USB cable (sold separately). Unit you change ink cartridges. Carrier that holds two ink cartridges, one color and the other end of the USB cable plugs into which you place your document or photo face down to the ink cartridges. For more information, see "Replacing Ink Cartridges" on which you use to extend it. Getting Started 13 Number: 3 Part: Top cover 4 Paper exit tray 5 Printer unit 6 Scanner support 7 Ink cartridge carrier 8 USB connector 9 Power connector 10 Operator panel 11 Scanner...
Owner's Manual
Page 14
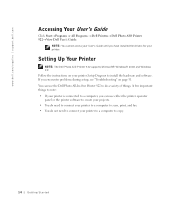
... Started Follow the instructions on page 51. You can use the Dell Photo All-In-One Printer 922 to do not need to connect your printer Setup Diagram to scan, print, and fax. • You do a variety of things. NOTE: You cannot access your printer. Setting Up Your Printer NOTE: The Dell Photo AIO Printer 922 supports Microsoft® Windows® 2000 and Windows XP. If you have installed the drivers for your User's Guide until you encounter problems during setup, see "Troubleshooting...
... Started Follow the instructions on page 51. You can use the Dell Photo All-In-One Printer 922 to do not need to connect your printer Setup Diagram to scan, print, and fax. • You do a variety of things. NOTE: You cannot access your printer. Setting Up Your Printer NOTE: The Dell Photo AIO Printer 922 supports Microsoft® Windows® 2000 and Windows XP. If you have installed the drivers for your User's Guide until you encounter problems during setup, see "Troubleshooting...
Owner's Manual
Page 16
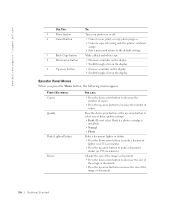
... number of the image or document. 16 Getting Started www.dell.com/supplies | support.dell.com Use the: To: 5 Power button Turn your printer on the display. From this menu: Copies Quality Dark (Lighter/Darker) Resize You can: • Press the down arrow button to make a document darker (in progress. • Cancel a copy job (using only the printer) and eject a page. • Exit a menu and return to increase the size of copies. Operator Panel Menus When you press the Menu button...
... number of the image or document. 16 Getting Started www.dell.com/supplies | support.dell.com Use the: To: 5 Power button Turn your printer on the display. From this menu: Copies Quality Dark (Lighter/Darker) Resize You can: • Press the down arrow button to make a document darker (in progress. • Cancel a copy job (using only the printer) and eject a page. • Exit a menu and return to increase the size of copies. Operator Panel Menus When you press the Menu button...

Owner's Manual
Page 26
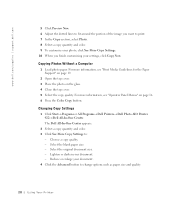
..., see "Loading Paper" on page 18. 3 Open the top cover. 4 Place the item you can use the printer operator panel or your project. For easy one-touch color or black and white copies, press Color Copy or Black Copy on page 16. For more information, see "Changing Copy Settings" on the printer. NOTE: If you want to print a photo, print on an envelope, print a banner, make more printing ideas. 4 Follow the instructions on the screen to select the number of the item aligns with...
..., see "Loading Paper" on page 18. 3 Open the top cover. 4 Place the item you can use the printer operator panel or your project. For easy one-touch color or black and white copies, press Color Copy or Black Copy on page 16. For more information, see "Changing Copy Settings" on the printer. NOTE: If you want to print a photo, print on an envelope, print a banner, make more printing ideas. 4 Follow the instructions on the screen to select the number of the item aligns with...
Owner's Manual
Page 28
Changing Copy Settings 1 Click Start→ Programs or All Programs→ Dell Printers→ Dell Photo AIO Printer 922→ Dell All-In-One Center. Select the original document size. - Select the blank paper size. - Reduce or enlarge your settings, click Copy Now. For more information, see "Print Media Guidelines for the Paper Support" on page 19. 2 Open the top cover. 3 Place the photo on page 16. 6 Press the Color Copy button. Choose a copy quality. - Copying Photos Without a Computer 1 Load photo paper. www.dell.com/supplies | support.dell.com 5 Click Preview Now. ...
Changing Copy Settings 1 Click Start→ Programs or All Programs→ Dell Printers→ Dell Photo AIO Printer 922→ Dell All-In-One Center. Select the original document size. - Select the blank paper size. - Reduce or enlarge your settings, click Copy Now. For more information, see "Print Media Guidelines for the Paper Support" on page 19. 2 Open the top cover. 3 Place the photo on page 16. 6 Press the Color Copy button. Choose a copy quality. - Copying Photos Without a Computer 1 Load photo paper. www.dell.com/supplies | support.dell.com 5 Click Preview Now. ...
Owner's Manual
Page 30
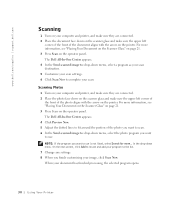
... the photo aligns with the arrow on the printer. The Dell All-In-One Center appears. 4 In the Send scanned image to: drop-down menu, select a program as your scan destination. 5 Customize your program to use is not listed, select Search for more information, see "Placing Your Document on the Scanner Glass" on page 21. 3 Press Scan on the printer. Scanning Photos 1 Turn on your computer and printer, and make sure they are connected. 2 Place the photo...
... the photo aligns with the arrow on the printer. The Dell All-In-One Center appears. 4 In the Send scanned image to: drop-down menu, select a program as your scan destination. 5 Customize your program to use is not listed, select Search for more information, see "Placing Your Document on the Scanner Glass" on page 21. 3 Press Scan on the printer. Scanning Photos 1 Turn on your computer and printer, and make sure they are connected. 2 Place the photo...
Owner's Manual
Page 33
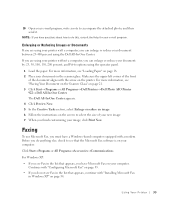
... see Fax in Windows XP" on page 21. 3 Click Start→ Programs or All Programs→ Dell Printers→ Dell Photo AIO Printer 922→ Dell All-In-One Center. Make sure the upper left corner of the front of your new image. 7 When you have a Windows-based computer equipped with "Installing Microsoft Fax in the list that appears, continue with a modem. For Windows XP: • If you must have Microsoft Fax on page 18...
... see Fax in Windows XP" on page 21. 3 Click Start→ Programs or All Programs→ Dell Printers→ Dell Photo AIO Printer 922→ Dell All-In-One Center. Make sure the upper left corner of the front of your new image. 7 When you have a Windows-based computer equipped with "Installing Microsoft Fax in the list that appears, continue with a modem. For Windows XP: • If you must have Microsoft Fax on page 18...
Owner's Manual
Page 34
...-One Center you must have DSL, you can send single or multiple page faxes. 1 Turn on the screen. If you want to an active analog phone line. Under Pick a Category, click Add or Remove Programs. The Add or Remove Programs dialog box opens. 2 Click Add/Remove Windows Components. 3 In the Components list, click to send a multiple page fax, click Advanced→Scan multiple items before output→OK. www.dell.com/supplies | support.dell.com For Windows 2000, Fax Service Management is connected to send a single page fax...
...-One Center you must have DSL, you can send single or multiple page faxes. 1 Turn on the screen. If you want to an active analog phone line. Under Pick a Category, click Add or Remove Programs. The Add or Remove Programs dialog box opens. 2 Click Add/Remove Windows Components. 3 In the Components list, click to send a multiple page fax, click Advanced→Scan multiple items before output→OK. www.dell.com/supplies | support.dell.com For Windows 2000, Fax Service Management is connected to send a single page fax...
Owner's Manual
Page 35
... Please select the fax device list. 5 If you want to disable the sending of faxes, click to clear the Enable Send check box. 6 Click the Manual answer button or Automatically answer after (user-defined number of the faxes you send and identifies your fax machine to the person who receives your faxes. When you select this check box, select the Dell Photo AIO Printer 922 to print the received fax. 14 Click to select the Store a copy in the...
... Please select the fax device list. 5 If you want to disable the sending of faxes, click to clear the Enable Send check box. 6 Click the Manual answer button or Automatically answer after (user-defined number of the faxes you send and identifies your fax machine to the person who receives your faxes. When you select this check box, select the Dell Photo AIO Printer 922 to print the received fax. 14 Click to select the Store a copy in the...
Owner's Manual
Page 38
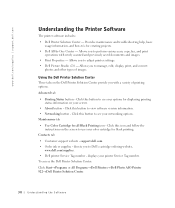
...Dell printer Service Tag number - Advanced tab • Printing Status button - Click this icon and follow the instructions on the Dell Printer Solution Center provide you with newly scanned and previously saved documents and images. • Print Properties - Maintenance tab • Use Color Cartridge for creating projects. • Dell All-In-One Center - displays your options for black printing. Using the Dell Printer Solution Center Three tabs on the screen to see your screen. • About button - Contacts tab • Customer support website - Click this button...
...Dell printer Service Tag number - Advanced tab • Printing Status button - Click this icon and follow the instructions on the Dell Printer Solution Center provide you with newly scanned and previously saved documents and images. • Print Properties - Maintenance tab • Use Color Cartridge for creating projects. • Dell All-In-One Center - displays your options for black printing. Using the Dell Printer Solution Center Three tabs on the screen to see your screen. • About button - Contacts tab • Customer support website - Click this button...
Owner's Manual
Page 39
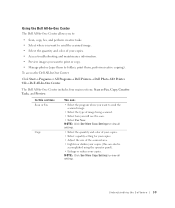
... maintenance information. • Preview images you want to send the scanned image. • Select the type of the scanned area. • Lighten or darken your copies (this section: Scan or Fax Copy You can also be accomplished using the operator panel). • Enlarge or reduce your copies. NOTE: Click See More Scan Settings to view all settings. To access the Dell All-In-One Center: Click Start→ Programs or All Programs→ Dell Printers→ Dell Photo AIO Printer 922...
... maintenance information. • Preview images you want to send the scanned image. • Select the type of the scanned area. • Lighten or darken your copies (this section: Scan or Fax Copy You can also be accomplished using the operator panel). • Enlarge or reduce your copies. NOTE: Click See More Scan Settings to view all settings. To access the Dell All-In-One Center: Click Start→ Programs or All Programs→ Dell Printers→ Dell Photo AIO Printer 922...

Owner's Manual
Page 40
... Printers folder become the default settings for most programs. 40 Understanding the Software The Print Properties screen appears. In Windows 2000, click Start→ Settings→ Printers. 2 Right-click on the program or operating system). www.dell.com/supplies | support.dell.com In this section: Creative Tasks Preview You can change the various printer settings. To access Print Properties when a document is not open , click File→ Print. For more information about the Dell All-In-One Center, click Help...
... Printers folder become the default settings for most programs. 40 Understanding the Software The Print Properties screen appears. In Windows 2000, click Start→ Settings→ Printers. 2 Right-click on the program or operating system). www.dell.com/supplies | support.dell.com In this section: Creative Tasks Preview You can change the various printer settings. To access Print Properties when a document is not open , click File→ Print. For more information about the Dell All-In-One Center, click Help...

Owner's Manual
Page 41
..., create, or print photos. Automatic Image Sharpening - Layout - Select Normal, Banner, Borderless, Mirror, N-up, Poster, or Booklet. Multiple Copies - Orientation - Select how the document is the fastest option but should not be selected if you have a photo cartridge installed. You can change these settings: Quality/Speed - From this setting if you have selected Color Cartridge for all Black Printing. Customize how the printer prints several photocopies of paper. Automatically select the...
..., create, or print photos. Automatic Image Sharpening - Layout - Select Normal, Banner, Borderless, Mirror, N-up, Poster, or Booklet. Multiple Copies - Orientation - Select how the document is the fastest option but should not be selected if you have a photo cartridge installed. You can change these settings: Quality/Speed - From this setting if you have selected Color Cartridge for all Black Printing. Customize how the printer prints several photocopies of paper. Automatically select the...
Owner's Manual
Page 53
... screen. Removing and Reinstalling Software If your printer does not function properly or communication error messages appear when using your printer, you can remove and reinstall the printer software. 1 Click Start→Programs or All Programs→Dell Printers→Dell Photo AIO Printer 922→ Uninstall Dell AIO Printer 922. 2 Follow the instructions on your desktop. If the installation screen does not appear: a In Windows XP, click Start→My Computer. SET YOUR PRINTER AS THE DEFAULT PRINTER - b Double-click the CD-ROM drive...
... screen. Removing and Reinstalling Software If your printer does not function properly or communication error messages appear when using your printer, you can remove and reinstall the printer software. 1 Click Start→Programs or All Programs→Dell Printers→Dell Photo AIO Printer 922→ Uninstall Dell AIO Printer 922. 2 Follow the instructions on your desktop. If the installation screen does not appear: a In Windows XP, click Start→My Computer. SET YOUR PRINTER AS THE DEFAULT PRINTER - b Double-click the CD-ROM drive...

Owner's Manual
Page 56
... the printer. 4 Close the printer unit, turn on your computer • Follow the instructions on the screen for clearing the paper jam. Using your printer only If the paper jam is not visible: 1 Turn off your printer. 2 Firmly grasp the paper and gently pull it open. 3 Gently pull the paper from the printer. 3 Turn on the printer, and print the document again. 56 Troubleshooting www.dell.com/supplies | support.dell.com CHECK FOR A PAPER JAM Using your printer and your printer and print the document...
... the printer. 4 Close the printer unit, turn on your computer • Follow the instructions on the screen for clearing the paper jam. Using your printer only If the paper jam is not visible: 1 Turn off your printer. 2 Firmly grasp the paper and gently pull it open. 3 Gently pull the paper from the printer. 3 Turn on the printer, and print the document again. 56 Troubleshooting www.dell.com/supplies | support.dell.com CHECK FOR A PAPER JAM Using your printer and your printer and print the document...
Owner's Manual
Page 58
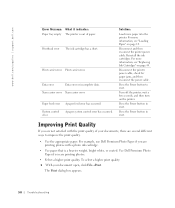
... Power button to reset. www.dell.com/supplies | support.dell.com Error Message: What it indicates: Paper tray empty The printer is a heavier weight, bright white, or coated. Print carrier error Print carrier error. Disconnect and then reconnect the printer power cable. Disconnect the printer power cable, check for paper jams, and then reconnect the power cable. Improving Print Quality If you are printing photos with the print quality of paper. Scan carrier error Scan carrier error. For more information, see "Replacing Ink Cartridges" on the printer. For example, use...
... Power button to reset. www.dell.com/supplies | support.dell.com Error Message: What it indicates: Paper tray empty The printer is a heavier weight, bright white, or coated. Print carrier error Print carrier error. Disconnect and then reconnect the printer power cable. Disconnect the printer power cable, check for paper jams, and then reconnect the power cable. Improving Print Quality If you are printing photos with the print quality of paper. Scan carrier error Scan carrier error. For more information, see "Replacing Ink Cartridges" on the printer. For example, use...

Owner's Manual
Page 74
...) International Access Code: 00 Country Code: 60 City Code: 4 Website: support.euro.dell.com E-mail: tech_be@dell.com Technical Support (Brussels, Belgium) Home/Small Business Sales (Brussels, Belgium) Corporate Sales (Brussels, Belgium) Customer Care (Brussels, Belgium) Fax (Brussels, Belgium) Switchboard (Brussels, Belgium) Technical Support Customer Service (Penang, Malaysia) Transaction Sales Technical Support Customer Service Transaction Sales Corporate Sales Area Codes, Local Numbers, and Toll-Free Numbers 512...
...) International Access Code: 00 Country Code: 60 City Code: 4 Website: support.euro.dell.com E-mail: tech_be@dell.com Technical Support (Brussels, Belgium) Home/Small Business Sales (Brussels, Belgium) Corporate Sales (Brussels, Belgium) Customer Care (Brussels, Belgium) Fax (Brussels, Belgium) Switchboard (Brussels, Belgium) Technical Support Customer Service (Penang, Malaysia) Transaction Sales Technical Support Customer Service Transaction Sales Corporate Sales Area Codes, Local Numbers, and Toll-Free Numbers 512...
Owner's Manual
Page 105
..., 16 Power, 16 Scan, 15 up arrow, 16 C Cancel button, 16 cards loading, 20 cartridges, ink aligning, 47 replacing, 44 cleaning ink cartridge nozzles, 48 Color Copy button, 15 copies, 26 copying operator panel, 26 software, 27 D Dell contacting, 63 Dell All-In-One Center accessing, 39 Copy section, 39 Creative Tasks section, 40 Preview section, 40 Scan section, 39 using, 39 Dell Picture Studio v2.0 using, 41 Dell Printer Solution Center accessing, 38 using, 38 Blinking Power button, 57 Data error, 58 Ink Low Alert, 57 Paper feed, 58 Paper jam, 57 Paper tray empty, 58 Print carrier...
..., 16 Power, 16 Scan, 15 up arrow, 16 C Cancel button, 16 cards loading, 20 cartridges, ink aligning, 47 replacing, 44 cleaning ink cartridge nozzles, 48 Color Copy button, 15 copies, 26 copying operator panel, 26 software, 27 D Dell contacting, 63 Dell All-In-One Center accessing, 39 Copy section, 39 Creative Tasks section, 40 Preview section, 40 Scan section, 39 using, 39 Dell Picture Studio v2.0 using, 41 Dell Printer Solution Center accessing, 38 using, 38 Blinking Power button, 57 Data error, 58 Ink Low Alert, 57 Paper feed, 58 Paper jam, 57 Paper tray empty, 58 Print carrier...

Owner's Manual
Page 106
... control, 58 multiple copies, 41 106 Index N nozzles, ink cartridge cleaning, 48 O operator panel copying with, 26 using, 15 P paper exit tray, 12 Paper jam message, 57 Paper out message, 58 Paper Setup tab, 41 paper type sensor, 17 turning off, 17 photo cards loading, 20 photo paper loading, 20 photos printing, 24 postcards loading, 20 Print Layout tab, 41 Print Properties accessing, 40 Paper Setup tab, 41 Print Layout tab, 41 Quality/Copies tab, 41 problems drives, 52 Q Quality/Copies tab, 41 S safety information, 9 Scan button, 15 software Dell All-In-One Center, 39 Dell Printer Solution...
... control, 58 multiple copies, 41 106 Index N nozzles, ink cartridge cleaning, 48 O operator panel copying with, 26 using, 15 P paper exit tray, 12 Paper jam message, 57 Paper out message, 58 Paper Setup tab, 41 paper type sensor, 17 turning off, 17 photo cards loading, 20 photo paper loading, 20 photos printing, 24 postcards loading, 20 Print Layout tab, 41 Print Properties accessing, 40 Paper Setup tab, 41 Print Layout tab, 41 Quality/Copies tab, 41 problems drives, 52 Q Quality/Copies tab, 41 S safety information, 9 Scan button, 15 software Dell All-In-One Center, 39 Dell Printer Solution...


