Owner's Manual
Page 2
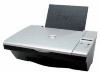
... 231622 64 21 4220710 800-858-0888 866 851 1760 902120385 08 587 705 81 0848 801 888 0870 907 4574 Your printer has been designed to warn you of low ink levels. Ordering Ink Cartridges and Supplies Your Dell™ Photo All-In-One Printer 922 includes software installed to detect the ink levels in the...
... 231622 64 21 4220710 800-858-0888 866 851 1760 902120385 08 587 705 81 0848 801 888 0870 907 4574 Your printer has been designed to warn you of low ink levels. Ordering Ink Cartridges and Supplies Your Dell™ Photo All-In-One Printer 922 includes software installed to detect the ink levels in the...
Owner's Manual
Page 6
Scanning 30 Scanning Photos 30 Scanning Multiple Pages or Images 31 Editing Scanned Text Using Optical Character Recognition (OCR) 31 Saving an Image on Your Computer 32 E-mailing a ... Fax Configuration 36 3 Understanding the Software Understanding the Printer Software 38 Using the Dell Printer Solution Center 38 Using the Dell All-In-One Center 39 Using Print Properties 40 Using Dell Picture Studio v2.0 41 4 Ink Cartridge Maintenance Replacing Ink Cartridges 44 Aligning Ink Cartridges 47 Cleaning the Ink Cartridge Nozzles 48 5 Troubleshooting Troubleshooting 52 Setup Problems 52...
Scanning 30 Scanning Photos 30 Scanning Multiple Pages or Images 31 Editing Scanned Text Using Optical Character Recognition (OCR) 31 Saving an Image on Your Computer 32 E-mailing a ... Fax Configuration 36 3 Understanding the Software Understanding the Printer Software 38 Using the Dell Printer Solution Center 38 Using the Dell All-In-One Center 39 Using Print Properties 40 Using Dell Picture Studio v2.0 41 4 Ink Cartridge Maintenance Replacing Ink Cartridges 44 Aligning Ink Cartridges 47 Cleaning the Ink Cartridge Nozzles 48 5 Troubleshooting Troubleshooting 52 Setup Problems 52...

Owner's Manual
Page 7
... 88 "Total Satisfaction" Return Policy (Canada Only 92 Dell Software and Peripherals (Canada Only 93 1-Year End-User Manufacturer Guarantee (Latin America and the Caribbean Only 94 Dell Inc. Only 82 "Total Satisfaction" Return Policy (U.S. Ink and Toner Cartridges Limited Warranties 97 Ink and Toner Cartridges Limited Warranty (U.S. Only 86 Limited Warranty Terms for...
... 88 "Total Satisfaction" Return Policy (Canada Only 92 Dell Software and Peripherals (Canada Only 93 1-Year End-User Manufacturer Guarantee (Latin America and the Caribbean Only 94 Dell Inc. Only 82 "Total Satisfaction" Return Policy (U.S. Ink and Toner Cartridges Limited Warranties 97 Ink and Toner Cartridges Limited Warranty (U.S. Only 86 Limited Warranty Terms for...
Owner's Manual
Page 13
... which you plug the USB cable (sold separately). Part under printer unit that holds two ink cartridges, one color and the other end of the printer. NOTE: To close the printer for normal operation, lift the printer unit, press the scanner support to the right, and then .... The other black or photo (sold separately). Panel on page 15. For more information on your cartridges, see "Using the Operator Panel" on the printer you use to the ink cartridges. Number: 3 Part: Top cover 4 Paper exit tray 5 Printer unit 6 Scanner support 7 Ink cartridge carrier 8 USB connector 9...
... which you plug the USB cable (sold separately). Part under printer unit that holds two ink cartridges, one color and the other end of the printer. NOTE: To close the printer for normal operation, lift the printer unit, press the scanner support to the right, and then .... The other black or photo (sold separately). Panel on page 15. For more information on your cartridges, see "Using the Operator Panel" on the printer you use to the ink cartridges. Number: 3 Part: Top cover 4 Paper exit tray 5 Printer unit 6 Scanner support 7 Ink cartridge carrier 8 USB connector 9...
Owner's Manual
Page 16
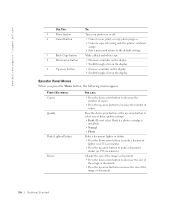
... document. 16 Getting Started Press the down arrow button or the up arrow button to select one of these quality settings. • Draft (Do not select Draft if a photo cartridge is installed.) • Normal • Photo Make a document lighter or darker. • Press the down arrow button to make a ...; Cancel a copy job (using only the printer) and eject a page. • Exit a menu and return to increase the size of the image or document. • Press the up arrow button to increase the number of copies. www.dell.com/supplies | support.dell.com Use the: To: 5 Power button Turn...
... document. 16 Getting Started Press the down arrow button or the up arrow button to select one of these quality settings. • Draft (Do not select Draft if a photo cartridge is installed.) • Normal • Photo Make a document lighter or darker. • Press the down arrow button to make a ...; Cancel a copy job (using only the printer) and eject a page. • Exit a menu and return to increase the size of the image or document. • Press the up arrow button to increase the number of copies. www.dell.com/supplies | support.dell.com Use the: To: 5 Power button Turn...
Owner's Manual
Page 17
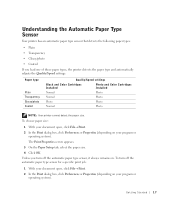
... paper size. 4 Click OK. Paper type Plain Transparency Glossy/photo Coated Quality/Speed settings Black and Color Cartridges Installed Photo and Color Cartridges Installed Normal Photo Normal Photo Photo Photo Normal Photo NOTE: Your printer cannot detect the paper size. Getting Started 17 Unless you load one of these paper types, the printer detects the paper type and automatically adjusts the Quality...
... paper size. 4 Click OK. Paper type Plain Transparency Glossy/photo Coated Quality/Speed settings Black and Color Cartridges Installed Photo and Color Cartridges Installed Normal Photo Normal Photo Photo Photo Normal Photo NOTE: Your printer cannot detect the paper size. Getting Started 17 Unless you load one of these paper types, the printer detects the paper type and automatically adjusts the Quality...
Owner's Manual
Page 19
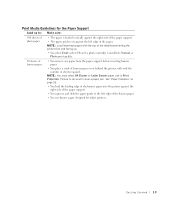
See "Paper Problems" on or behind the printer, with the top of the letterhead entering the printer first and facing up to: Make sure: 100 sheets of plain paper • The paper is installed), Normal, or Photo print quality. 20 sheets of banner paper • You remove any paper ...You load the leading edge of the banner paper into the printer against the left edge of the banner paper. • You use banner paper designed for the Paper Support Load up . • You select Draft (select Photo if a photo cartridge is loaded vertically against the right side of the paper support....
See "Paper Problems" on or behind the printer, with the top of the letterhead entering the printer first and facing up to: Make sure: 100 sheets of plain paper • The paper is installed), Normal, or Photo print quality. 20 sheets of banner paper • You remove any paper ...You load the leading edge of the banner paper into the printer against the left edge of the banner paper. • You use banner paper designed for the Paper Support Load up . • You select Draft (select Photo if a photo cartridge is loaded vertically against the right side of the paper support....
Owner's Manual
Page 24
... the photo paper with the print side facing up . For more information, see "Loading Paper" on page 18. 3 With your document open , click File→ Print. 4 To customize your computer and printer, and make sure they are connected. 2 Load paper with the print (glossy) side ... on your print settings, click Preferences, Properties, Options, or Setup (depending on page 19. 2 Make sure you have a color cartridge and a photo cartridge (sold separately) installed. www.dell.com/supplies | support.dell.com Printing Printing a Document 1 Turn on the program or operating system).
... the photo paper with the print side facing up . For more information, see "Loading Paper" on page 18. 3 With your document open , click File→ Print. 4 To customize your computer and printer, and make sure they are connected. 2 Load paper with the print (glossy) side ... on your print settings, click Preferences, Properties, Options, or Setup (depending on page 19. 2 Make sure you have a color cartridge and a photo cartridge (sold separately) installed. www.dell.com/supplies | support.dell.com Printing Printing a Document 1 Turn on the program or operating system).

Owner's Manual
Page 25
... time for the prints to dry thoroughly (12 to 24 hours, depending on the program or operating system). 10 To prevent your photos from sticking together or smudging, remove each photo after it exits the printer. NOTE: Before placing your prints. For more information, see "Print Media Guidelines for printing... Borderless. 6 When finished customizing your print settings, click Preferences, Properties, Options, or Setup (depending on page 19. 2 Make sure you have a color cartridge and a photo cartridge installed. 3 With your document open, click File→ Print. 4 To customize your...
... time for the prints to dry thoroughly (12 to 24 hours, depending on the program or operating system). 10 To prevent your photos from sticking together or smudging, remove each photo after it exits the printer. NOTE: Before placing your prints. For more information, see "Print Media Guidelines for printing... Borderless. 6 When finished customizing your print settings, click Preferences, Properties, Options, or Setup (depending on page 19. 2 Make sure you have a color cartridge and a photo cartridge installed. 3 With your document open, click File→ Print. 4 To customize your...
Owner's Manual
Page 38
...→ Dell Printers→ Dell Photo AIO Printer 922→ Dell Printer Solution Center. 38 Understanding the Software Allows you to Dell's cartridge ordering website, www.dell.com/supplies. • Dell printer Service Tag number - Allows you to perform various scan, copy, fax, and print operations with a variety of images. directs you to see your options for creating projects. • Dell All-In-One Center...
...→ Dell Printers→ Dell Photo AIO Printer 922→ Dell Printer Solution Center. 38 Understanding the Software Allows you to Dell's cartridge ordering website, www.dell.com/supplies. • Dell printer Service Tag number - Allows you to perform various scan, copy, fax, and print operations with a variety of images. directs you to see your options for creating projects. • Dell All-In-One Center...

Owner's Manual
Page 41
...paper. Customize how the printer prints several photocopies of paper. Print your color images in black and white to organize, create, or print photos. Select how the document is the fastest option but should not be selected if you have a photo cartridge installed. Duplexing - ... this to the Dell Picture Studio: • Paint Shop Photo Album Click Start→ Programs→ Dell Picture Studio v2.0→Paint Shop Photo Album 4→ Paint Shop Photo Album • Dell Picture Studio Home Click Start→ Programs→ Dell Picture Studio v2.0→ Dell Picture Studio Home ...
...paper. Customize how the printer prints several photocopies of paper. Print your color images in black and white to organize, create, or print photos. Select how the document is the fastest option but should not be selected if you have a photo cartridge installed. Duplexing - ... this to the Dell Picture Studio: • Paint Shop Photo Album Click Start→ Programs→ Dell Picture Studio v2.0→Paint Shop Photo Album 4→ Paint Shop Photo Album • Dell Picture Studio Home Click Start→ Programs→ Dell Picture Studio v2.0→ Dell Picture Studio Home ...

Owner's Manual
Page 43
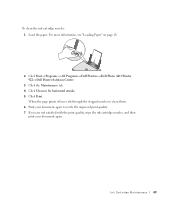
SECTION 4 Ink Cartridge Maintenance Replacing Ink Cartridges Aligning Ink Cartridges Cleaning the Ink Cartridge Nozzles 4
SECTION 4 Ink Cartridge Maintenance Replacing Ink Cartridges Aligning Ink Cartridges Cleaning the Ink Cartridge Nozzles 4

Owner's Manual
Page 44
... moves and stops at www.dell.com/supplies or by Dell. 1 Turn on your printer. www.dell.com/supplies | support.dell.com Replacing Ink Cartridges CAUTION: Before performing any of the procedures listed in this section, read and follow the "CAUTION: SAFETY INSTRUCTIONS" on page 2. Dell ink cartridges are available only through Dell. Dell recommends Dell ink cartridges for problems caused by...
... moves and stops at www.dell.com/supplies or by Dell. 1 Turn on your printer. www.dell.com/supplies | support.dell.com Replacing Ink Cartridges CAUTION: Before performing any of the procedures listed in this section, read and follow the "CAUTION: SAFETY INSTRUCTIONS" on page 2. Dell ink cartridges are available only through Dell. Dell recommends Dell ink cartridges for problems caused by...
Owner's Manual
Page 45
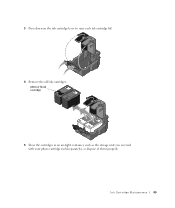
photo or black cartridge 5 Store the cartridges in an air-tight container, such as the storage unit you received with your photo cartridge (sold separately), or dispose of them properly. 3 Press down on the ink cartridge lever to raise each ink cartridge lid. 4 Remove the old ink cartridges. Ink Cartridge Maintenance 45
photo or black cartridge 5 Store the cartridges in an air-tight container, such as the storage unit you received with your photo cartridge (sold separately), or dispose of them properly. 3 Press down on the ink cartridge lever to raise each ink cartridge lid. 4 Remove the old ink cartridges. Ink Cartridge Maintenance 45

Owner's Manual
Page 46
NOTE: The illustration below shows a black cartridge and a color cartridge (use a photo cartridge and a color cartridge. 7 Insert the new ink cartridges. photo or black cartridge 46 Ink Cartridge Maintenance For photo printing, use for normal printing). Make sure the black or photo ink cartridge is secure in the left ink cartridge carrier and the color ink cartridge is secure in the right ink cartridge carrier. www.dell.com/supplies | support.dell.com 6 If you are installing new ink cartridges, remove the sticker and transparent tape from the back and bottom of each ink cartridge.
NOTE: The illustration below shows a black cartridge and a color cartridge (use a photo cartridge and a color cartridge. 7 Insert the new ink cartridges. photo or black cartridge 46 Ink Cartridge Maintenance For photo printing, use for normal printing). Make sure the black or photo ink cartridge is secure in the left ink cartridge carrier and the color ink cartridge is secure in the right ink cartridge carrier. www.dell.com/supplies | support.dell.com 6 If you are installing new ink cartridges, remove the sticker and transparent tape from the back and bottom of each ink cartridge.
Owner's Manual
Page 47
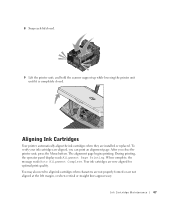
... Page Printing. The alignment page begins printing. You may also need to align ink cartridges when characters are not properly formed or are aligned, you close the printer unit, press the Menu button. To verify your ink cartridges are not aligned at the left margin, or when vertical or straight lines appear wavy...
... Page Printing. The alignment page begins printing. You may also need to align ink cartridges when characters are not properly formed or are aligned, you close the printer unit, press the Menu button. To verify your ink cartridges are not aligned at the left margin, or when vertical or straight lines appear wavy...
Owner's Manual
Page 48
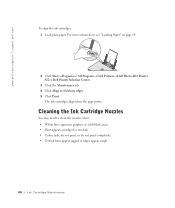
... You may need to fix blurry edges. 5 Click Print. The ink cartridges align when the page prints. For more information, see "Loading Paper" on page 18. 2 Click Start→ Programs or All Programs→ Dell Printers→ Dell Photo AIO Printer 922→ Dell Printer Solution Center. 3 Click the Maintenance tab 4 Click Align to clean the nozzles when: •...
... You may need to fix blurry edges. 5 Click Print. The ink cartridges align when the page prints. For more information, see "Loading Paper" on page 18. 2 Click Start→ Programs or All Programs→ Dell Printers→ Dell Photo AIO Printer 922→ Dell Printer Solution Center. 3 Click the Maintenance tab 4 Click Align to clean the nozzles when: •...
Owner's Manual
Page 49
... clogged nozzles to clean them. 6 Print your document again. Ink Cartridge Maintenance 49 To clean the ink cartridge nozzles: 1 Load the paper. For more information, see "Loading Paper" on page 18. 2 Click Start→ Programs or All Programs→ Dell Printers→ Dell Photo AIO Printer 922→ Dell Printer Solution Center. 3 Click the Maintenance tab. 4 Click Clean to verify...
... clogged nozzles to clean them. 6 Print your document again. Ink Cartridge Maintenance 49 To clean the ink cartridge nozzles: 1 Load the paper. For more information, see "Loading Paper" on page 18. 2 Click Start→ Programs or All Programs→ Dell Printers→ Dell Photo AIO Printer 922→ Dell Printer Solution Center. 3 Click the Maintenance tab. 4 Click Clean to verify...
Owner's Manual
Page 54
C H E C K F O R F L A S H I N G L I G HT S O N T H E P R I N T E R - For more information, see "Loading Paper" on page 57 ENSURE YOU INSTALLED THE INK CARTRIDGES CORRECTLY AND REMOVED THE STICKER AND TAPE FROM EACH CARTRIDGE - Windows 2000 1 Click Start→Settings→Printers. 2 Double-click Dell Photo AIO Printer 922, and then click Printer. 3 Make sure a check mark is next to Pause Printing, click Pause Printing to Pause...
C H E C K F O R F L A S H I N G L I G HT S O N T H E P R I N T E R - For more information, see "Loading Paper" on page 57 ENSURE YOU INSTALLED THE INK CARTRIDGES CORRECTLY AND REMOVED THE STICKER AND TAPE FROM EACH CARTRIDGE - Windows 2000 1 Click Start→Settings→Printers. 2 Double-click Dell Photo AIO Printer 922, and then click Printer. 3 Make sure a check mark is next to Pause Printing, click Pause Printing to Pause...

Owner's Manual
Page 57
To order a new ink cartridge, go to www.dell.com/supplies. Clear the paper jam. For more information, see "Loading Paper" on ink. The ink cartridge is out of paper. A paper jam exists in the printer. Error Messages and Lights The following error messages can be found on ... printer is zero. The Low Ink Alert occurs when your computer screen or operator panel display. For more information, see "Paper Problems" on your ink cartridges reach levels of paper, see "Replacing Ink Cartridges" on page 56. Order a new ink cartridge from Dell and replace the old ink cartridge....
To order a new ink cartridge, go to www.dell.com/supplies. Clear the paper jam. For more information, see "Loading Paper" on ink. The ink cartridge is out of paper. A paper jam exists in the printer. Error Messages and Lights The following error messages can be found on ... printer is zero. The Low Ink Alert occurs when your computer screen or operator panel display. For more information, see "Paper Problems" on your ink cartridges reach levels of paper, see "Replacing Ink Cartridges" on page 56. Order a new ink cartridge from Dell and replace the old ink cartridge....


