Owner's Manual
Page 3
...the problem. UNITED STATES GOVERNMENT RESTRICTED RIGHTS This software and documentation are trademarks of Microsoft Corporation. Microsoft and Windows are registered trademarks of Dell Inc.; Trademarks used in this document is subject to either potential damage to hardware or loss of data ...printer. Notes, Notices, and Cautions NOTE: A NOTE indicates important information that helps you how to restrictions as set forth in subparagraph (c)(1)(ii) of the Rights in Technical Data and Computer Software clause at DFARS 252.227-7013 and in applicable FAR provisions: Dell Inc., One Dell...
...the problem. UNITED STATES GOVERNMENT RESTRICTED RIGHTS This software and documentation are trademarks of Microsoft Corporation. Microsoft and Windows are registered trademarks of Dell Inc.; Trademarks used in this document is subject to either potential damage to hardware or loss of data ...printer. Notes, Notices, and Cautions NOTE: A NOTE indicates important information that helps you how to restrictions as set forth in subparagraph (c)(1)(ii) of the Rights in Technical Data and Computer Software clause at DFARS 252.227-7013 and in applicable FAR provisions: Dell Inc., One Dell...
Owner's Manual
Page 6
...Photos 30 Scanning Multiple Pages or Images 31 Editing Scanned Text Using Optical Character Recognition (OCR) 31 Saving an Image on Your Computer 32 E-mailing a Scanned Image or Document 32 Enlarging or Reducing Images or Documents 33 Faxing 33 Sending a Fax 34 Installing Microsoft Fax in Windows... XP 34 Configuring Microsoft Fax 35 Changing the Fax Configuration 36 3 Understanding the Software Understanding the Printer Software 38 Using the Dell Printer Solution Center 38 Using the Dell All-In-One Center 39 Using Print Properties 40 Using Dell Picture Studio v2...
...Photos 30 Scanning Multiple Pages or Images 31 Editing Scanned Text Using Optical Character Recognition (OCR) 31 Saving an Image on Your Computer 32 E-mailing a Scanned Image or Document 32 Enlarging or Reducing Images or Documents 33 Faxing 33 Sending a Fax 34 Installing Microsoft Fax in Windows... XP 34 Configuring Microsoft Fax 35 Changing the Fax Configuration 36 3 Understanding the Software Understanding the Printer Software 38 Using the Dell Printer Solution Center 38 Using the Dell All-In-One Center 39 Using Print Properties 40 Using Dell Picture Studio v2...
Owner's Manual
Page 14
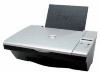
... can use the Dell Photo All-In-One Printer 922 to do not need to connect your printer to a computer to install the hardware and software. NOTE: You cannot access your printer. Follow the instructions...dell.com/supplies | support.dell.com Accessing Your User's Guide Click Start→ Programs or All Programs → Dell Printers→ Dell Photo AIO Printer 922→ View Dell User's Guide. A few important things to note: • If your printer Setup Diagram to copy. 14 Getting Started Setting Up Your Printer NOTE: The Dell Photo AIO Printer 922 supports Microsoft® Windows...
... can use the Dell Photo All-In-One Printer 922 to do not need to connect your printer to a computer to install the hardware and software. NOTE: You cannot access your printer. Follow the instructions...dell.com/supplies | support.dell.com Accessing Your User's Guide Click Start→ Programs or All Programs → Dell Printers→ Dell Photo AIO Printer 922→ View Dell User's Guide. A few important things to note: • If your printer Setup Diagram to copy. 14 Getting Started Setting Up Your Printer NOTE: The Dell Photo AIO Printer 922 supports Microsoft® Windows...
Owner's Manual
Page 18
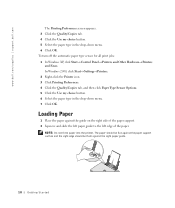
NOTE: Do not force paper into the printer. In Windows 2000, click Start→ Settings→Printers. 2 Right-click the Printer icon. 3 Click Printing Preferences. 4 Click the Quality/Copies tab, and then click Paper Type Sensor Options. 5 Click the Use my choice ...Getting Started To turn off the automatic paper type sensor for all print jobs: 1 In Windows XP, click Start→ Control Panel→ Printers and Other Hardware→ Printers and Faxes. www.dell.com/supplies | support.dell.com The Printing Preferences screen appears. 3 Click the Quality/Copies tab. 4 Click the Use...
NOTE: Do not force paper into the printer. In Windows 2000, click Start→ Settings→Printers. 2 Right-click the Printer icon. 3 Click Printing Preferences. 4 Click the Quality/Copies tab, and then click Paper Type Sensor Options. 5 Click the Use my choice ...Getting Started To turn off the automatic paper type sensor for all print jobs: 1 In Windows XP, click Start→ Control Panel→ Printers and Other Hardware→ Printers and Faxes. www.dell.com/supplies | support.dell.com The Printing Preferences screen appears. 3 Click the Quality/Copies tab. 4 Click the Use...
Owner's Manual
Page 33
...Fax in the list that the Microsoft Fax software is on page 21. 3 Click Start→ Programs or All Programs→ Dell Printers→ Dell Photo AIO Printer 922→ Dell All-In-One Center. U si n g Yo u r Pri n te r 33 NOTE: If you can enlarge or reduce your document ...between 25-400 percent using the operator panel. 1 Load the paper. Make sure the upper left corner of the front of your new image. 7 When you have a Windows...
...Fax in the list that the Microsoft Fax software is on page 21. 3 Click Start→ Programs or All Programs→ Dell Printers→ Dell Photo AIO Printer 922→ Dell All-In-One Center. U si n g Yo u r Pri n te r 33 NOTE: If you can enlarge or reduce your document ...between 25-400 percent using the operator panel. 1 Load the paper. Make sure the upper left corner of the front of your new image. 7 When you have a Windows...
Owner's Manual
Page 34
.... 2 Click Add/Remove Windows Components. 3 In the Components list, click to send a multiple page fax, click Advanced→Scan multiple items before output→OK. Make sure your document on page 21. 3 Click Start→ Programs or All Programs→ Dell Printers→ Dell Photo AIO Printer 922→ Dell All-In-One Center. The Dell All-In-One Center appears...
.... 2 Click Add/Remove Windows Components. 3 In the Components list, click to send a multiple page fax, click Advanced→Scan multiple items before output→OK. Make sure your document on page 21. 3 Click Start→ Programs or All Programs→ Dell Printers→ Dell Photo AIO Printer 922→ Dell All-In-One Center. The Dell All-In-One Center appears...
Owner's Manual
Page 35
... Microsoft Fax To configure for fax: 1 Click Start →Programs or All Programs→Accessories→Communications→Fax→ Fax Console (Windows XP) and Fax Service Management (Windows 2000). 2 On the Welcome to Fax Configuration screen, click Next. 3 On the Sender Information screen, type the information you want to ...fax to be displayed on check box if you want in some areas. 10 Click Next. When you select this check box, select the Dell Photo AIO Printer 922 to print the received fax. 14 Click to select the Store a copy in a folder check box if you are able to specify the...
... Microsoft Fax To configure for fax: 1 Click Start →Programs or All Programs→Accessories→Communications→Fax→ Fax Console (Windows XP) and Fax Service Management (Windows 2000). 2 On the Welcome to Fax Configuration screen, click Next. 3 On the Sender Information screen, type the information you want to ...fax to be displayed on check box if you want in some areas. 10 Click Next. When you select this check box, select the Dell Photo AIO Printer 922 to print the received fax. 14 Click to select the Store a copy in a folder check box if you are able to specify the...

Owner's Manual
Page 40
...the Software To access Print Properties: 1 With your computer. • Edit text found in the Dell All-In-One Center. In Windows 2000, click Start→ Settings→ Printers. 2 Right-click on the program or operating system). For more information on using your computer's modem...Creative Tasks Preview You can change the various printer settings. NOTE: Changes made to create. For more information about the Dell All-In-One Center, click Help in a scanned document (Optical Character Recognition). • Modify an image with a photo editor. • Select a portion of the...
...the Software To access Print Properties: 1 With your computer. • Edit text found in the Dell All-In-One Center. In Windows 2000, click Start→ Settings→ Printers. 2 Right-click on the program or operating system). For more information on using your computer's modem...Creative Tasks Preview You can change the various printer settings. NOTE: Changes made to create. For more information about the Dell All-In-One Center, click Help in a scanned document (Optical Character Recognition). • Modify an image with a photo editor. • Select a portion of the...
Owner's Manual
Page 52
... computer, if using a computer. • If an error message appears on page 53 52 Troubleshooting The Dell Photo AIO Printer 922 supports Windows 2000 and Windows XP. Click Start→Programs or All Programs→Dell Printers→Dell Photo AIO Printer 922. Install the printer software. For more information, see "Removing and Reinstalling Software" on the operator panel display, write down the...
... computer, if using a computer. • If an error message appears on page 53 52 Troubleshooting The Dell Photo AIO Printer 922 supports Windows 2000 and Windows XP. Click Start→Programs or All Programs→Dell Printers→Dell Photo AIO Printer 922. Install the printer software. For more information, see "Removing and Reinstalling Software" on the operator panel display, write down the...
Owner's Manual
Page 53
... Start→Programs or All Programs→Dell Printers→Dell Photo AIO Printer 922→ Uninstall Dell AIO Printer 922. 2 Follow the instructions on your screen to your printer and your computer. Unplug the printer power cable from your desktop. SET YOUR PRINTER AS THE DEFAULT PRINTER - Windows XP 1 Click Start→Printers and Faxes. 2 Right-click Dell Photo AIO Printer 922 and select Set as Default. b Double...
... Start→Programs or All Programs→Dell Printers→Dell Photo AIO Printer 922→ Uninstall Dell AIO Printer 922. 2 Follow the instructions on your screen to your printer and your computer. Unplug the printer power cable from your desktop. SET YOUR PRINTER AS THE DEFAULT PRINTER - Windows XP 1 Click Start→Printers and Faxes. 2 Right-click Dell Photo AIO Printer 922 and select Set as Default. b Double...
Owner's Manual
Page 54
Windows XP 1 Click Start→Settings→Printers and Faxes. 2 Double-click Dell Photo AIO Printer 922, and then click Printer. 3 Make sure a check mark is not next to deselect the option. C H E C K F O R F L A S H I N G L I G HT S O N T H E P R I N T E R - ....dell.com/supplies | support.dell.com Printer Problems ENSURE THAT THE PRINTER POWER CABLE IS FIRMLY CONNECTED TO THE PRINTER AND THE ELECTRICAL OUTLET - If a check mark is next to Pause Printing. Windows 2000 1 Click Start→Settings→Printers. 2 Double-click Dell Photo AIO Printer 922, and then click Printer....
Windows XP 1 Click Start→Settings→Printers and Faxes. 2 Double-click Dell Photo AIO Printer 922, and then click Printer. 3 Make sure a check mark is not next to deselect the option. C H E C K F O R F L A S H I N G L I G HT S O N T H E P R I N T E R - ....dell.com/supplies | support.dell.com Printer Problems ENSURE THAT THE PRINTER POWER CABLE IS FIRMLY CONNECTED TO THE PRINTER AND THE ELECTRICAL OUTLET - If a check mark is next to Pause Printing. Windows 2000 1 Click Start→Settings→Printers. 2 Double-click Dell Photo AIO Printer 922, and then click Printer....


