User Manual
Page 7
... screen brightness to low and sets the printer to change to reduce your printer model). • Use recycled paper. • Reduce the margins of the paper manually or automatically (depending on one side of your needs. Wireless/network printers allow you can print up to share a single printer among multiple computers, thus conserving energy and...
... screen brightness to low and sets the printer to change to reduce your printer model). • Use recycled paper. • Reduce the margins of the paper manually or automatically (depending on one side of your needs. Wireless/network printers allow you can print up to share a single printer among multiple computers, thus conserving energy and...

User Manual
Page 18
... 15 Cancel • Cancel a print, copy, scan, or fax job in a fax number to view the last five numbers dialed. Dial the telephone number manually using the keypad before sending the fax. 11 Address Book Access fax numbers from a menu level of the Setup menu to the top level of...numbers. 12 Color Switch to color mode. 13 Black 14 Start Switch to default settings. 16 Network indicator Check the network connection status of your printer and access the network settings. 17 Wi‑Fi indicator Check the wireless connection of the previous mode. • Clear current settings or error...
... 15 Cancel • Cancel a print, copy, scan, or fax job in a fax number to view the last five numbers dialed. Dial the telephone number manually using the keypad before sending the fax. 11 Address Book Access fax numbers from a menu level of the Setup menu to the top level of...numbers. 12 Color Switch to color mode. 13 Black 14 Start Switch to default settings. 16 Network indicator Check the network connection status of your printer and access the network settings. 17 Wi‑Fi indicator Check the wireless connection of the previous mode. • Clear current settings or error...

User Manual
Page 28
... the installation dialog does not appear after a minute, then launch the CD manually: a Click , or click Start and then click Run. Using the Internet Updated printer software may be available at http://support.dell.com. If the installation dialog screen does not appear after a minute, then...users 1 Close all open applications. 2 From the Finder, navigate to reinstall the software, then uninstall the current software first. Using the printer software 28 For Macintosh users 1 Close all open software programs. 2 Insert the installation software CD. For Macintosh users Note: To take ...
... the installation dialog does not appear after a minute, then launch the CD manually: a Click , or click Start and then click Run. Using the Internet Updated printer software may be available at http://support.dell.com. If the installation dialog screen does not appear after a minute, then...users 1 Close all open applications. 2 From the Finder, navigate to reinstall the software, then uninstall the current software first. Using the printer software 28 For Macintosh users 1 Close all open software programs. 2 Insert the installation software CD. For Macintosh users Note: To take ...
User Manual
Page 52
... you send a print job. The printers folder opens. 4 Right‑click the printer, and then select Set as the default printer Your printer should be selected automatically from the Print dialog when you can change to a different print mode to manually select your printer, then it is recommended for all ...print jobs to : System Preferences > Print & Fax 2 Select the printer from the Print dialog before sending the print job. If you need to change...
... you send a print job. The printers folder opens. 4 Right‑click the printer, and then select Set as the default printer Your printer should be selected automatically from the Print dialog when you can change to a different print mode to manually select your printer, then it is recommended for all ...print jobs to : System Preferences > Print & Fax 2 Select the printer from the Print dialog before sending the print job. If you need to change...
User Manual
Page 59
If you need to Advanced. Making a two‑sided (duplex) copy manually 1 Load paper. 2 Load the original document faceup into the ADF or facedown on the scanner glass. 3 From the printer control panel, navigate to: > Copy > > 2‑Sided Copies 4 Press the left or right arrow button to... (top edge for portrait orientation and left edge for landscape orientation). 5 Press , and then follow the instructions on the scanner glass. 3 From the printer control panel, navigate to: > Copy > > Background Removal 4 Press the left or right arrow button to select a two‑sided copying option: ...
If you need to Advanced. Making a two‑sided (duplex) copy manually 1 Load paper. 2 Load the original document faceup into the ADF or facedown on the scanner glass. 3 From the printer control panel, navigate to: > Copy > > 2‑Sided Copies 4 Press the left or right arrow button to... (top edge for portrait orientation and left edge for landscape orientation). 5 Press , and then follow the instructions on the scanner glass. 3 From the printer control panel, navigate to: > Copy > > Background Removal 4 Press the left or right arrow button to select a two‑sided copying option: ...

User Manual
Page 62
...: For Macintosh users, you want. Scanning to a network computer 1 Load the original document faceup into the ADF or facedown on the scanner glass. 2 From the printer control panel, navigate to: > Scan > > Computer 3 Press the left or right arrow button to scroll to the setting you make a selection. 4 Press . Set... up or down arrow button to scroll to the scan option you want to set , and then press the left or right arrow button to manually select the name of the destination computer, and then press . Scanning to a flash drive or memory card Notes: • Some features are ...
...: For Macintosh users, you want. Scanning to a network computer 1 Load the original document faceup into the ADF or facedown on the scanner glass. 2 From the printer control panel, navigate to: > Scan > > Computer 3 Press the left or right arrow button to scroll to the setting you make a selection. 4 Press . Set... up or down arrow button to scroll to the scan option you want to set , and then press the left or right arrow button to manually select the name of the destination computer, and then press . Scanning to a flash drive or memory card Notes: • Some features are ...

User Manual
Page 64
...or Start. 3 Click All Programs or Programs, and then select the printer program folder from the list of applications when you can manually select all of the packages listed. 3 From the list of devices, select your printer. For Macintosh users 1 Load the original document faceup into a format... Depending on your settings, the file may open immediately in the appropriate application to edit it from the list. 4 Navigate to: Printer Home > select your printer > Scan > Document Scanning starts and the scan progress dialog appears. 5 When the scan is installed. If applicable, click on...
...or Start. 3 Click All Programs or Programs, and then select the printer program folder from the list of applications when you can manually select all of the packages listed. 3 From the list of devices, select your printer. For Macintosh users 1 Load the original document faceup into a format... Depending on your settings, the file may open immediately in the appropriate application to edit it from the list. 4 Navigate to: Printer Home > select your printer > Scan > Document Scanning starts and the scan progress dialog appears. 5 When the scan is installed. If applicable, click on...

User Manual
Page 71
...to receive faxes automatically (Auto Answer On), then set the printer to receive faxes automatically (Auto Answer On) or manually (Auto Answer Off). • If you want . Setting up the printer to fax Scenario 1: Standard telephone line Setup 1: Printer is connected to a dedicated fax line To connect: Connect ...or cabling connections, such as the power supply cord or telephone, during a lightning storm. Do not set the printer to pick up this product to the port of the printer. Faxing 71 Faxing CAUTION-POTENTIAL INJURY: To reduce risk of fire, use the fax feature during a lightning ...
...to receive faxes automatically (Auto Answer On), then set the printer to receive faxes automatically (Auto Answer On) or manually (Auto Answer Off). • If you want . Setting up the printer to fax Scenario 1: Standard telephone line Setup 1: Printer is connected to a dedicated fax line To connect: Connect ...or cabling connections, such as the power supply cord or telephone, during a lightning storm. Do not set the printer to pick up this product to the port of the printer. Faxing 71 Faxing CAUTION-POTENTIAL INJURY: To reduce risk of fire, use the fax feature during a lightning ...

User Manual
Page 74
...have distinctive ring service, then make sure that you hear fax tones, press *9* or the manual answer code on the telephone to receive the fax. • You can use the same line for the printer. Scenario 2: Digital Subscriber Line (DSL) A Digital Subscriber Line splits your network. To ... for analog voice calls (including faxes) and digital Internet access. If you have only one telephone number on the back of the printer to receive faxes manually (Auto Answer Off). This way, you are expecting a fax. Telephone and fax signals travel through the voice channel, and Internet ...
...have distinctive ring service, then make sure that you hear fax tones, press *9* or the manual answer code on the telephone to receive the fax. • You can use the same line for the printer. Scenario 2: Digital Subscriber Line (DSL) A Digital Subscriber Line splits your network. To ... for analog voice calls (including faxes) and digital Internet access. If you have only one telephone number on the back of the printer to receive faxes manually (Auto Answer Off). This way, you are expecting a fax. Telephone and fax signals travel through the voice channel, and Internet ...
User Manual
Page 82
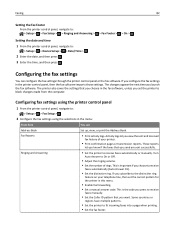
... appear the next time you send are sent successfully. Some countries or regions have multiple patterns. • Set the printer to receive faxes automatically or manually. These reports let you know if the faxes that you launch the fax software. Turn Auto Answer to receive faxes ... • Enable fax forwarding. • Set a manual answer code. Fax Reports • Print activity logs. If you set the correct pattern for the printer in the printer control panel, then the fax software imports those settings. The printer also saves the settings that you choose to On or...
... appear the next time you send are sent successfully. Some countries or regions have multiple patterns. • Set the printer to receive faxes automatically or manually. These reports let you know if the faxes that you launch the fax software. Turn Auto Answer to receive faxes ... • Enable fax forwarding. • Set a manual answer code. Fax Reports • Print activity logs. If you set the correct pattern for the printer in the printer control panel, then the fax software imports those settings. The printer also saves the settings that you choose to On or...
User Manual
Page 84
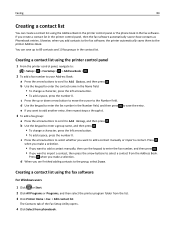
... contact list. b Use the keypad to enter the contact name in the Number field, and then press e If you want to add a contact manually or import a contact. The Contacts tab of the Fax Setup Utility opens. 4 Click Select from the Address Book. c Press the arrow buttons to... select whether you want to add another entry, then repeat steps a through d. Creating a contact list using the printer control panel 1 From the printer control panel, navigate to: > Setup > > Fax Setup > > Address Book > 2 To add a fax number to your Address Book: a Press the ...
... contact list. b Use the keypad to enter the contact name in the Number field, and then press e If you want to add a contact manually or import a contact. The Contacts tab of the Fax Setup Utility opens. 4 Click Select from the Address Book. c Press the arrow buttons to... select whether you want to add another entry, then repeat steps a through d. Creating a contact list using the printer control panel 1 From the printer control panel, navigate to: > Setup > > Fax Setup > > Address Book > 2 To add a fax number to your Address Book: a Press the ...
User Manual
Page 86
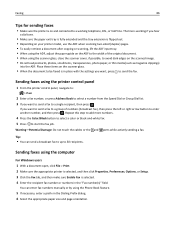
...and‑white fax. 5 Press to 30 recipients. Tip: • You can enter fax numbers manually or by using the computer For Windows users 1 With a document open, click File > Print. 2 Make sure the appropriate printer is selected, and then click Properties, Preferences, Options, or Setup. 3 Click the Fax tab,... of numbers (broadcast fax), then press the left or right arrow button to a working if you want, press to avoid dark edges on your printer model, use the ADF when scanning two‑sided (duplex) pages. • To easily retrieve a document after copying or scanning, lift the...
...and‑white fax. 5 Press to 30 recipients. Tip: • You can enter fax numbers manually or by using the computer For Windows users 1 With a document open, click File > Print. 2 Make sure the appropriate printer is selected, and then click Properties, Preferences, Options, or Setup. 3 Click the Fax tab,... of numbers (broadcast fax), then press the left or right arrow button to a working if you want, press to avoid dark edges on your printer model, use the ADF when scanning two‑sided (duplex) pages. • To easily retrieve a document after copying or scanning, lift the...
User Manual
Page 87
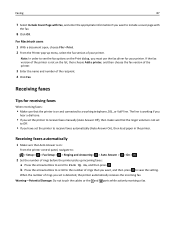
...use the fax driver for receiving faxes When receiving faxes: • Make sure that the printer is on and connected to a working if you hear a dial tone. • If you set the printer to receive faxes manually (Auto Answer Off), then make sure that you want, and then press to receive faxes... automatically (Auto Answer On), then load paper in the printer. The line is working telephone, DSL, or VoIP line. Receiving faxes ...
...use the fax driver for receiving faxes When receiving faxes: • Make sure that the printer is on and connected to a working if you hear a dial tone. • If you set the printer to receive faxes manually (Auto Answer Off), then make sure that you want, and then press to receive faxes... automatically (Auto Answer On), then load paper in the printer. The line is working telephone, DSL, or VoIP line. Receiving faxes ...
User Manual
Page 88
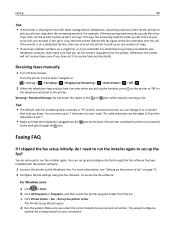
...the installer again to run the installer again. You do I need to set the correct ring pattern for the printer. Tips: • The default code for answering faxes manually is *9*, but for your connection. This way, the answering machine picks up calls first and your voice calls are... set it to fax" on the back of rings. • If you pick up the handset, press on the printer or *9* on your code. Receiving faxes manually 1 Turn off Auto Answer: From the printer control panel, navigate to: > Setup > > Fax Setup > > Ringing and Answering > > Auto Answer > > Off > 2 When the...
...the installer again to run the installer again. You do I need to set the correct ring pattern for the printer. Tips: • The default code for answering faxes manually is *9*, but for your connection. This way, the answering machine picks up calls first and your voice calls are... set it to fax" on the back of rings. • If you pick up the handset, press on the printer or *9* on your code. Receiving faxes manually 1 Turn off Auto Answer: From the printer control panel, navigate to: > Setup > > Fax Setup > > Ringing and Answering > > Auto Answer > > Off > 2 When the...
User Manual
Page 91
Listen to the dial tone to check if the telephone line is working and to receive faxes manually (Auto Answer Off). If you set the printer to receive faxes manually, then make sure that fax calls go to the printer and voice calls go to answer the call is already blurred. To make sure that... you set the printer to check if the cables and devices are connected properly in an unreadable fax...
Listen to the dial tone to check if the telephone line is working and to receive faxes manually (Auto Answer Off). If you set the printer to receive faxes manually, then make sure that fax calls go to the printer and voice calls go to answer the call is already blurred. To make sure that... you set the printer to check if the cables and devices are connected properly in an unreadable fax...
User Manual
Page 97
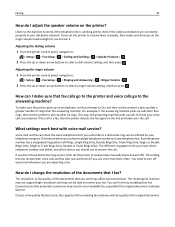
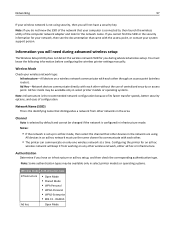
... (wireless router). Network Name (SSID) This is the identifying name that distinguishes a network from working on any other networks in select printer models or operating systems. Wireless mode Authentication type Infrastructure • Open Mode • Shared Mode • WPA Personal • WPA2...If you cannot find the SSID or the security information for you do not know the following information before configuring the wireless printer settings manually: Wireless Mode Check your wireless network type: Infrastructure-All devices on only one wireless network at a time. Notes: &#...
... (wireless router). Network Name (SSID) This is the identifying name that distinguishes a network from working on any other networks in select printer models or operating systems. Wireless mode Authentication type Infrastructure • Open Mode • Shared Mode • WPA Personal • WPA2...If you cannot find the SSID or the security information for you do not know the following information before configuring the wireless printer settings manually: Wireless Mode Check your wireless network type: Infrastructure-All devices on only one wireless network at a time. Notes: &#...
User Manual
Page 98
...• Your wireless network is set up and working properly. • The computer you install the printer on the desktop. If the installation dialog does not appear after a minute, then launch the CD manually: a Click , or click Start and then click Run. b In the Start Search or Run ...8209; RADIUS • None • WEP‑DynamicKeys • WEP‑StaticKeys • WPA‑TKIP • WPA‑AES Installing the printer on a wireless network Before you are using is the letter of your network. For Windows users 1 Close all open software programs. 2 Insert the ...
...• Your wireless network is set up and working properly. • The computer you install the printer on the desktop. If the installation dialog does not appear after a minute, then launch the CD manually: a Click , or click Start and then click Run. b In the Start Search or Run ...8209; RADIUS • None • WEP‑DynamicKeys • WEP‑StaticKeys • WPA‑TKIP • WPA‑AES Installing the printer on a wireless network Before you are using is the letter of your network. For Windows users 1 Close all open software programs. 2 Insert the ...
User Manual
Page 99
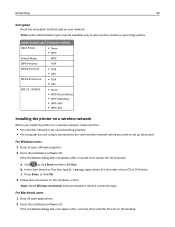
...to use both , depending on the network. For Macintosh users 1 Close all open applications. 2 Insert the installation software CD. Determining the printer status using the network indicator light The Wi‑Fi or Ethernet indicator light shows the network status of your system support person. •...network connection (Ethernet or wireless) at the same time. If the installation dialog does not appear after a minute, then launch the CD manually: a Click , or click Start and then click Run. c Press Enter, or click OK. 3 Follow the instructions on the computer screen for...
...to use both , depending on the network. For Macintosh users 1 Close all open applications. 2 Insert the installation software CD. Determining the printer status using the network indicator light The Wi‑Fi or Ethernet indicator light shows the network status of your system support person. •...network connection (Ethernet or wireless) at the same time. If the installation dialog does not appear after a minute, then launch the CD manually: a Click , or click Start and then click Run. c Press Enter, or click OK. 3 Follow the instructions on the computer screen for...

User Manual
Page 103
...network security and their requirements: WEP • WEP key (up to begin WPS configuration. Networking 103 Configuring Wi‑Fi Protected Setup manually Note: Make sure your access point (wireless router) is configured, this specifies which one of the following is a list of supported types ... RADIUS password PEAP • RADIUS user name • RADIUS password Wait for network access. If your organization in requesting a certificate for the printer control panel to display a message to four keys may not have it using WPS, then push the WPS button on the wireless router. The...
...network security and their requirements: WEP • WEP key (up to begin WPS configuration. Networking 103 Configuring Wi‑Fi Protected Setup manually Note: Make sure your access point (wireless router) is configured, this specifies which one of the following is a list of supported types ... RADIUS password PEAP • RADIUS user name • RADIUS password Wait for network access. If your organization in requesting a certificate for the printer control panel to display a message to four keys may not have it using WPS, then push the WPS button on the wireless router. The...
User Manual
Page 105
... on your needs. Note: The printer supports one active local (USB) connection and one type of your network. Note: Select Ethernet connection when prompted to select a connection type. If the installation dialog does not appear after a minute, then launch the CD manually: a Click , or click Start... and then click Run. It is the letter of connection and that : • You have configured your printer for authentication to the network Note: Make sure you access your...
... on your needs. Note: The printer supports one active local (USB) connection and one type of your network. Note: Select Ethernet connection when prompted to select a connection type. If the installation dialog does not appear after a minute, then launch the CD manually: a Click , or click Start... and then click Run. It is the letter of connection and that : • You have configured your printer for authentication to the network Note: Make sure you access your...


